
Importing/exporting tasks
You can import tasks into PPM Pro from the latest 2 releases of Microsoft Project (MSP). MSP data is converted to PPM Pro data, as listed in the table below. Conversely, you can export PPM Pro data into MSP; see the corresponding table for exported data. You might want to take a look at Microsoft Project (MSP) and PPM Pro before you begin.
All imported tasks will result in new tasks in the PPM Pro project. In addition, tasks schedules can be automatically created in PPM Pro for MSP Tasks with assigned resources. On import, the application suggests best match mapping based on resource names, but the user can override suggested resource mapping. For example, even if a match is found, you might decide to give all of User A’s tasks to User B or even exclude these task assignments.
Please note if importing task schedules:
- If project is in Task planning mode (bottom up) - Task schedules are imported and staffing allocations are generated to match in PPM Pro.
- If project is in Project planning mode (top down) - Task schedules are imported and:
- if there is no matching allocation, one is created with dates and hours that match the task schedule
- if there is a matching allocation, the system checks its dates and will expand the allocation dates to include the dates for the imported schedule, and will increase the hours by the amount on the task schedule being imported. For example, if the existing allocation has 10 hours and the imported schedule has 40, the resulting allocation will have 50 hours.
Importing and Dates
Please note the following:
- When importing into project w/no tasks (or choosing the option to remove all existing tasks from the plan before importing): PPM Pro uses the imported (MSP) Project Start Date - updates the Schedule From date in the PPM Pro project.
- When importing into project w/tasks: PPM Pro uses the existing (PPM Pro) Schedule From date - all imported tasks will be offset by the difference between the MSP Start Date and the PPM Pro Schedule From date.
- If any imported tasks coincide with PPM Pro non-working day(s), task is scheduled with 0 duration for those days (PPM Pro is date-based, not duration-based) (illustrated in examples 2, 3).
- Duration is derived from the PPM Pro project calendar.
- If MSP tasks can be imported whether or not they have task dates. However, if a PPM Pro category requires task dates and the MSP tasks did not have them, you'll need to add the dates before you can edit the task (the import will succed).
- MSP elapsed days are not supported but can be imported as manually scheduled tasks. Duration will be calculated from Start to Target dates (edays and emons represented by days in PPM Pro, eweeks represented by weeks).
For the most straightforward approach to importing MSP projects into PPM Pro, set the Schedule From dates the same in both systems and set calendars up identically. This will help keep dates and durations aligned.
MSP and PPM Pro Field Mappings
Below is a table detailing what data are currently supported by the task import function.
|
--> |
PPM Pro Task |
|
|---|---|---|
|
Title |
--> |
Title |
|
Project Start Date |
--> |
Schedule From |
|
Duration |
--> |
Duration |
|
Start Date Note: if you wish to preserve the MSP Start/Finish dates upon import into PPM Pro, select the option "Import All Tasks as Manually Scheduled (MSP controls scheduling)" in the import dialog |
--> |
Start Date |
|
Finish Date Note: if you wish to preserve the MSP Start/Finish dates upon import into PPM Pro, select the option "Import All Tasks as Manually Scheduled (MSP controls scheduling)" in the import dialog |
--> |
Target Date |
|
Actual Finish Date |
--> |
Complete Date |
|
Outline number |
--> |
Sequence |
|
Predecessors |
--> |
Predecessor |
|
Constraint Type |
--> |
Constraint Type |
|
Constraint Date |
--> |
Constraint Date |
|
Milestone |
--> |
Milestone |
|
Task Mode |
--> |
Manually Scheduled? |
|
Active |
--> |
Active? |
|
Note |
--> |
Description |
|
Resource |
--> |
Resource Schedule |
|
Work |
--> |
Scheduled Hours |
| % Complete | --> |
If you are using the Manual Percent Complete or Manual Percent Complete (Weighted) method, then the % Complete value from the lowest leaf task in MSP is imported. Parent tasks % complete will be calculated based on the PPM Pro % Complete method used. |
Organization standard group members, project owners, and project team members with the appropriate edit tasks permissions can import tasks.
Note: If you import an allocated resource that has the same name as a terminated resource in PPM Pro, the Staffing screen will display the allocation, but the resource name will be crossed out (indicating the resource has been terminated). If you float-over the allocation with your mouse, the termination date will be displayed. Capacity and demand reports will show the resource's capacity as 0 as of the termination date, although the resource will still be allocated to the project.
Importing tasks
- Navigate to the MyProject/Tasks.
- Choose Actions > MSP Import. The Step 1 of 2 modal appears.
- Select the parent for the tasks you are about to import (the project or any task), then click Next. Note that you can use the ad hoc filter at the top of the modal to narrow down the displayed tasks.
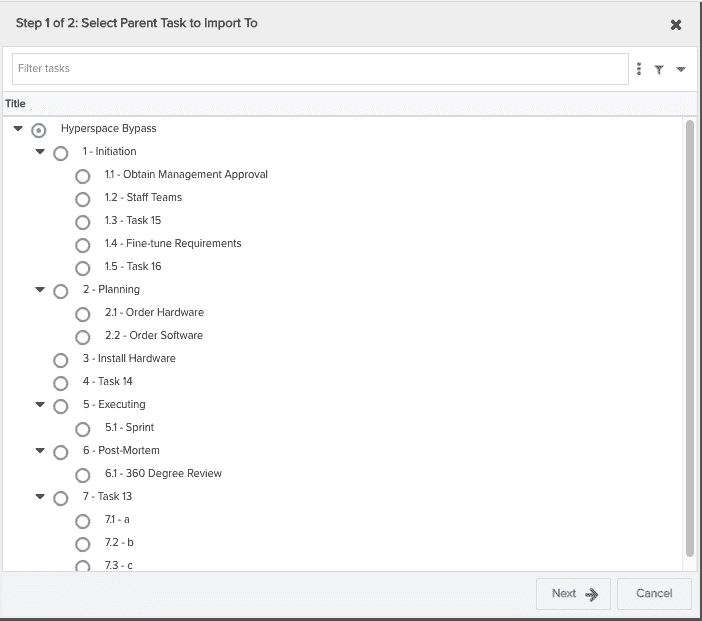
The Step 2 of 2 modal appears.
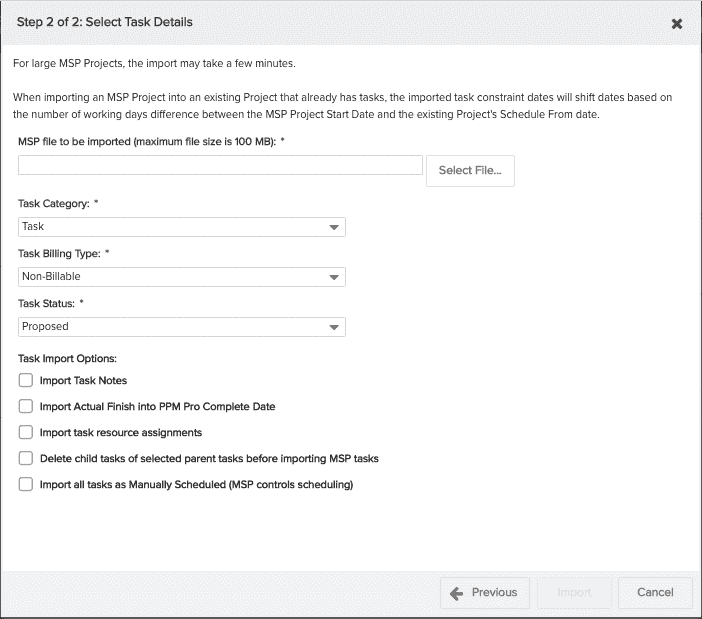
- Select the .mpp file you wish to import by clicking Select File and browsing to it on your computer or network resource.
- Select the Task Category to use for the tasks you are about the import. If you have only one task category, the category field will not be available.
- Select values for the required Task Billing Type and Task Status fields for the tasks to be created in PPM Pro.
- (Optional) Select any of the settings in the Options section shown in th the screenshot above.
- Import Task Notes --> Description
- Import Actual Finish into PPM Pro Complete Date
- Import task resource assignments - Choose this option if you want to display a mapping dialog where you can either accept the mapping, choose an alternate resource for scheduled tasks, or click [Clear] to prevent a task assignment from importing. The mapping dialog appears after you click Save.
- Delete tasks under selected node before importing MSP tasks - This option is available only if none of the existing tasks have hours logged to them. Select this option to delete existing tasks under the selected node (either the project or a selected task). If you do not select this option and import tasks that already exist, duplicate tasks will be created.
- Import All Tasks as Manually Scheduled (MSP controls scheduling) - This option allows you to designate all imported tasks as "manual", and keep the actual dates from the MSP import. The resulting tasks in PPM Pro will be designated as "manually scheduled" with the dates set by the MSP file. Note that MS Project and PPM Pro use different task date rollup logic, and can have different base calendars. So task dates can change during the import process, even when imported as Manually Scheduled.
- Click Save when you are done.
The selected .mpp file will be uploaded to PPM Pro (this may take a few minutes if the file is particularly large). Once the file is uploaded, the tasks will be created and the status indicator will display the progress of the import. Once the import is completed the status window will close and the task list will refresh to display the imported tasks.
Export
The task export function allows you to export an PPM Pro task plan for use by Microsoft Project. Any user who has access to the task plan in a project can export Tasks.
Exporting is performed in two steps: first, PPM Pro generates an XML file with the project data that you can save to your local machine. Second, you open the XML file in MSP.
Because of how Microsoft Project automatically adjusts some fields, certain values in the table below can vary depending on the state of your project. While PPM Pro does not have control over the logic that Microsoft Project uses, this table can help you determine why fields may not reflect exactly what you thought would be exported.
Please note the following:
- PPM Pro project's Schedule From date will export to MSP project's Project Start Date.
- When exporting a task plan to MSP that contains resources scheduled to tasks for less than the task duration, the hours on the task schedule are exported as "work", Hours to Complete (HTC) are exported as "remaining work", and actuals from timesheets are exported as "actual work" for each task schedule. Exported tasks are also set to "Fixed Duration". Note that MSP does not allow work, remaining work, and actual work to float independent of each other. Work will be adjusted to remaining work + actual work when MSP opens the exported file.
|
PPM Pro Task |
--> |
MS Project Task |
Notes |
|---|---|---|---|
|
Title |
--> |
Task Name |
|
|
Duration |
--> |
Duration |
(Not a mapped value) The active working time between the scheduled Start Date and Finish Date of the task. |
|
Start Date |
--> |
Start |
|
|
Target Date |
--> |
Finish |
Note 1: This field is calculated by MSP based on MSP Start Date + MSP Task Work & Resource Assignment Work Units if that data is available in the task Note 2: This field is calculated by MSP based on Actual Hours + HTC if that data is available in the task |
|
Complete Date |
--> |
Actual Finish Date |
Note 1: If a Complete Date is present in PPM Pro, the MSP Finish Date will be the same as PPM Pro Complete Date. |
|
Predecessor |
--> |
Predecessor(s) |
|
|
Type |
--> |
Type |
Predecessor Type (e.g., Finish-to-Start) |
|
Lag |
--> |
Lag |
Predecessor lag |
|
Constraint Type |
--> |
Constraint Type |
|
|
Constraint Date |
--> |
Constraint Date |
|
|
Manually Scheduled? |
--> |
Task Mode |
|
|
Milestone |
--> |
Milestone |
|
|
Active? |
--> |
Active |
|
|
Resource(s) (From Task Schedule) |
--> |
Resource Names |
|
|
Scheduled Resources and Hours |
--> |
Assignment Work |
If Actual Hours are present, this is set to PPM Pro Actual Hours + Resource HTC |
|
|
--> |
Work |
This is a sum of Scheduled Hours for all resources on the task, unless Actual Hours are present, in which case this is set to PPM Pro Task Actual Hours + Task HTC |
|
Scheduled Resource's Capacity Hours |
--> |
Assignment Units |
|
|
Actual Hours |
--> |
Actual Work |
|
|
Hours to Complete |
--> |
Remaining Work |
|
|
Objective |
--> |
Notes |
Optional |
|
Description |
--> |
Notes |
Optional |
|
Notes |
--> |
Notes |
Optional |
Note: As described above, exporting from PPM Pro to MSP works by exporting an XML file from PPM Pro to your browser that can then be saved and opened in Microsoft Project. By default, Internet Explorer does not allow downloads of files from web sites without first accepting this (a warning bar appears below the URL line in your browser), making the export a multi-step process. To enable downloads in Internet Explorer:
- Open Internet Explorer.
- On the Tools menu, click Internet Options.
- On the Security tab, click Custom Level.
- In the Downloads section of the list, under Automatic prompting for file downloads, click Enable.
Exporting tasks
Note: Microsoft Project does not support brackets - [] - or commas - , - in resource names. If your export file contains resource or role names from PPM Pro that contain these characters, you will get an error message when opening the file with MSP. Select OK to open the file. MSP will have removed the disallowed characters.
- Navigate to the MyProject/Tasks.
- Choose Actions > Export Tasks.
- Select the fields to export.
- Click Save when you are done.
An XML export file will be created and downloaded to your computer (this may take a few minutes if the file is particularly large). Some browsers may block or prompt for permission to download the file. If so, allow download, and in some cases you may need to repeat steps 3-6 again.
- Open the file with a supported version of Microsoft Project.