Printing the Projects List
In the PPM Pro application, all entities have "list" pages. These list pages contain a set of rows that satisfy the current filter. Note that projects and tasks include a Gantt chart on their list pages. See Printing List Pages with Gantt Charts for printing instructions.
All list pages (except dashboards and reports) support the following features:
- Print (all rows that meet current filter criteria)
- Copy to Clipboard
- Export to Excel - can invoke Export to Excel from Actions menu or click Print and then click the Export to Excel button
- Printing to PDF (can select columns to include, change font size, fit on one page; repeats headings on each page)
Printing the List page
To print the list for an entity:
- Navigate to a list page for an entity.
- Click the print icon -
 .
. - The standard printing dialog will appear and you can adjust copies, layout, printer destination, and so on.
- Maximum of 1000 rows can be printed. If your list is longer that 1000 rows, you will be notified that your printout will be truncated and encouraged to download to Excel.
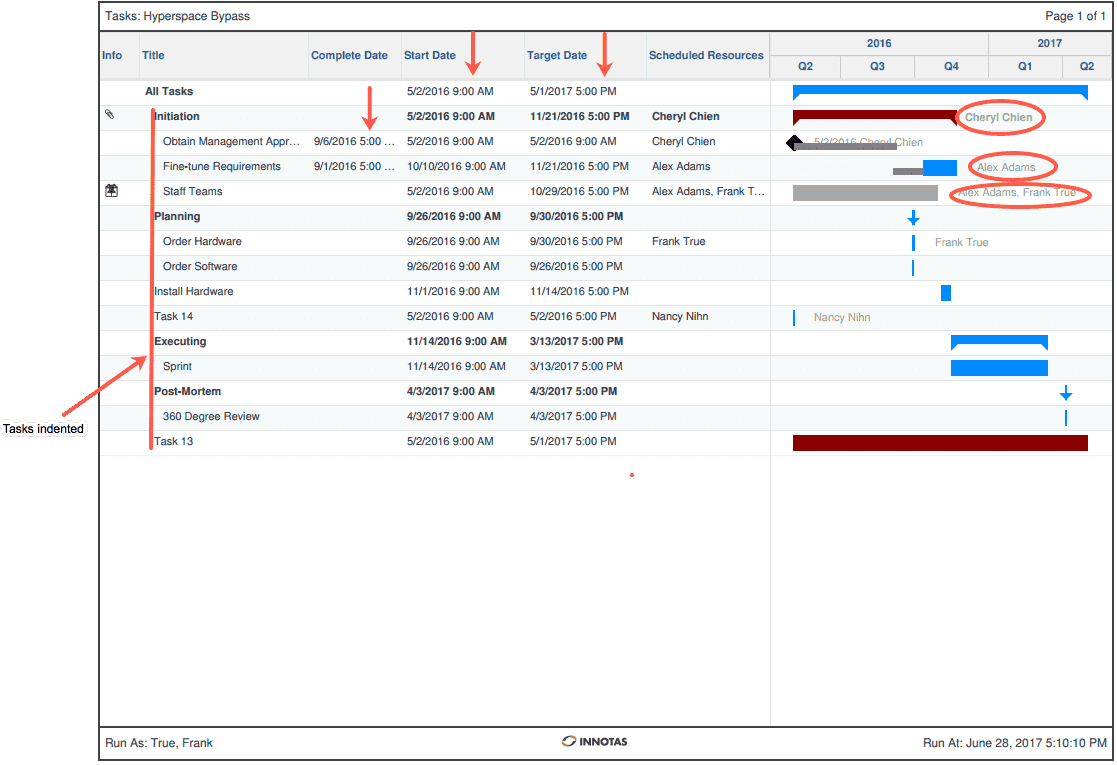
- Each page has a page header that displays the name of the list as shown in the UI, and the date. For tasks, the page title is always the project name prefixed with "Tasks:" (for example Tasks: Hyperspace Bypass).
- Column headers are repeated on every page, as well as the page number in the footer.
- The Run As: resourceName displays the name of the currently logged in user at the time the list was printed. This is useful because depending on permissions, different users can see different data. Knowing who printed the list can help the recipient of the printout understand why certain data is/is not included.
Copying Rows to the Clipboard
You can select one or more rows to copy to the clipboard. You have to option to copy text only, which will remove all formatting, or Rich Text/Table, which will preserve the tabular layout and other formatting. After you Copy, you can paste the payload into Excel, or a Word document, or an email message, for example.
To copy selected rows to the clipboard:
- Navigate to an entity list.
- Select a range of rows by using Shift-click; use Ctrl-click for non-adjacent selections.
- Choose Actions > Copy Rows to Clipboard. The "Copy Selected Rows to Clipboard" dialog appears.
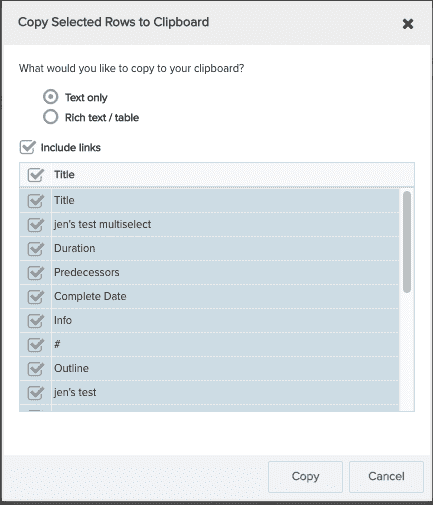
- In the dialog, choose whether to copy "Text only" or "Rich text/table".
- Include links:
- For Rich Text/Table, check this option to convert the entity title to a hyperlink to the entity.
- For Text only, check this option to add a plain text link to the end of each row.
- Select the columns to include in the print output by selecting/deselecting the checkbox next to the column name. All of the columns are selected by default.
- Click Copy.
- Open a target document - Excel, Word, a text editor, an email message - and paste.
Exporting to Excel
You can export a maximum of 5000 list rows to Microsoft Excel. If you export 5000+ rows, you will be notified that your export will be truncated and encouraged to run a report to accommodate the large number of rows. Reports can handle up to 50,000 rows.
To export to Excel:
- Navigate to an entity list page.
- Select the rows and choose Actions > Export to Excel.
- A default file called "export.xlsx" is created. Click Save to accept the default name and location, or rename/move the default file and then click Save.
Printing to a PDF
You can print up to 1000 rows of entity data to a PDF.
Note that Project and Task lists include a Gantt chart; the PDF Options dialog for those entities will have additional options and are described below.
To print to a PDF (no Gantt chart or Gantt chart closed):
- Navigate to an entity list.
- Select the rows and click the icon.
- In the PDF Options dialog, select the columns you wish to include in the PDF. Note that the pagination reflects how many pages the columns will span, not the total number of pages in the file.
- If you want your data to fit on one page, click "Print list/chart on one page (shrinking columns as necessary)".
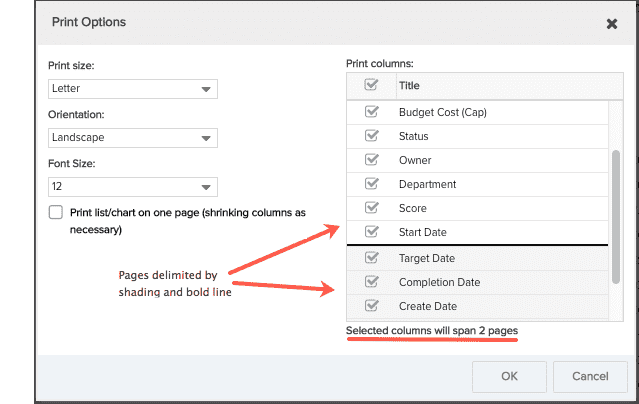
- Click OK.
Printing Task/Project List Pages with Gantt Charts
Task and Project list pages include a Gantt chart that can be hidden or displayed. You can print the Gantt chart to a PDF file, either standalone or with list data.
Printing the project or task Gantt chart:
- Navigate to the project (or task) list page.
- Show the Gantt chart if it is not already visible.
- Click the icon. The Print Options: Projects/Tasks dialog appears.
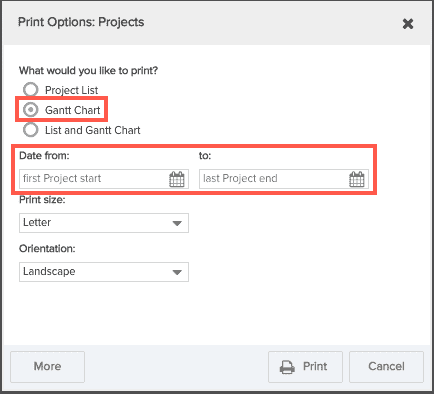
- In the dialog, select the Gantt Chart radio button.
- Enter an optional date range for the projects you want to include on the chart (first project start date to last project end date). If you don't enter a date range, all project/tasks are printed. Note that everything under the More button is disabled for this option.
- Click Print.
Printing the project list and Gantt chart:
- Navigate to the projects list page.
- Show the Gantt chart if it is not already visible.
- Click the icon.
- Select the List and Gantt Chart radio button.
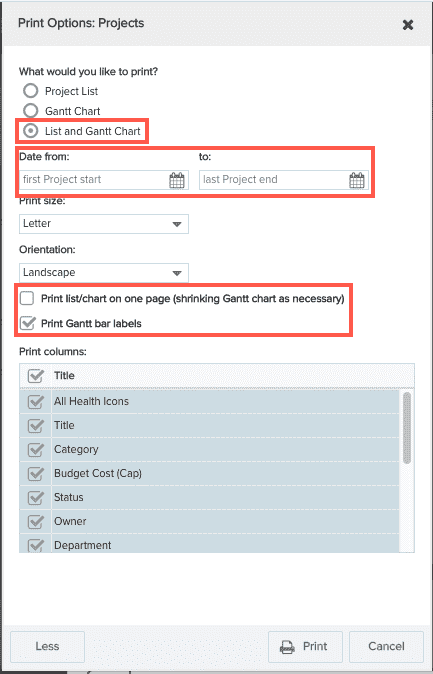
- Enter an optional date range for the projects you want to include on the chart (first project start date to last project end date). If you don't enter a date range, all project/tasks are printed.
- Click the
 button.
 - If you want the list and the chart to appear on the same page, click the checkbox next to "Print list/chart on one page (shrinking Gantt chart as necessary)".
- If you want the Gantt bar labels to print, click the checkbox next to "Print Gantt Bar labels".
- Select the columns you want to include in the PDF by checking/unchecking the checkbox next to the column name. All of the columns are selected by default. The selections are sticky after your first print.
- Click Print.
Printing the task list and Gantt chart:
The page title is always the project name prefixed with "Tasks:". The filter name, if any, appears below the list of tasks. The footer displays the name of the user who printed the chart (created the PDF) in the left corner, and the right corner displays the date and time the PDF was generated.
- Navigate to the task list page.
- Show the Gantt chart if it is not already visible.
- Click the icon.
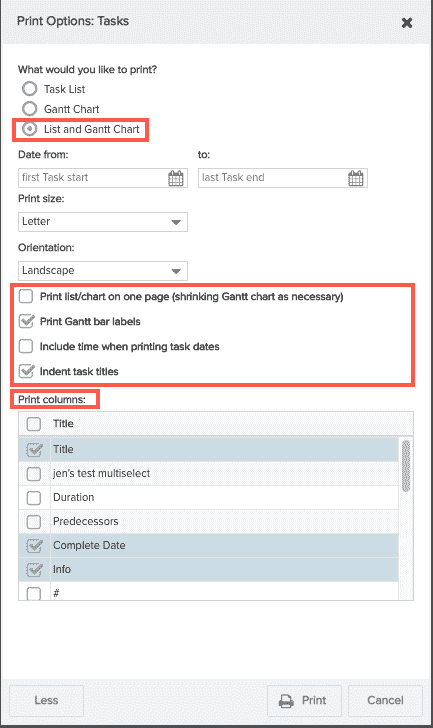
- In the dialog, select the List and Gantt Chart radio button.
- Enter an optional date range for the tasks you want to include on the chart. If you enter a start date with no end date, the latest task end date is assumed. An end date with no start date assumes the earliest task. No dates assumes print all tasks.
- Click the button.
- If you want the list and the chart to appear on the same page, click the checkbox next to "Print list/chart on one page (shrinking Gantt chart as necessary)".
- Task specific options - example shown below:
- Print resource names on chart - Include the names of the resources scheduled to the task next to the bar.
- Include time when printing task dates - Any date field will display the time the date was set.
- Indent task titles - Indents child task titles.
- Select the columns you want to include in the PDF by checking/unchecking the checkbox next to the column name. All of the columns are selected by default. The selections are sticky after your first print.
- Click Print.
Example Gantt/Task List PDF with all options selected (print on one page, print gantt bar labels, include time, indent task titles):