OData Setup (Legacy)
To get the most value out of the data that your organization generates and consumes inside of PPM Pro every day, PPM Pro supports an “Open Data Protocol” or “OData” feed. With robust coverage of database-level fields, this mechanism will facilitate reporting and analytics workflows across any data warehouse, data lake, or business intelligence ecosystem that can consume OData feeds. The PPM Pro feed currently supports OData version 4, to include (but not limited to) support of Power BI, Tableau, Microsoft Excel, and others. NOTE: If you are using Tableau 10.0.1 and above, you will follow a slightly different set of instructions to retrieve your data via a Web Data Connector.
Below are the PPM Pro OData feed setup steps. These steps are in two parts: 1) identifying the data fields to access, and 2) accessing the data. For more information, see OData Webinar Recording.
NOTE
This uses legacy dashboards only. To connect OData feed with the new reporting and dashboards, See OData Setup (R2D2)
Identifying Data Fields
The OData feed uses the PPM Pro List report and dashboard functionality as a way to identify what fields to access with OData. Therefore, start by creating one or more List reports that contain the data you would like to access, add these reports to a dashboard, and publish it.
- Create one or more List reports where the Selected Fields correspond to the data you want to access. NOTE: OData brings all field information across as plain text. Format information such as alignment, bold, HTML, etc., is lost. Many BI/Reporting tools will attempt to detect the format of date and money fields, but you may need to adjust these and other field formats as desired once the data is in your tool.
- Use a Target of "Organization" to give you the widest data access. With wider data access, you can use your BI or Reporting tool to do the filtering for you, but note that it does increase access and refresh time over lower level targets.
- Ensure that any entities that you report on do not use special characters, such as "#", "%", " ' ", ":", etc., or HTML in their titles. For example, if you want to create a report based on "Issues/Risks", you will need to enter a Support case to change it to remove the "/". Some Reporting/BI tools such as PowerBI that uses SSAS do not allow entity titles to have special characters.
- Only add fields that you want to access. Avoid adding fields that you are never going to look at to promote faster refresh and data access times.
- Ensure none of the fields have special characters or any punctuation, such as "#", "%", " ' ", ":", etc., or HTML in their title. Some Reporting/BI tools such as PowerBI that uses SSAS do not allow field titles to have special characters. If you have any Available Field titles that include special characters, please either change their titles within Admin to avoid potential errors or edit the Report field to have a Display Name without special characters and edit/republish the Dashboard, particularly if you are using PowerBI; use only alpha and numeric characters in their titles.
- Ensure none of the fields just have the word "Entity" as their title. When we first deployed the OData service we used this term to identify the entity for fields and unintentionally caused problems for fields that have this title. We will change this with our next deployment, but in the mean time if you have any report fields that just show as "Entity", please either change their titles within Admin to avoid potential errors or edit the Report field to have a Display Name with more than just "Entity" (such as changing to "Entity Type") and edit/republish the Dashboard.
- Do NOT select any Available Fields from "Children" folder. We cannot send hierarchical data, only a flat table, so "Children" fields may cause errors. To access "Children" data, create a separate List report where the desired fields are not "Children" and make sure the relationship is mapped correctly to the parent entity within your Reporting/BI tool.
- DO enter a Display Name for each field, ensuring that it does not use any special characters, such as "#", "%", " ' ", ":", etc. If you do not enter a Display Name, the report column title will use both the Object title and the Field title separated by a colon in the column title, e.g., "Project: Title". The presence of the colon can cause the OData access to fail.
- Do NOT configure any other Selected Fields parameters (Max Width, Horizontal Alignment, Vertical Alignment, Aggregate, Drilldown, Drilldown Target, Display Data As, Export Data/Color, Hide), Sorting, or List Options. Doing so could negatively affect the generated table relationships. The BI/Reporting tool should allow you to configure these as you like once you have the data.
- Do NOT use Group By, as some tools will introduce blank rows or may not be able to handle.
- There is no need to set Visibility, as the OData feed does not use this information.
- Create a top level Dashboard containing the List report(s); do not create entity level dashboards.
- Add the List reports containing the data you want to access. There is no need to worry about how the reports are arranged, as the OData feed does not use this information.
- Do NOT add more than one report of the same category to the dashboard. If you need to bring in another report of the same category, create another dashboard and add it there. You can bring in additional dashboards with your OData feed by substituting the Dashboard ID as needed.
- Configure Target, Filter or other scope parameters on the Component tab as needed. Certain report sources, such as Timesheet, require this. We recommend using Filters and other scope parameters to define/limit what data is accessed; if there is data that will never be used, then filter it out to promote faster refresh and access times.
- There is no need to set Display Name, Size, or Visibility, as the OData feed does not use this information.
- NOTE: It is recommended that the dashboards created for OData access only be used for OData access; do not access OData for dashboards that are viewed and used by other users or as part of your regular business needs.
- Run and publish the Dashboard.
- Ensure that the Dashboard is published by the Owner; publishing a linked dashboard will cause problems with the OData access.
- Ensure the "Expires on" date is set to accommodate your OData access timeframe, for example, a maximum of 1 year out.
- If one or more of the reports on your Dashboard is so large that it will not display/only the download to Excel option link is shown, make sure the "Allow viewers to export dashboard data to Excel" checkbox is selected.
- Although the OData feed does not use the User authentication information, we recommend that you set up standard authentication (for example, "Require user to be logged in to PPM Pro") to protect from unauthorized access to your dashboard.
- Configure a publishing schedule to run sufficiently for accessing your data. The OData feed will pull the last published dashboard.
- Capture the Dashboard ID as it will be needed for the OData feed URL.
- Select the Help menu > Developer Tools > ID Inspector.
- Select the Dashboard row in your Dashboards grid.
- The ID should appear within the ID Inspector, note it down as this will be needed for Accessing Data (steps below).
Accessing Data: All tools EXCEPT Tableau
To access data from BI/Reporting tools other than Tableau, you will need to do both of the following:
- Enter the URL for your OData feed within your BI/Reporting tool. To do this, find the function/location and enter the following OData feed URL (note that this URL is case sensitive):
https://odata.ppmpro.com/InnotasOdataService/Entities('dashboardID@yourSubdomain')
where "dashboardID" is the Dashboard ID from step 4 above, and, "yourSubdomain" is the first part of the URL you use when logging in to PPM Pro. For example, if you log in to https://myCompany.ppmpro.com, then yourSubdomain is "myCompany". It is case sensitive, so make sure you have the correct upper and lower case characters.
- Find the login function/location in your BI/Reporting tool and enter the relevant credentials:
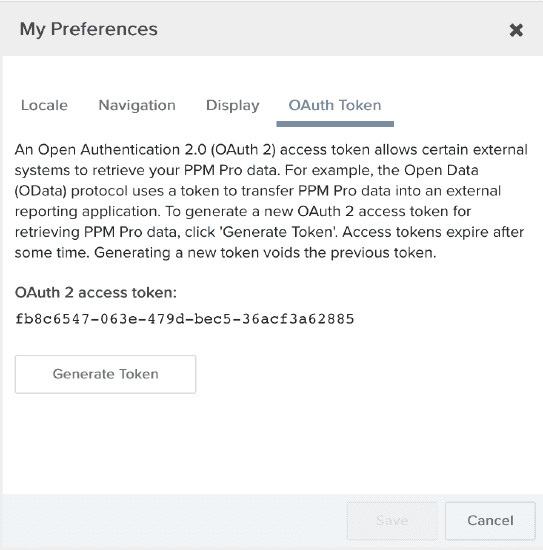
- Use your personal PPM Pro Username for the login user and your personal OAuth Token for the login Password (not your own user password). To generate your personal OAuth Token, within PPM Pro in the upper right user dropdown menu select “Edit Preferences”. In the resulting modal (shown below), select the OAuth Token tab. Click the “Generate Token” button and copy the token that appears (in the example below the OAuth Token is “fb8c6547-063e-479d-bec5-36acf3a62885”). Use this token, including hyphens, as the password.
Accessing Data: Tableau 10.0.1 +
To access data from Tableau 10.0.1 and higher versions, you will need to do all of the following:
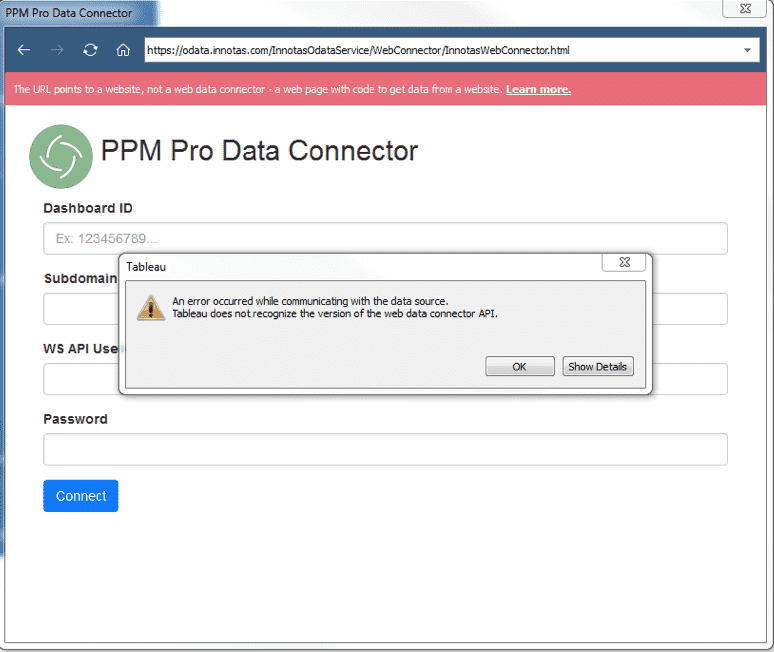
- Access the Web Data Connector. Go to the Tableau "Connect" view and select To a Server "Web Data Connector". In the resulting Web Data Connector "Enter your web data connector URL here", enter this URL (note that this URL is case sensitive) and hit Return/Enter:
https://odata.ppmpro.com/InnotasOdataService/WebConnector/InnotasWebConnector.html
- You will see a "PPM Pro Data Connector" dialog where you need to enter identifying information for your data and login credentials.
- Enter the Dashboard ID from step 4 above.
- Enter your Subdomain, which is the first part of the URL you use when logging in to PPM Pro. For example, if you log in to https://myCompany.ppmpro.com, then yourSubdomain is "myCompany". It is case sensitive, so make sure you have the correct upper and lower case characters.
- Enter a Username:
- Enter your personal PPM Pro Username for the login user (note that the username is case sensitive).
- Enter a Password:
- Enter your personal OAuth Token for the login password (not your own user password). To generate your personal OAuth Token, within PPM Pro in the upper right user dropdown menu select “Edit Preferences”. In the resulting modal (shown below), select the OAuth Token tab. Click the “Generate Token” button and copy the token that appears (in the example below the OAuth Token is “fb8c6547-063e-479d-bec5-36acf3a62885”). Use this token, including hyphens, as the password.

- Click "Connect".
After performing the above, Tableau should show relevant Tables on the left side which you can drag and drop to the top middle section and then click "Update Now" to pull in the data. All data comes in as string data type, so some work may be needed to change the formats so that you can display and aggregate as you like when building Tableau reports.
Trouble Shooting & Tips
Completing all of the above relevant setup steps should enable you to use your BI/Reporting tool to access the PPM Pro OData feed! PPM Pro does not have in-house expertise in all the various BI/Reporting tools that accept OData, however if you experience difficulties making the connection or if the data isn't showing up, please submit a PPM Pro Support case. Below are some trouble shooting and tips that we have gathered.
| BI/Reporting Tool | Problem Encountered | Things to Try |
|---|---|---|
| Any tool | Need to bring in current data, not just last published data. |
Within PPM Pro:
Note that publishing actions do not change the Dashboard ID, it will always be the same (so the URL will not change just because a dashboard is republished). The 3 steps above are much faster than selecting to Unpublish and then repeating the Publish steps. Thanks to one of our customer Community posters for this tip, you know who you are! If you have a strong need to republish dashboards outside of the regularly scheduled publish time or find yourself constantly republishing, please contact Support and ask about alternative methods. |
| Any tool | Your original attempt to access OData did not succeed and/or you changed your dashboard, login credentials, or some other access information and the data is not updated. |
Clear your credentials in your BI/Reporting tool:
|
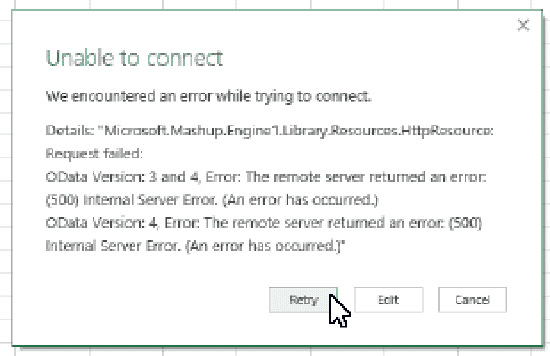
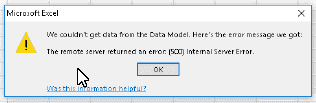
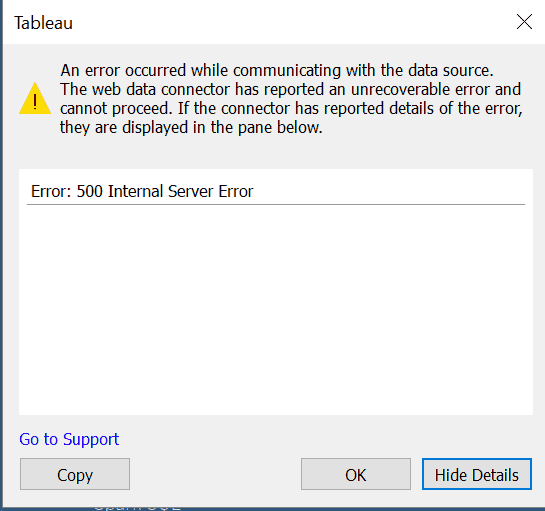
| Any tool |
500 error:
|
This may be due to a number of reasons.
|
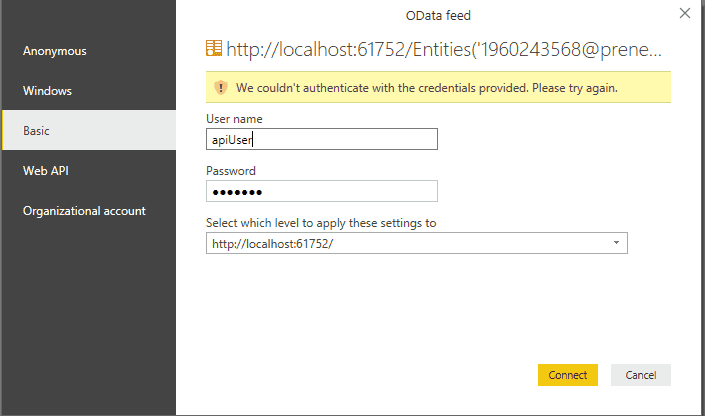
| Any tool |
401 error:
|
This error usually occurs when the credentials do not authenticate due to incorrect Username/Password or attempting OData access from a restricted IP address.
|
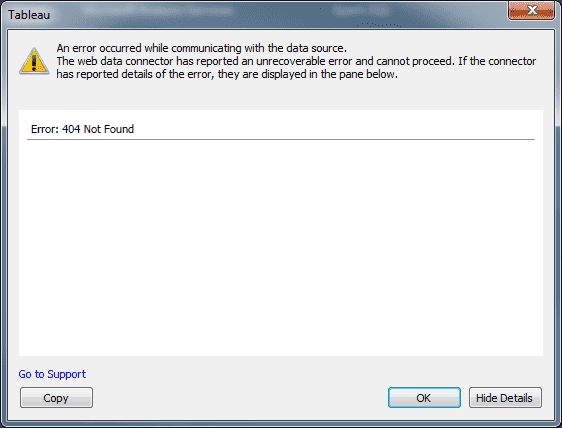
| Any tool |
404 error:
|
This error usually occurs when the attempt to reach a URL fails and may be due to a couple of reasons.
|
| Any tool | Need to bring in data from two reports that are of the same category. | Add each report to a separate dashboard (which still can include other reports of different categories). You can bring in additional dashboards with your OData feed by substituting the Dashboard ID within the URL. |
| Excel (Power Query), Power BI | Not all of the expected data columns are appearing. |
|
| Excel | After the data table appears, unable to or not sure how to expand all of the individual data elements. |
|
| Excel, possibly other tools | Dates, money, and other special formatted data comes in as string data. | OData sends data in string format. Many tools, such as PowerBI, will attempt to automatically detect the appropriate format and convert accordingly. Other tools, such as Excel, may not detect the data format or do so correctly (PowerQuery for Excel might do a better job of doing this). You will need to format this data manually in the BI/Reporting tool, e.g., in Excel and PowerBI, there is a Transform/Detect Data Type option and also a Transform/Data Type selection option to change a column of data to a particular format. |
| Power BI, possibly other tools | A report field that is multi-select displays the data in a single cell separated by commas. Need to separate out the individual multi-select values. |
Transform the data when it gets into Power BI. There is a function that can split the column into multiple rows using the ‘Split Column’ function. This Power BI Community article on it may be helpful. The example uses a semicolon, but the same would apply for a comma in our example. Other reporting/BI tools may have similar functions. For example, one customer has one or more sponsors for a Request. If multiple sponsors are selected in a multi-select list they are separated by a comma. The customer created a new copy of the query that contains the data in Power BI and deleted all the columns except the Request ID and the Sponsors. They then selected the Sponsors column and Split. In Advanced, they selected By Rows instead of Columns. Now, instead of one row with the ID as “123” and the Sponsor as “<sponsor 1>, <sponsor 2>” it has two rows with both having the same ID but each row now only has one sponsor. They then created relationships in the Query Editor between the queries – the original Sponsor List, Sponsors, and Requests. |
| Excel, possibly other tools | Columns do not expand, just spins | Try tweaking the URL to include a capital "D" in InnotasODataService, for example, "https://odata.ppmpro.com/InnotasODa...vice/Entities(‘9999999999@domain’)". Bizarre, we know, but one of the participants found that this solved the column expansion and access. |
| Tableau |
Tableau does not recognize the version of the web data connector API error:
|
Check your version of Tableau and ensure it is 10.0.1 or higher. Their version 10.0.0 had a bug for their web data connector capabilities that was patched in 10.0.1. |
| SQL (and possibly MySQL) | Unable to expand/open more columns after generating a table. |
When entering https://odata...../Entities(dashboard@subdomain), the OData service returns a list of keys that specify all of the available types like project… and on the next column, there is the link of a table that you can expand. Power BI handles this and generates the next OData call for each, which is as follows. https://odata...../Entities(key)/Fields which returns the data expanded that you are familiar with. Creating this URL may help. Another URL to try is https://odata.innotas.com/InnotasOdataService/Fields('dashboardID@domain'). |
 .
.