
Working with the Resources List page
The Resource List is the screen that displays when you click the Resources navigation icon and displays all the resources in your organization. Use ad-hoc or PPM Pro-supplied filters to refine the list contents.
The Resources List page is the starting place for creating, editing, and deleting resources. You can also switch the base calendar for one or many resources, access the Capacity & Demand report screen. Links to any organization assets will appear in the left-nav area.
See About Resources for more information.
Anatomy of the Resources List page
Below is a screenshot of the Resources List page:
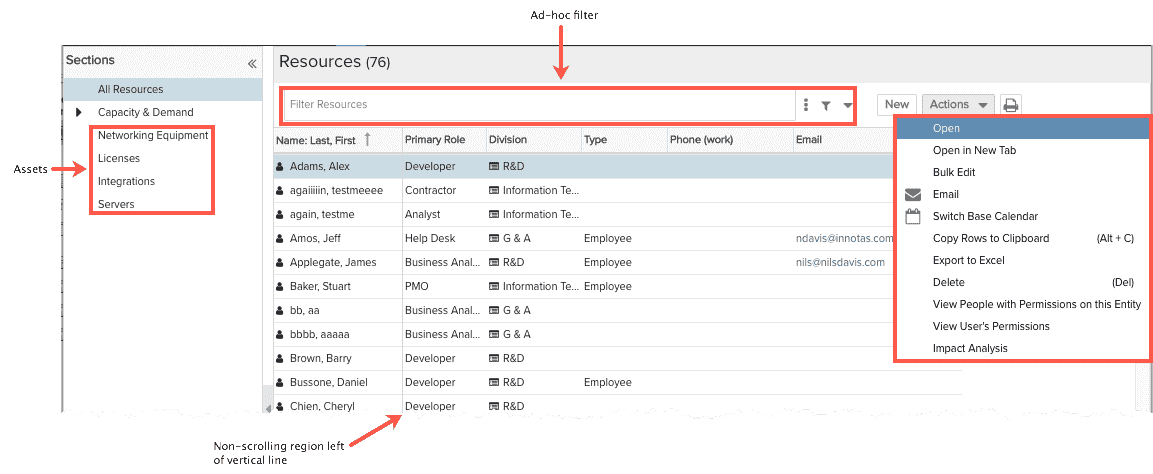
Out-of-the-Box Filters
PPM Pro supplies a set of built-in filters to help you display exactly the resources you want to see.
Note that the filters simply return resources but do not give you permission to make edits. All full users can edit allocations for projects where they have edit permission.
|
Resource Filters |
Returns... |
|---|---|
|
no filter |
All resources (terminated and non-terminated) |
|
My Resources |
Non-terminated resources that have me as their immediate supervisor, unit manager, or timesheet/expense approver |
|
+My Direct Reports |
Non-terminated resources that have me as their Immediate Supervisor or Unit Manager |
|
+My Resources (All) |
Resources (terminated and non-terminated) who are part of my organization (all my direct reports (Immediate Supervisor or Unit Manager) and their direct reports, and so on) |
|
+Current Resources |
Resources that are not terminated |
|
+My Resource Pool |
(For centralized staffing only) Show all resources I have permission to staff. |
|
+Resources Visible to Me |
All resources whose availability I have been given permission to view by way of a permission profile. |
Selecting Records
Select single records by single-clicking; use shift-click to select a range (or hold down the shift key and hit the down arrow key repeatedly) or use Ctrl-click to select multiple non-adjacent records. When you select more than one record, the message "n items selected" is displayed (temporarily) in the footer of the page. This is useful if you want to select a range of records and want to know the count.
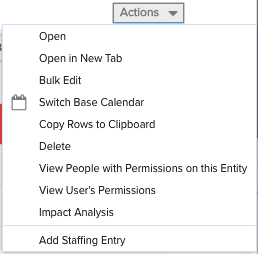
The Actions menu
The Actions menu at the top of the list holds all operations that you can perform on resources. You can also access this menu by right-clicking on an issue. Perform bulk actions by selecting multiple records and then choosing an operation from the Actions menu.
 |
Menu Option |
Description |
|
Open |
Opens selected resource's Info page in the same window |
|
|
Open in New Tab |
Opens selected resource's Info page in new tab |
|
|
Bulk Edit |
Opens modal displaying info for selected resources (shift-click or ctrl-click to multi-select) |
|
|
Switch Base Calendar |
Change the base calendar used for the resource. By default, the resource calendar is the Organization calendar. |
|
| Copy Rows to Clipboard | Copy the selected rows to the clipboard. (Shift-click or Ctrl-click to select multiple rows.) | |
| Delete | Deletes the selected resource. | |
| View People with Permissions on this Entity | Displays the Permissions Explorer with the focus on the current resource (who has permissions on this resource). See Using the Permissions Explorer. | |
| View User's Permissions | Displays the Permissions Explorer where you can browse entities the current resource has permissions on. | |
|
Impact Analysis |
Invokes the Impact Analysis tool in a new window with the currently selected resource as the focal point. See About Impact Analysis. |
|
|
Add Staffing Entry |
Allows users with appropriate permissions to create an allocation: Must be project owner or on project team with "can edit" permission. If using centralized staffing, must have Can Staff Directly permission. |
To open a resource, double-click on any field in a row, or select a resource and choose Actions > Open or choose Actions from the right-click menu..
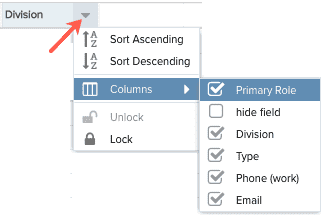
Customize the grid
You can customize the Resources grid layout using the column header menu. Hover the cursor over any column header to display the down arrow; click the arrow to display the menu.
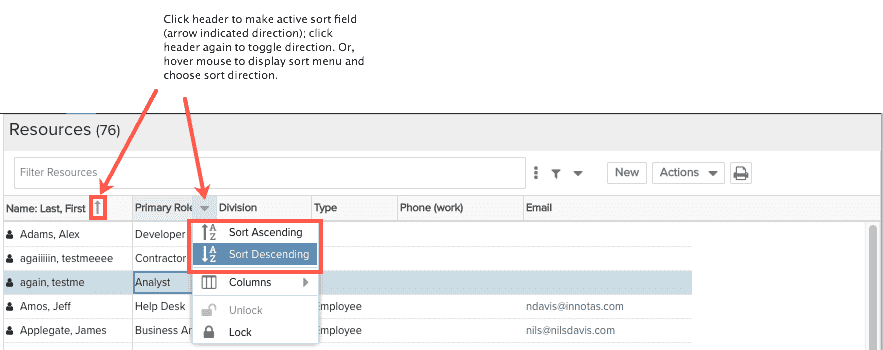
Sorting
To sort a list, simply click on a header. An arrow pointing up indicates ascending sorting; down indicates descending. Alternatively, hover your cursor over the header to display the sort menu. Choose the sort order.
Move Columns
You can move columns to any position by simply dragging the column header.
Lock columns
You can select one or more columns to remain "locked" to the left of the screen, preventing them from scrolling out of view. For each column you wish to lock, choose Lock from the column header menu for that column.
Filtering Resources
Use the "ad-hoc" filter just as you would on any on page. See Ad-Hoc Filters for more information.