
Contouring Allocations
Contours are the individual work effort per interval (weekly/monthly) across an allocation date range. For example, if you have a 4-month allocation displayed in weekly periods, the values displayed in each period comprise the allocation contour.
You display contours by clicking the Contours View icon. The contour cells have a right-click menu that supports copying contour values.
Contours have two states: automatic or custom. An automatic contour is one that is generated by the system and not edited by a user. A custom contour is one that has been edited inline by a user. The contour state affects the behavior of the system when shifting or extending allocation dates. For more information, see Contour Examples for more information.
Automatic Contours
The project Staffing screen initially automatically contours allocations evenly across the date range for a resource, based on the project calendar's working hours, including exceptions. You don't have to do anything to create an automatic contour, simply enter a Total Hours/Headcount value and display the Contours panel.
-
If you have the allocation units set to Headcount, the Total Headcount value is applied uniformly across each interval. For example, if you specify 1 Total Headcount, then 1 will be displayed in each contour interval.
-
If you have the allocation units set to Hours, the Total Hours value is spread evenly across each interval. For example, if you specify 20 Total Hours and your allocation period is four full months, then those 20 hours will be divided evenly across the four months.
Changing Total Demand for Auto-Contours
Any time you make a change to the Total Headcount/Hours value, the contours will behave as described above. If you have make edits to one or more contour interval, then you are working with a custom contour (see below).
Custom Contours
A custom contour is a contour to which you have made manual, inline edits. You can customize a contour by allocating hours or headcount to specific weeks/months by simply turning on the Contours view and making edits inline.
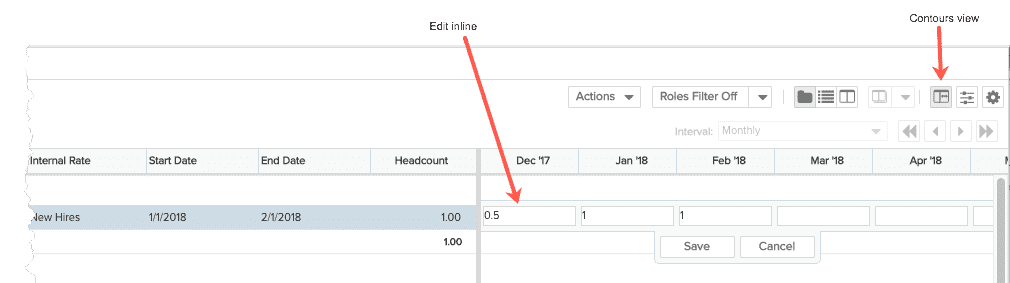
Changing Total Demand for Custom Contours
If you change the Total Headcount/Hours value after you have customized a contour, the contours will be redistributed evenly and you will lose your custom values. You will receive a message reminding you about this outcome and have the option to cancel the change.
Copying Contour Values
If you make a change to a value in a contour interval that you want to repeat for the rest of the allocation, choose copy to end of allocation from the right-click menu. Choose copy to end of year to copy the value to every interval for the rest of the year (assuming that the allocation ends beyond the end of the year).
For example, you might start out with a resource allocated with a headcount .04 (part-time) in January. Then you find out that in June she's returning full-time. You can reflect that in the contours by clicking on June, typing 1.0, and copying that to the end of the allocation. This change would be reflected in the total hours. Similarly, the copy to end of year option is given as a shortcut for making a repeated change for a limited period of time.

Allocation Details - Availability Post Allocation
You can mouse-over any allocation cell (for a staffed allocation) to display the availability percentage, as shown below.
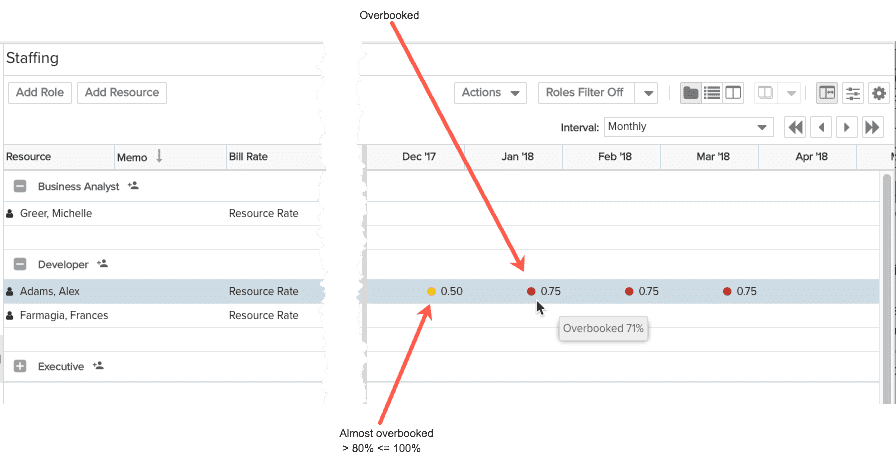
The percentage is for the specific resource during that time period. Availability information is calculated for the current month and forward for 2 years.
If the resource is close to being overbooked (>80% to <= 100%), a yellow indicator is displayed.
If the resource is overbooked (> 100%), a red indicator is displayed.