
Working with the Asset List page
Note: This topic uses "Server" as an example class type. Your organization can create as many classes as it needs, and name them accordingly.
The Asset List page (on the Resources/yourAsset tab) is the launching point for asset activity, including creating, viewing, and editing assets. You can also add assets to a portfolio, if your organization has created one (or more).
Anatomy of the Assets List page
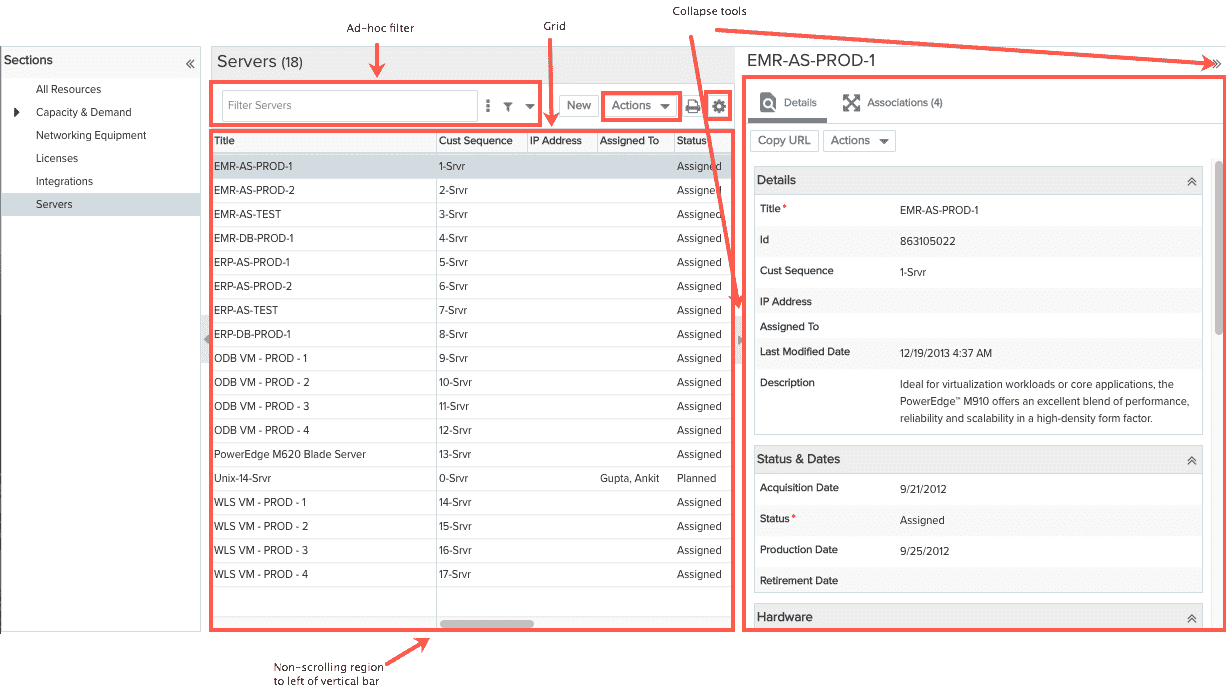
This Assets List page displays a list of issues on the left-hand side (often referred to as the "grid"), and the Asset Info pane on the right-hand side that houses multiple tabs you can use to manage different aspects of an asset. When you select an asset in the Assets list, the relevant information for that asset for whatever tab is active is displayed in the Asset Info pane. You can expand/collapse the panes to display only the Assets list, or only the Info pane, by clicking any of the collapse tools (shown below). You can also use the splitter to resize the two panes. Any changes you make to the layout (resizing panes, for example) will be retained when you return to this page.
Below is a screenshot of the Asset List page, populated with a some servers. You can navigate between asset types by clicking the links in the left navigation pane. For example, additional asset types are Networking Equipment, Licenses, and Integrations.
Selecting Records
Select single records by single-clicking; use shift-click to select a range (or hold down the shift key and hit the down arrow key repeatedly) or use Ctrl-click to select multiple non-adjacent records. When you select more than one record, the message "n items selected" is displayed (temporarily) in the footer of the page. This is useful if you want to select a range of records and want to know the count.
Edit Records Inline
You can edit fields inline in the Assets grid, where typically a subset of the Details fields appear. Simply double-click a row to activate. You can use your mouse and/or keyboard navigation. Tab moves you from field to field and to the Save/Cancel Buttons. Use arrow keys to move you through drop lists and suggested matches (for picklists) and use Return/Enter to make your selections. Use Esc to undo an edit that hasn't yet been saved.
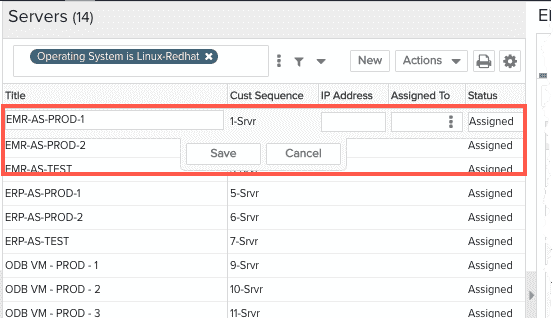
You can also edit fields in the Details panel using the same keyboard gestures, with the addition of Ctrl-S to save.
Newly Created or Edited Records
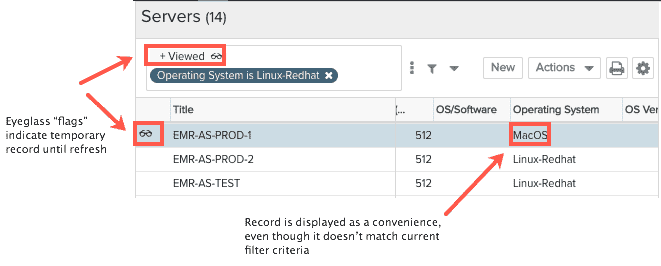
Note that you might find yourself in a situation where you have set up some filter criteria to populate the grid. Then you create a new record, or modify an existing record in such a way that it does not meet the current criteria (or might fall outside the scroll region). For example, your filter might specify "Status is Assigned," but the new entity you created has a status of "In Progress." Because we assume that you still might want to make additional edits, rather than immediately filter it out of the list, PPM Pro keeps the record in the list and labels it with a temporary "spectacles" flag ![]() . In addition, a this temporary indicator will also be placed in the ad hoc filter field to remind you that you might be displaying some records that don't meet the current criteria. Both of these flags, as well as any records that don't meet the current filter criteria, will be removed after refreshing the screen.
. In addition, a this temporary indicator will also be placed in the ad hoc filter field to remind you that you might be displaying some records that don't meet the current criteria. Both of these flags, as well as any records that don't meet the current filter criteria, will be removed after refreshing the screen.
Info Panel/Tab Icons
The Info panel displays one or more tabs where you can configure different aspects of a portfolio. The exact tabs you see depends on how your organization has configured portfolios, as well as the current user's permissions. The following is the list of all possible tabs and a short description of each:
|
Tab/Icon |
Description |
|
|
Most entities have Details tabs/pages (older style pages are called Basic Info). The Details page is where you enter general information about the entity. The fields that appear on Details depends how your organization has configured the page. |
|
|
The Notes tab lists all the notes that have been created in the currently selected entity. You can add notes to entities from the Notes tab (for projects, navigate to the Notes section). |
|
|
The Attachments page for any entity lists the attachments for that entity. You can add document and hyperlink (URL) attachments for each entity. The maximum size for any single file attachment is 100MB. |
|
|
The Team tab lists the users who have permissions on the specify instance of the entity. You can add/remove users, or change their permission profile. See About Profile-Based Permissions for more information. |
|
|
The Associations tab lists the entities linked to the current entity. The following are supported associations:
|
The Actions menu
The Actions menu at the top of the list holds all operations that you can perform on assets. You can also access this menu by right-clicking on an asset. Perform bulk actions by selecting multiple records and then choosing an operation from the Actions menu.
|
Actions menu |
Action |
Description |
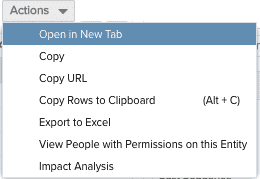 |
Open in New Tab |
Opens the selected asset in a new tab for viewing or editing, depending on user profile permissions. |
|
Copy |
Makes a copy of the asset definition and opens it. By default the asset definition Title is prefixed with "Copy of:" You can make a copy of any assset visible to you. |
|
| Copy URL | Copies the URL to the current asset. | |
|
Copy Rows to Clipboard |
Copy the selected rows to the clipboard. (Shift-click or Ctrl-click to select multiple rows.) |
|
|
Export to Excel |
Deletes the selected asset. You must have the appropriate permissions to delete an asset. |
|
|
View People with Permissions on this Entity |
Displays the Permissions Explorer with the focus on the current project. See Using the Permissions Explorer. | |
|
Impact Analysis |
Invokes the Impact Analysis tool in a new window with the currently selected asset as the focal point. See About Impact Analysis. |
Customizing the Assets List grid
Add/Remove Columns
Click the Configure Settings icon. To add columns to the grid, select them in the Available Fields pane and then click the right-arrow. To remove columns, select them in the right-hand panel and click the left-arrow.
![]()
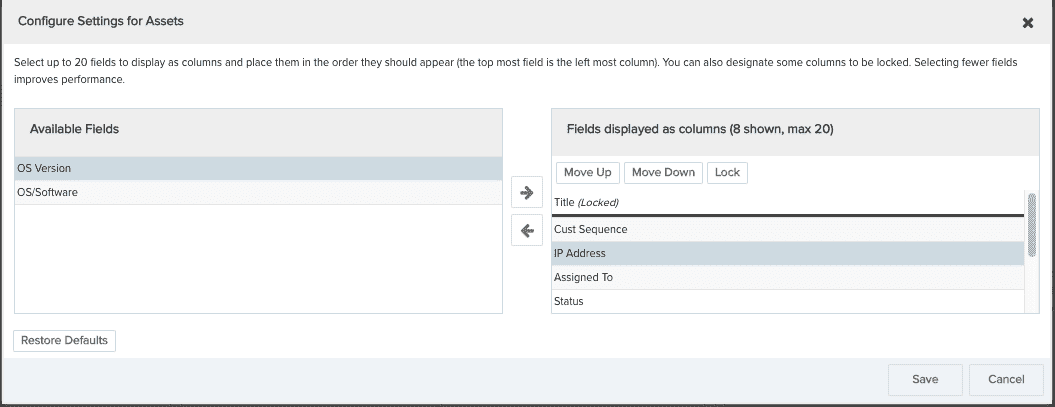
Lock columns
You can select one or more columns to remain "locked" to the left of the screen in the non-scrolling region, preventing them from scrolling out of view. The Title field for an entity is locked by default. To lock an additional column, select the field and click the Lock button. To move a column into the scrolling section of the grid, select it and click the Unlock button (on appears once you select a locked column other than Title).
Move Columns
You can move columns to any position in the grid by simply dragging the column header in the grid. Or, you can change their position by clicking the Configure Settings icon and using the Move Up/Move Down buttons to reorder the columns.
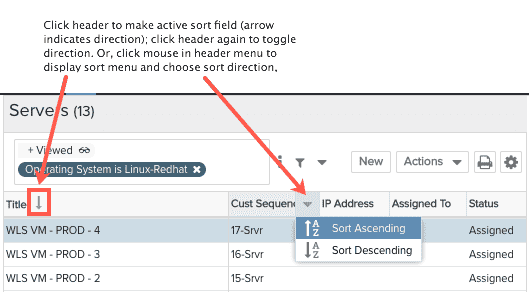
Sorting
To sort a list, simply click on a header. An arrow pointing up indicates ascending sorting; down indicates descending. Alternatively, click your cursor in the header menu to display the sort menu and choose the sort order - ascending or descending.
Filtering Assets
Use the "ad-hoc" filter just as you would on any on page. See Ad-Hoc Filters for more information.