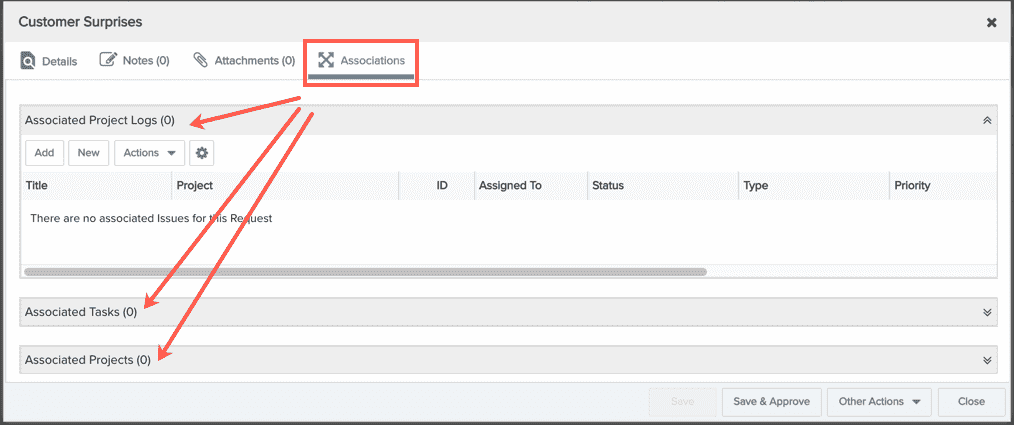
Associating Projects
Associations define a relationship between entities that is useful for navigating between those entities, as well as for generating reports on entities that participate in a relationship. Entities that support associations have either an Associations tab or section in the entity's UI. These Association tabs/sections contain sub-sections for each entity type the current entity can be associated with. For example, the project Associations section could contains subsections for requests and hierarchy units.
Please note the following permission requirements:
NOTES
- Both the anchor entity (the entity where the association is initiated) and the target entity must be configured to support associations. For example, if you are associating a project with a request, the project category must include request associations and the request category must include project associations.
- All association types: the user creating the association must have edit permission on the anchor entity and view permission on the target entity. For example, if you are creating a project-to-request association, you must have Project > Edit permission and Request > View permissions.
- Requests only: to create entities from a request, you must have Create permission on the target entity. For example, to create a project from a request, you must have Request > Edit and Project > Create permissions.
- Requests only: Permitted users can add/edit associations for finally-approved requests
- Portfolios only: For associations where the portfolio is the anchor, must have Portfolio > Edit Component Links permission and View permission on the target entity
- Projects only: For associations where the project is the anchor a) for project-portfolio associations, must have Project > Edit > Portfolio Links permission and Portfolio > View permission, and b) for all other supported entities, must have Project > Edit > Associations and View permission for each target entity.
Read on to learn more about:
- Supported Associations
- Creating an Association
- Configuring the Associations Grid
- Reporting on Associations
Supported Associations
| Entity... | ...Can Associate With |
|---|---|
| Asset | Portfolio |
| Financial Entry | Task |
| Project Log/Issue |
Request, Task |
|
Portfolio See Adding Portfolio Components - Projects and Hierarchy Units for information about portfolios. |
Asset, Project, Sub-Portfolio, Unit Note that sub-portfolios are not created with associations, but by specifying the parent portfolio in the child portfolio's Parent field. See Creating Sub Portfolios. |
|
Project A project can be associated with more than one portfolio, and each association can be for a specific percentage of the project. See Associating Portfolios to Projects and Hierarchy Units |
Portfolio, Request, Unit |
| Request | Project Log/Issue, Project, Task |
|
Task |
Financial Entry, Project Log/Issue, Request |
|
Unit |
Portfolio, Project |
Anatomy of an Association
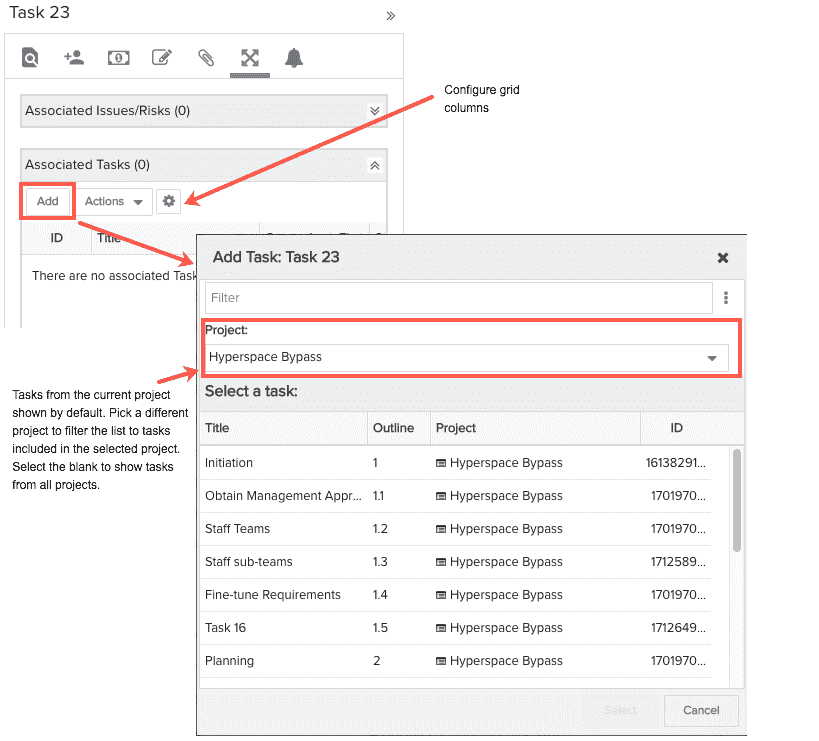
The following screenshot shows a request that is configured to support associations with project logs, tasks, and projects:
The screenshot below is for the task entity, which can be associated with other tasks, issues, requests, and financial entries. You can expand or collapse the sections separately if you need more room. Use the Project filter to limit the list of tasks to a specific parent project, or show tasks from all projects.
Create an Association
- Navigate to the entity (for example, Project/ProjectName/Tasks/taskname or Issues/IssueName).
- Click the Associations tab.
- Click Add for the appropriate entity (in this example, a task or an issue). Note that for requests you can also create a New entity.
- In the Add modal, select the Add modoal, select the entity and then click the Select button. The list in this modal will exclude entities for which you do not have at least View permission. If your target is a task, you can use the Project filter to limit the list of tasks to a specific parent project, or show tasks from all projects.
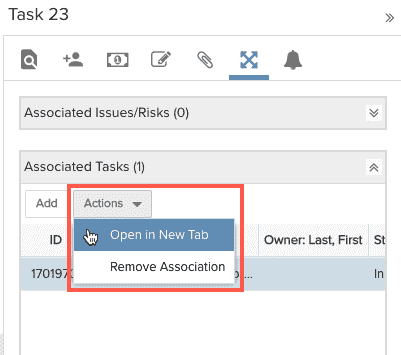
Once you have added the entity, you can view or or edit it in a new tab (provided you have View or Edit permission on the entity, respectively), or remove it. This gives you a quick way to see, or, if you have edit permissions on the target, to update the entity. For example, you can provide initial role demand on a project associated to the request.
TIP
Associations cannot be deleted from finally-approved requests, however, permitted users can add/edit associations for finally-approved requests.
Reporting on Associations
Notes:
- The nature of the hierarchical report sources does not allow for reporting on associations between the same entities (for example, an issue's related issues, a task's related tasks). For example, if you are using a Portfolio report source and want to include associations, you can include, for example, issue -> task associations, or task -> request associations.
- When reporting on associations, it's best to limit the report to one level of associations. If you include multiple levels (2+), the report is likely to include recursive associations that will repeat content and exponentially inflate the size of your report.
- Associations are not child entities. However, when reporting on associations you choose the associated entity from the Children folder. For example, for 'Project > Children > Task > Children > Finance Entry', the finance entries that are shown will be the ones associated to the task, and not the project.
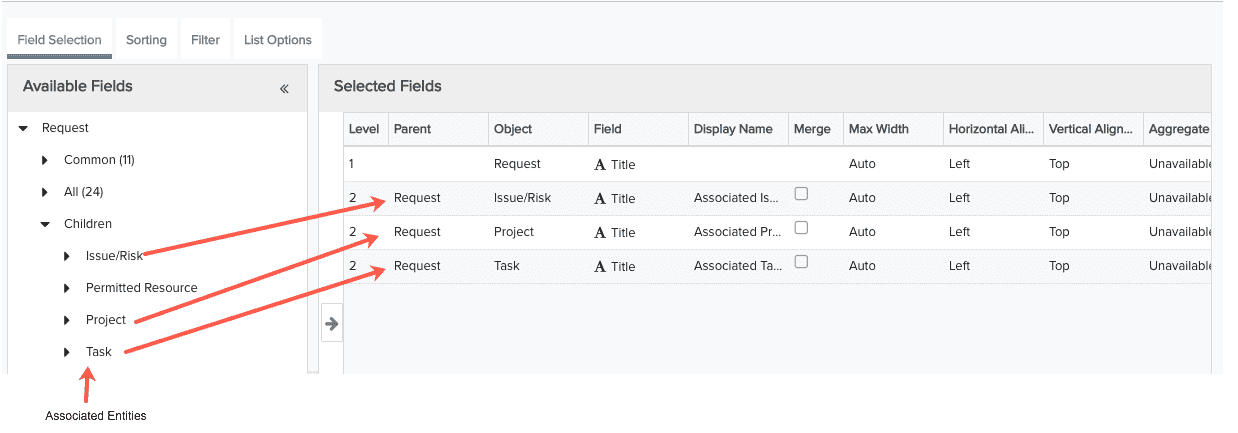
You can report on associated entities by including fields from the Children folder of the target entity. For example, if you want to report on all the associated entities for a request, you would:
- Choose your report source - this example uses the All Requests report source.
- Select the List output type.
- Choose the fields you want included in the report and drag them into the Selected Fields panel. This example simple uses the request Title field.
- Go to the Children folder, locate the folders of the entity type(s) you are interested in (such as Task, Project, Issue/Risk).
- Select the fields you want to include from the associated entity (this example uses the Title of each associated entity - note that we added a Display Title of "Associated <entity name>"). Your report definition would look something like this:
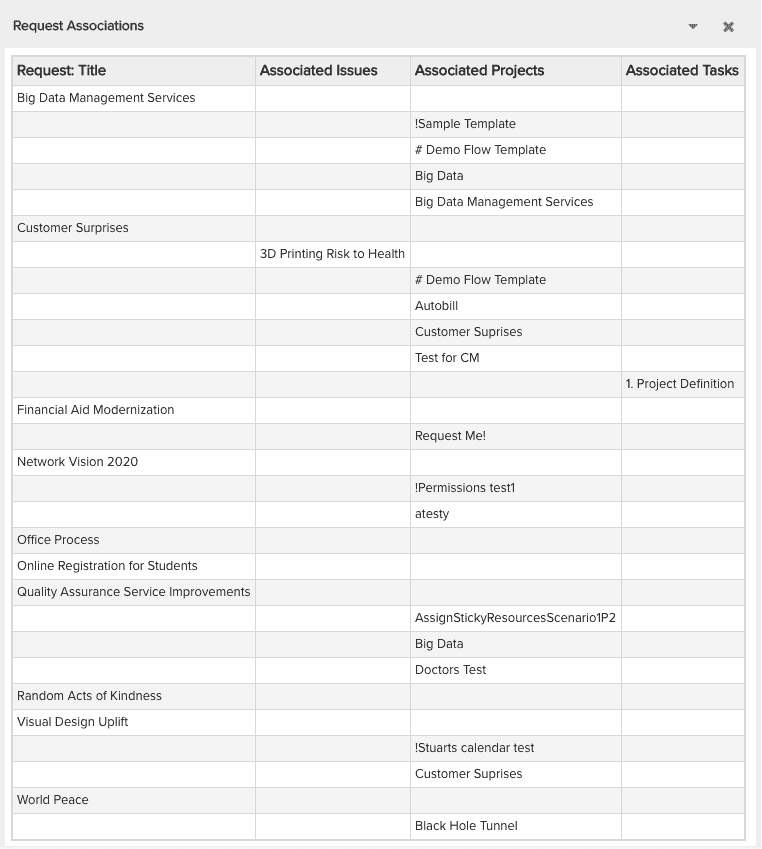
- Run the report.
The example report is shown below:
Configuring the Associations Grid
You can determine the columns that appear on the grid of the modal/page for managing Associations. For example, navigate to a task and select its Associations tab. Open one of the association sections, like Project Logs and you'll see the gear icon. Click  to display the Configure Settings dialog, where you can add/remove fields, and reposition them. The available fields include those columns configured to be available on the entity's Grid view. For example, if you open a Task associations tab and click , you'll see a dialog like the following:
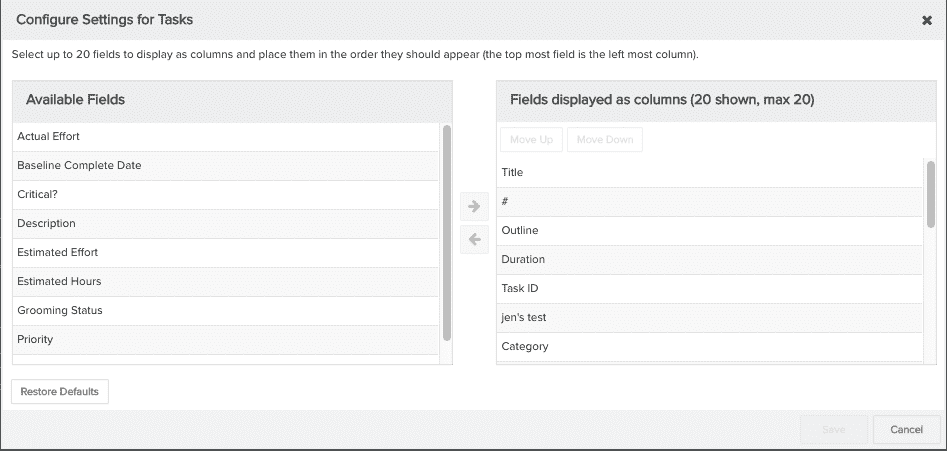
The set of fields available fields match what your organization set up for grid columns on the Task entity.
Note: The complete set of available columns for the project grid under Portfolio associations will include the configured grid Project fields plus 11 default fields: Project Title, Owner, Type, Status, Start Date, Target Date, Complete Date, Percent to Include, Budget Hours, Budget Cost Total, and Budget Revenue (if applicable).
Configure Columns
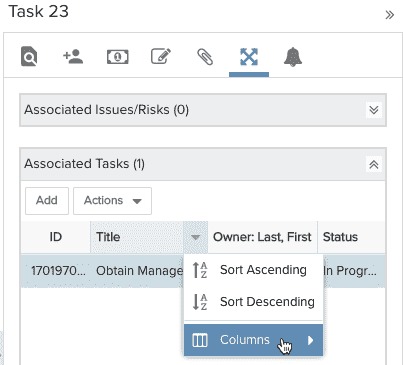
You can add/remove columns in the Association tab by clicking in the column header and selecting/deselecting columns in the Columns menu.
Add/Remove Columns
To add columns to the grid, open the Configure Settings dialog and select the fields in the Available Fields pane and then click the right-arrow. To remove columns, select them in the right-hand panel and click the left-arrow. You can display 20 columns max. The list of fields available in this dialog is determined by the request category, which is configured by an PPM Pro Admin.
Lock Columns
You can select one or more columns to remain "locked" to the left of the screen in the non-scrolling region, preventing them from scrolling out of view. The Title field for an entity is locked by default. To lock an additional column, select the field and click the Lock button. To move a column into the scrolling section of the grid, select it and click the Unlock button (appears once you select a locked column other than Title).
Move Columns
You can move columns to any position in the grid by simply dragging the column header in the grid. Or, you can change their position by clicking the Configure Settings icon and using the Move Up/Move Down buttons to reorder the columns.
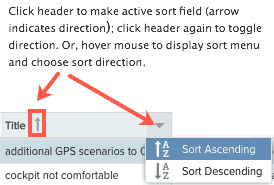
Sorting
To sort a list, simply click on a header. An arrow pointing up indicates ascending sorting; down indicates descending. Alternatively, click your cursor in the header to display the sort menu and choose the sort order - ascending or descending.