
Manipulating data in scenarios
After you have created your initial scenario in the Filters dialog, the What If Workbench opens with projects, role demand and resource allocations displayed according to the filters (if any) you used.
This topic covers:
Interpreting the workbench
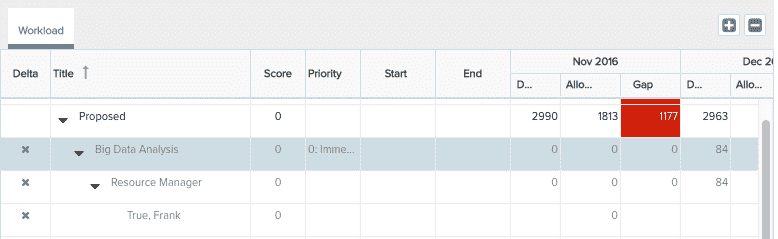
Take a look at the Workload grid of the workbench and notice any color coding; anywhere project demand exceeds resource allocation there is a gap highlighted in red. The cell for the role as well as the project will be shown in red. Over-allocations are not color coded.
Now look at the Resources grid, which shows capacity and allocations. If, for example, a resource has a capacity of 160 and is allocated for 120, then the resource shows 40 in the Available column and can be booked. If the resource has a capacity of 160 and allocated for 200, then there is an over-allocation of 40 shown in red in the Available column. You can exclude a resource if, for example, you know that resource is moving to another project or leaving the company; similarly, you can explore moving resources between projects to see the affect on each project's demand.
Typically the goal for a scenario is to minimize the amount of red by shifting projects out or excluding them, or by shifting role demand. You reduce the red by reducing the number of under-allocated projects and the number of over-allocated resources. There are several factors that can help you choose which projects to staff and which to shift out; for example, your organization might standardize on a minimum project score, and any project that does not meet this score can be excluded from the scenario or shifted to a later date. Or, you might decide to exclude low-priority projects. You can also decide to leave some lower-priority projects under-allocated, in which case you would not worry about the red markers.
Shifting a project, resource, or role
Shifting a project means moving its demand out by weeks or months, depending on the Frequency filter you used when you created the scenario. Note that shifting only moves the allocation contour and not the start or target date of the project. Ideally, the target date of the project is the max date of all allocations. Shifting is additive, that is, you can re-invoke the Shift menu to keep moving the item out or in.
You can also shift resources and roles. For example, if a resource is currently overallocated, you can shift it out.
To shift a project
The instructions below use a project as the shifted object; you would shift a resource or a role the same way.
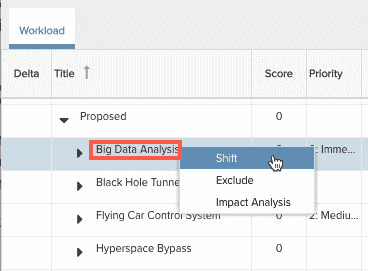
- In the Workload grid, right-click the project you wish to shift and choose Shift.
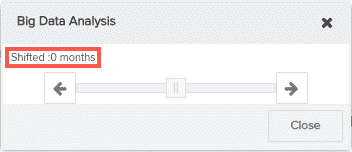
- The Shift window appears. If the project has not been shifted yet, the window will indicate a shift of 0 months.
The Shifted label displays the shift period: months if you selected Monthly for the Frequency filter when you created the scenario, or weeks if you chose Weekly.
- Slide the bar to the right to shift the project out. You can click the left/right arrows to shift, click on the bar, or hold and drag the slider. Note that the Shifted label displays the size of the shift.
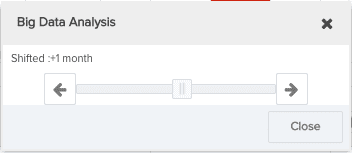
- Click Close.
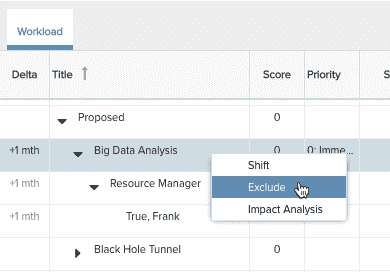
Now the shift duration is displayed in the ![]() column for the project and its allocated roles and resources:
column for the project and its allocated roles and resources:

Excluding projects, resource and roles
You can exclude projects to remove their demand from your analysis. You can exclude a project from any of the grids. When you exclude a project, you also exclude its underlying demand and allocations.
You can also exclude resource and roles, without excluding the projects to which they have been allocated.
To exclude a project
The instructions below use a project as the excluded object; you would exclude a resource or a role the same way.
- In the Workload or Resources grid, right-click the project you wish to exclude and choose Exclude.
- The project and its associated resources, roles, and allocations are grayed out and a red
 appears to the left of the grid. In addition, in the Resources grid the project role associated with the excluded resource is grayed out.
- To add the project, resource, or role back into the mix, right-click on it and choose Include.
Booking a Resource
If there is a gap on the project demand, user can book a resource to fill the gap. If there are multiple booked resources, then the gap is evenly split between the resources. You can drag a resource from the bottom resource grid and drop it on the role to book a resource for that project role. If you use the Book Resource menu choice, a list of resources is presented from which you can select a resource.
Booking only available on roles, choose book resource and find one to allocate. You can also drag a resource on top of a row.
Saving your scenario
If you decide you want to save a scenario, choose Actions > Save. If this is the first time you have save the scenario, you will be prompted to give it a name. The named scenario will appear in the What If list page, where you can run it again. The scenario name is limited to 80 characters.
If you wish to save variations of a scenario, use Actions > Save As to save different versions with different names.
Use Save As to create copies with slightly different scenarios.