Working with the What If Scenarios list page
The What If Scenarios List Page (on the What If tab) is the launching point for creating scenarios. The What If Scenarios List displays all the available scenarios and allows you to edit, delete, and view them - provided you have the appropriate visibility - as well as create new scenarios.
Note: You can edit and delete scenarios only if you are the scenario owner. You can view scenarios if you have been given visibility to the scenario, or if the Visibility is set to All Users and you are in one of the following standard groups: Organization, Resource, or Capacity & Demand.
This topic covers the following:
-
a description of the scenario list columns
-
how to use the Actions menu
-
customizing the list page by adding/rearranging columns
Anatomy of the What If Scenarios List page
Below is a screenshot of the What If Scenarios List page, populated with a some scenarios definitions.

Double-click on a scenario to open it or select the record and click the Open button.
Click New to create a new scenario.
The Actions menu
The Actions menu contains a set of common actions. Select the scenario you wish to act on, and then select Actions and choose a menu item.
The Actions menu commands are described in the table below:
|
Action |
Description |
|
 |
Edit Details |
Brings up the Details dialog for the scenario. You can edit the name of the scenario, or change the scenario visibility. See Setting the Scenario Visibility. |
|
Delete |
Deletes the selected scenario; you will be prompted to confirm the delete. Only the scenario owner can delete a scenario. |
Customizing the What If List Page
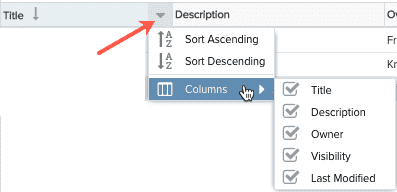
You can customize the Resources grid layout using the column header menu. Hover the cursor over any column header to display the down arrow; click the arrow to display the menu.

Sorting
To sort a list, simply click on a header. An arrow pointing up indicates ascending sorting; down indicates descending. Alternatively, hover your cursor over the header to display the sort menu. Choose the sort order.

Move Columns
You can move columns to any position in the grid by simply dragging the column header in the grid.

