
Stepping Into Resource Management
This is one of a series of articles designed to help your organization get the most out of PPM Pro.
Resource management can be a beautiful thing - it allows you to focus your people on the right work, understand when you don't have enough people with the needed skills to get your work done, analyze your resource-related financials, and effectively plan for the future. Below are several tactical steps you can take along the people resource management path to help you achieve your company's goals and objectives. You may already have accomplished one more of the steps (great!). For those of you who haven't and want to pursue, or if you have any questions, please contact Customer Care or Consulting Services.
The steps covered in this topic include:
Step 1: Ensure your People Resources are in the System
Step 2: Assign Resources to Projects and/or Tasks
Step 4: Analyze Capacity and Demand
Step 5: Predict and Strategize for the Future - What If vs. Predictive Portfolio Analysis (PPA)
Step 6: Maintain & Terminate Resources (Considering GDPR)
See also: Resource Planning Terms and Influences
Step 1: Ensure your People Resources are in the System
The pretty obvious first step in resource management is to make sure your people are in PPM Pro. Whether you already have resources entered and just need to add additional resources over time, or if you are just starting to add resources, below are methods and information to help ensure you have the most appropriate and useful resource data represented in the system.
Your People Inventory
What roles will you need to get work done? Who do you need to represent in the system for those roles? Do they need to be actual users, with access to PPM Pro so that they can enter data, or just represented in the system? Will you include just your own employees, or external resources such as contractors, or placeholders for future resources? Answering these questions will help you determine who and how to add your people. Following are some tips as you consider this first step:
- Ensure appropriate roles are set up before you add people to PPM Pro because each resource must have at least a primary role assigned
- Set up the minimal number of roles you need for easier management, it's much easier to add more in the future than to have to eliminate
- Do not confuse roles with skills - roles are a must to set up, skills are nice to have
- Organization Roles describe the different functions your resources perform in your organization. Roles have associated internal and billable rates that help in estimating costs when the roles are assigned to a project, and also help to streamline the process when it comes time to staff the role. Examples of roles are: Project Manager, Architect, Engineer, Business Analyst, Art Director.
- Resource skills profiles are optional. They allow you to record special training or capabilities and can be used via advanced search when staffing projects, making it easier to perform resource staffing and planning.
- Identify the people who will be assigned as resources only on projects versus those who will be accessing PPM Pro as users
- You do not have to enter ALL resources right from the get go; you can just enter an initial set to help you get up and running with your initial projects and work, so you can try out processes and strategies, and add more later as needed
- Every PPM Pro user is a resource, but not every resource needs to be a user:
- Resources can be made users at any time, you do not have to make your resources users right away.
- Users should be those people who will need to log in to PPM Pro in order to view, enter, or manage entity data. The degree of entity access (such as view, create, edit, delete, and so on) is based on both the user type and the permission profiles they are given. The primary user types include: Full, T&E/Time, Stakeholder, and Request. See User Types/Permissions for more information.
Understanding (and Leveraging) Key Resource Fields & Related Elements
Once you've inventoried which people should be represented in PPM Pro and how they should be represented (just resources or as users), there are several key fields and properties that you should consider for each as they will impact your resource management options and capabilities.
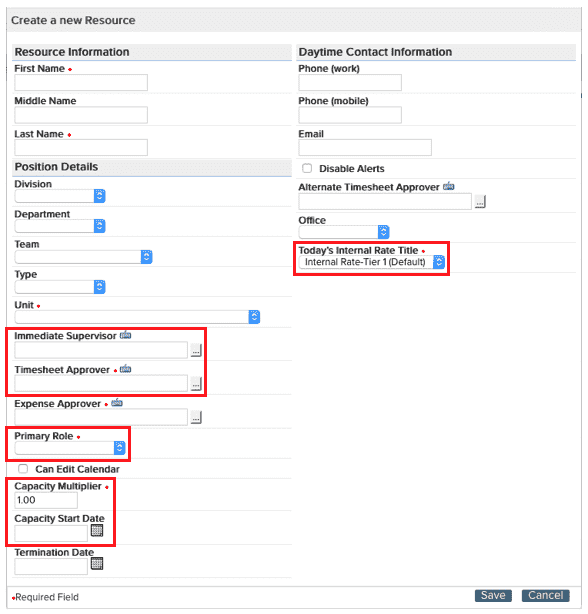
Resource Fields
- Immediate Supervisor - This is not a required field but it is important to complete if you want another person to be able to view this resource in their Home/Resources workbench view so that they can monitor work utilization and adjust project allocations. The Immediate Supervisor can also edit their resource's record and capabilities, except for rate information (this last bit is only editable by members of the Resource group).
- Timesheet Approver - If the resource will need to track their time and you have a manual timesheet approval process, you'll want to ensure you choose for Timesheet Approver the user who will be doing this resource's timesheet approvals. You'll also want to make sure that this resource is made a user type of T&E/Time User or Full User so that they can enter timesheet data (see further below about users).
- A note about time tracking...time tracking is not the end all be all, even though it provides many benefits. If you are not already tracking time in your organization you can implement it in phases. Start with high level resource planning (below), which provides the visibility to see what is really being asked of your organization. Follow with time tracking, using timesheet data to improve on overall project outcomes and planning cycles. Worried about user reactions to time tracking? See Encouraging Adoption by Time Users and Timesheet Approvers for ideas.
- Primary Role - This is a required field because it describes what the person's main function is within your organization; this is the role that the resource normally performs on projects. This is used:
- When assigning resources to projects, in project Staffing and the Home/Resources workbench. For example, when you select to add a resource to a project's staffing, the primary role is listed next to the resource so that you can sort.
- To identify where the resource fits in capacity and demand calculations and analysis and within Predictive Portfolio Analysis (PPA) optimization (see further below for both of these).
- Capacity Multiplier - This is a required field that allows you to adjust the resource's capacity according to their true availability. PPM Pro determines capacity from the resource calendar, and then multiplies it by the value in the Capacity Multiplier field. The capacity multiplier facilitates high level planning. For example, you might want:
- a single resource to represent a team of 5 people (as far as capacity, for example, as an Agile team that can be assigned to projects), you use 5 in the capacity multiplier
- to reduce capacity by 20% to account for administrative time, use .8 in the capacity multiplier
- a resource to have no capacity, for example the resource is in the system only so they can approve requests and they are never available to be scheduled to work, then use zero (0) because you don't want to inflate the capacity of that person's role or show this person as available when searching for a resource
- Capacity Start Date - This is usually the date the person was hired and can have capacity. However, if you need to buffer for getting the resource up to speed or if the resource really shouldn't be assigned to projects or considered in capacity and demand analysis yet, then enter a date that accommodates those needs; whatever date you entered is when the resource will be counted as available for work within PPM Pro.
- Today's Internal Rate Table or Internal Rate - The internal rate determines how much a resource costs, so that when they are added to a project the resource cost to that project can be calculated. For new resource entry you must enter a rate or select an internal rate table, but this can be changed later as needed.
Related Elements
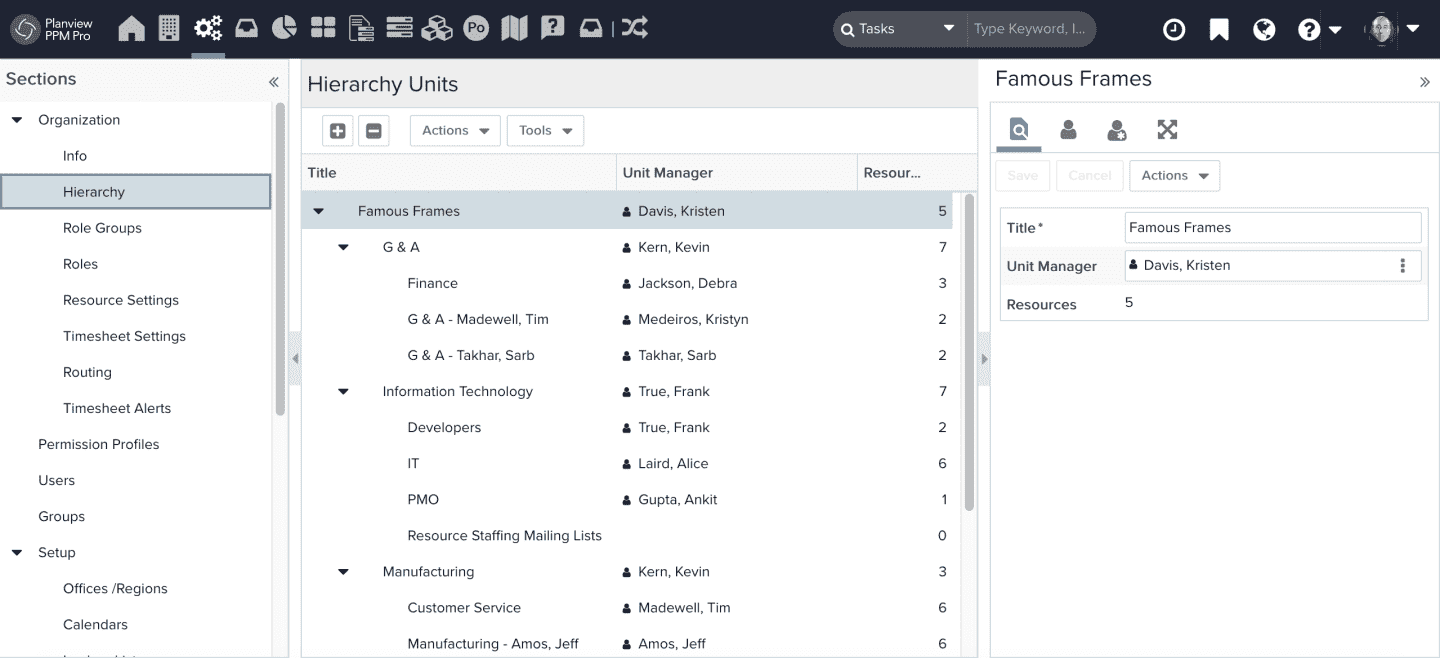
- Unit and the Unit Hierarchy - The Organization Hierarchy is a tool for organizing resources and creating a management structure in the PPM Pro system. It is comprised of units (like departments), managers, and unit members/resources. Your entire organization can be represented in the organization hierarchy even if you are not currently tracking their work. This allows for fast adoption in other departments when the time comes. Aside from the value of reflecting your organization structure, having all of your resources within the organization hierarchy is also a great way to grant permissions to users, such as a Global rule for managing resources or performing staffing, as well as for adding a unit of resources to groups and project teams. When a resource is created they must be assigned to a unit. Although they can be reassigned to another unit later, it is helpful to have the basic unit structure setup before resources are added.
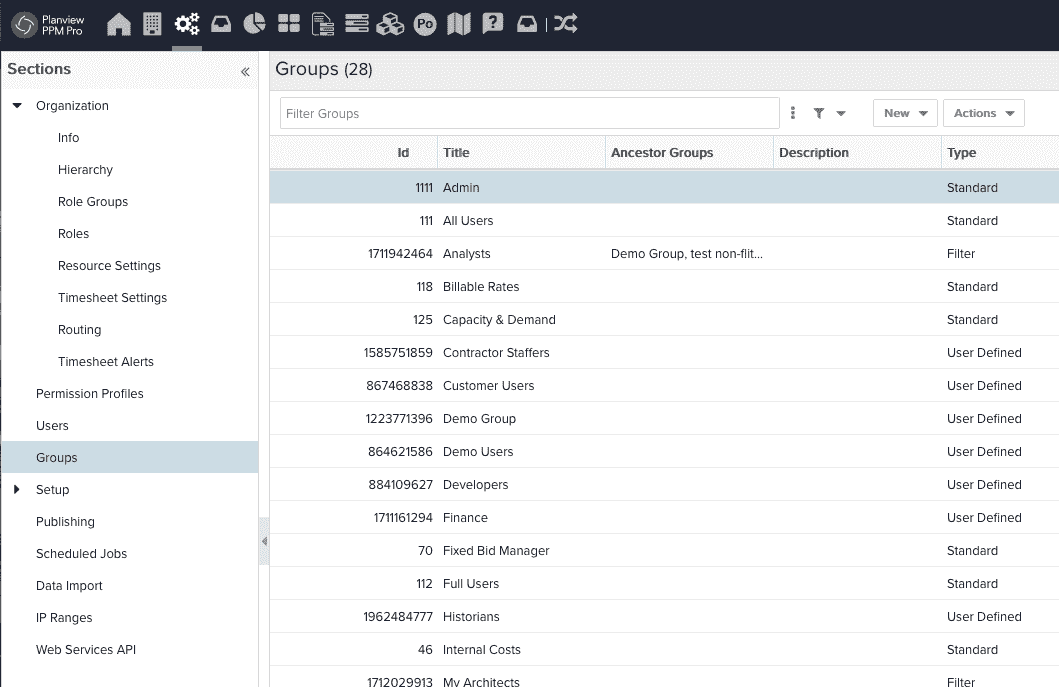
- Groups - Groups can be set up at a later time, but are worth thinking about up front - user resources can be added to groups, which in turn are used when assigning permission profiles to multiple users at one time, as well as for adding a group of users to project teams or field restrictions.
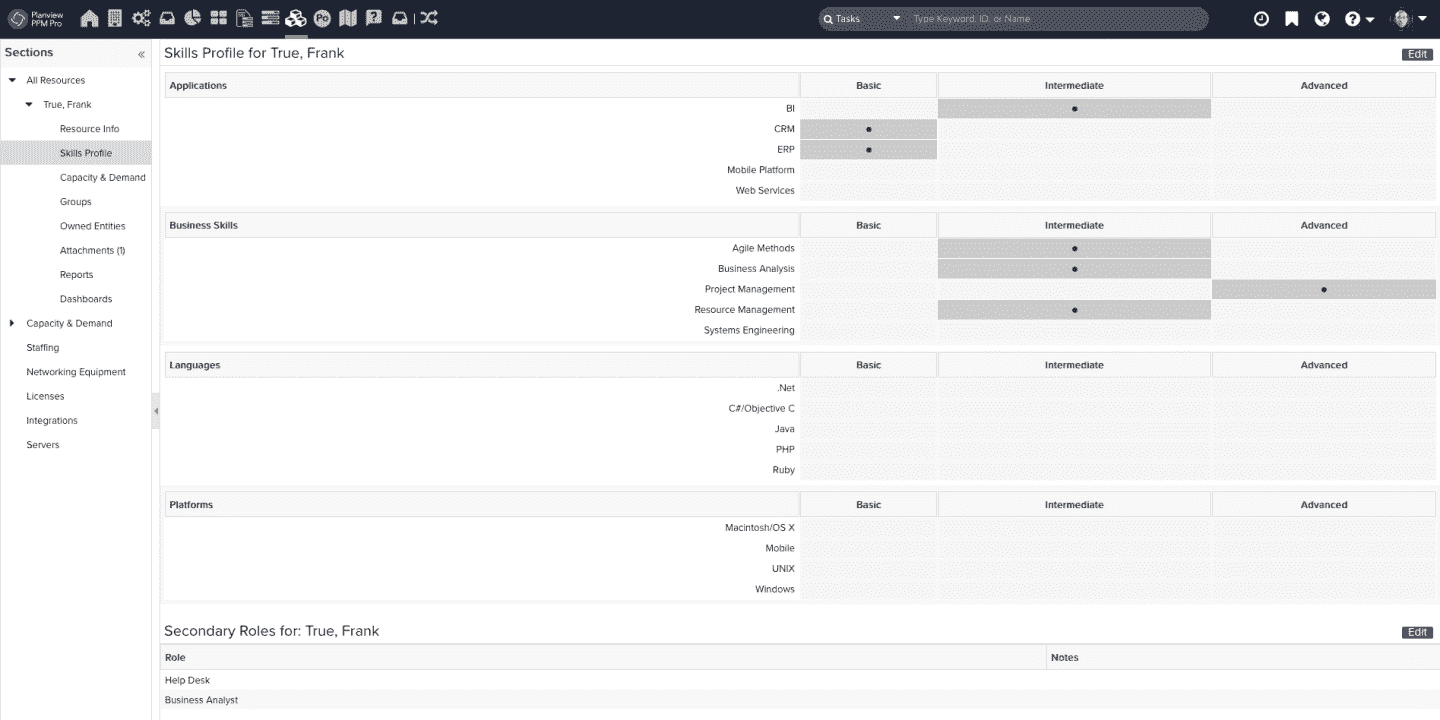
- Skills Profile (skills and secondary roles) - Skills profile also can be set up at a later time, but it is also worth thinking about. As mentioned earlier, this is a section within an individual resource's view that allows you to set up specific skills a person has as well as additional organization roles. The skills can be used when performing an advanced search in the Find Resource modal when staffing. Secondary roles can also be used when finding resources for staffing as well as when performing PPA optimization (see further below).
Manual Entry vs. Data Import
Once you have digested the above information, you can decide how to populate your system. There are three primary methods to add people to PPM Pro:
- Manual entry - If you are adding individual resources here and there, or need to be able to set up not just the details of a resource but also other information such as whether or not they are a user, what groups they belong to, their skills profile, and so on, then you'll likely want to add the resource manually.
- Data import - If you need to add numerous resources at once and can wait to set up user, group, and skills profiles at a later time, then you'll likely want to perform a data import type of Resources. The data import lets you fill in an Excel template with resource information and then import it into the system.
- Integration - If you have an external system that has all of your resource information already, consider if you might be able to integrate to it for easier updates, additions, and terminations.
Step 2: Assign Resources to Projects and/or Tasks
Note that the following approaches are not mutually exclusive; you can have a hybrid for many of these. You can use top down project-level planning for some projects and bottom up task-level planning for others. You can express demand in hours for some projects and headcount for others. You can have some people directly staff projects while others use resource request fulfillment through managed staffing. Choose what works best for your organization.
Staffing Considerations
Following are some worthwhile considerations before you begin staffing your projects or tasks.
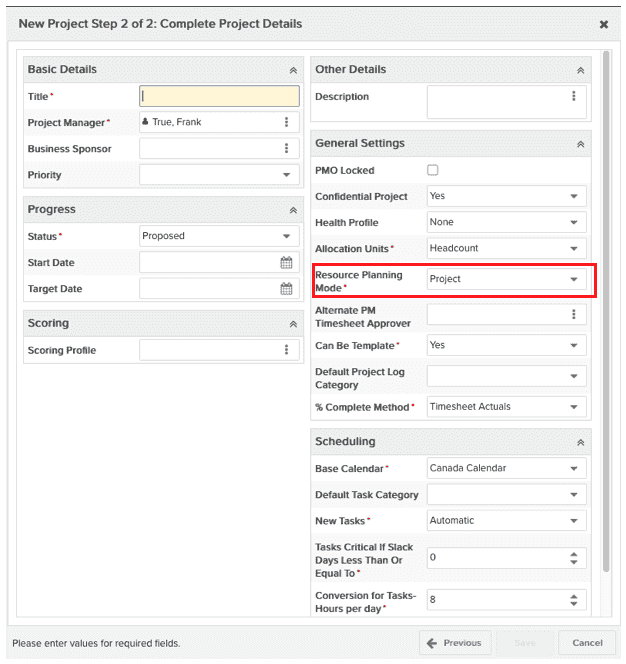
Project (top down) or task (bottom up) planning mode?
All projects have a resource planning mode that can be set at project creation and adjusted later as needed.
- Project planning mode
- Is typically high-level planning; you may or may not know who will work on the project, but you are likely to know what kind of roles will need to be filled. Usually you would choose Project planning mode when you need to have role and resource allocations in place at the project level for further analysis and approval, when others in the organization will be doing staffing or staffing approvals, or when you need to represent demand before having detailed project task work breakdown structures.
- Allows you to staff roles and resources, including the ability to specify rates, dates, and headcount or hours.
- Allows you to optionally schedule resources to tasks, including estimated role hours, estimated scheduled resource hours, and estimated resource hours to complete (HTC).
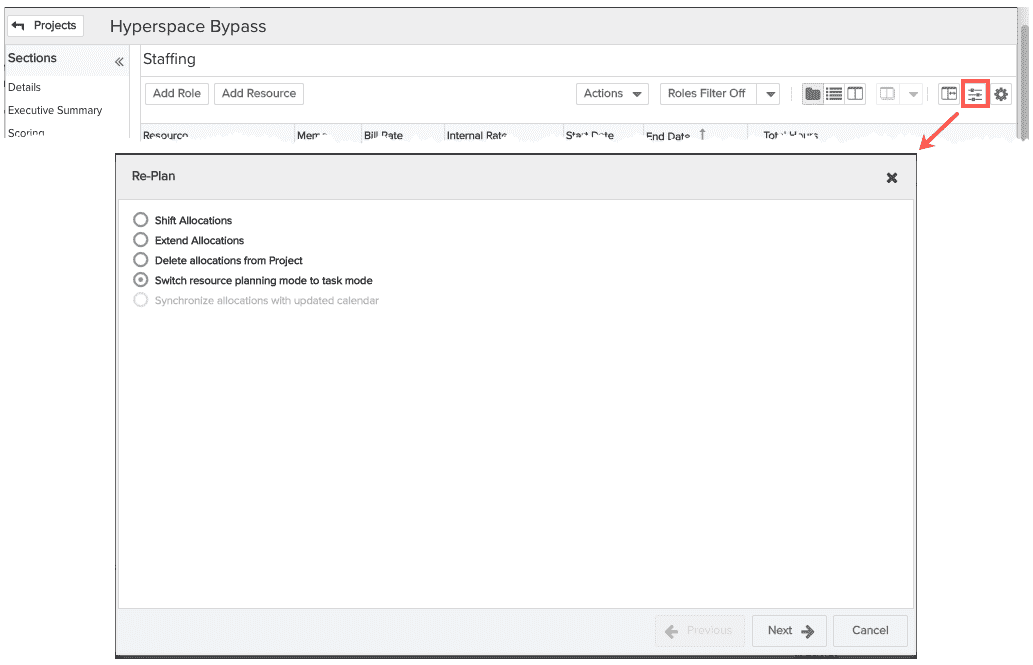
- If you save or have a project in Task planning mode you can still switch to Project planning mode through the Re-Plan option on the Staffing view.
- Task planning mode
- Is typically low-level planning; you have your detailed task work breakdown structure and are building your demand off of this information. Usually you would choose Task planning mode when you already have approval or don't need approval for resource allocations, have a detailed task plan, and want to schedule resources to those tasks.
- Allows you to schedule resources to tasks, including estimated role hours, estimated scheduled resource hours, and estimated resource hours to complete (HTC). High-level project staffing is automatically created for you and can NOT be edited; project-level staffing of roles and dates are derived from the task-level planning, but you will not be able to specify rates at the project level.
- If you save or have a project in Project planning mode you can still switch to Task planning mode through the Re-Plan option on the Staffing view.
Resource staffing in hours or headcount?
Project staffing demand can be expressed in either hours or headcount (this is changed through the Staffing view Settings modal).
- Hours - If representing all of your project resource work directly in hours is more meaningful, go for it! For example, a resource could be allocated to work 80 hours on a project. All project-level staffing data is stored in hours so there are no conversions.
- Headcount - If you prefer to represent allocations as a percentage of time a resource will be working, then headcount is the way to go. For example, a resource could be assigned to work half-time or 50% on a project when allocated as 0.5 headcount.
- Note that when in project-level planning mode you can enter Total Hours or Headcount for each staffing allocation and/or can contour allocated hours and headcount to vary over your time interval (weekly, monthly) as needed.
- Tip: Express allocations in either hours or headcount, but do this consistently across all of your allocations; do not switch back and forth between hours and headcount or between intervals when creating resource allocations. This is because the unit and interval you plan in might have an impact on calculations if you later shift or extend dates.
- A project calendar's working hours and events will impact allocations. For this and related information, see Expressing Demand - Allocation Units and Resource Planning Terms and Influences.
Direct or managed staffing?
There are various approaches to who can staff resources, from simply allowing project managers to staff directly, to having the resource's manager perform the staffing, to having a centralized management team with a formal request process do the staffing, to a mix of these.
- Direct only staffing
- Is typically how staffing is performed within PPM Pro. Usually this approach is taken whenever there is not a formal resource management process such that project and resource managers can staff as desired.
- Users with appropriate permissions (for example a project owner or a user on a project team with Project > Edit > Staffing permission) can add staffing entries directly from within relevant project views and the resource workbench (more on these below).
- Benefits include immediate staffing and no special configuration other than basic staffing permissions.
- Challenges include a user could staff inappropriately or without a resource manager's or project manager's knowledge, and without considering capacity and priorities.
- Works in either project-level or task-level resource planning modes.
- Managed staffing
- Users, typically project managers, can request resource staffing for the role demands of their projects, with the option of requesting specific resources. Resource staffing requests are routed to the appropriate resource managers based on your organization's resource staffing approval needs, where they can be fulfilled in a number of ways.
- Benefits include visibility into requests that are in process as well as having access to metrics such as the time it takes to fulfill staffing requests, documented workflow history, more accurate and controlled resource management.
- Challenges include the need for dedicated staffers/schedulers, others relinquishing control, and the staffing process may take longer. Also, relevant permissions and routing options will need to be configured.
- Works best for projects that are in project-level resource planning mode, in order to take advantage of staffing requests capabilities. For projects that are in task-level planning mode, you will need to ensure that relevant users have the Staff Directly permission as staffing requests cannot be used because the Project Staffing view is non-editable (there are no add or request resource functions).
- Note that even with managed staffing, you can still allow some users to staff directly while others need to request staffing. Use Managed staffing and just ensure relevant users have the Staff Directly permission.
- This capability is not on by default within PPM Pro; to have it turned on, please submit a Support Case to Customer Care.
Performing Staffing
There are various areas within PPM Pro where you can staff your projects and tasks, depending on the user permissions, planning mode, and whether or not you are using managed staffing...use what makes the most sense to you!
Project Staffing View
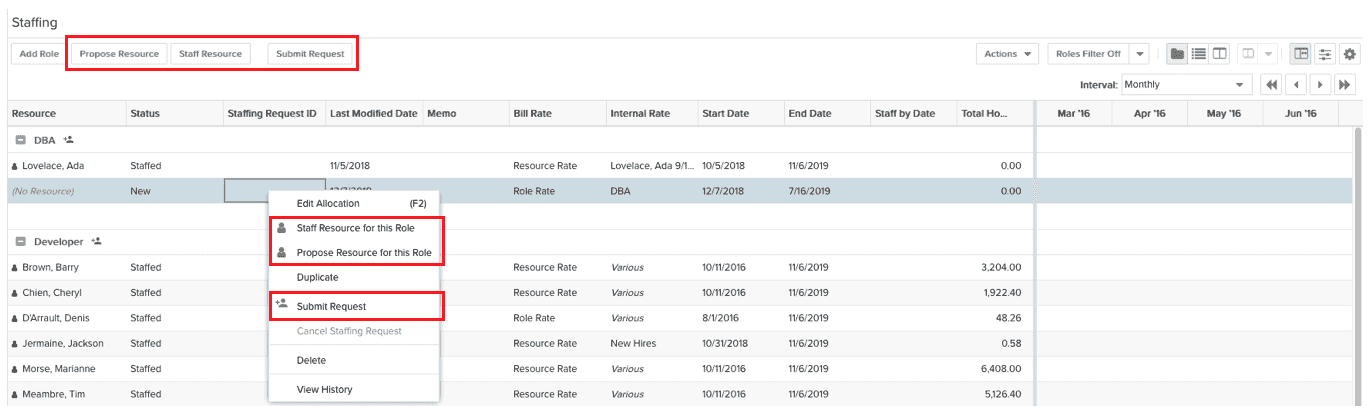
Project managers or users who tend to work primarily within projects will find the project Staffing view to be the best place for managing staffing. For projects that include a Staffing view and are in project-level planning mode, permitted users can:
- Add role demand
- Staff resources directly, when not using Managed Staffing
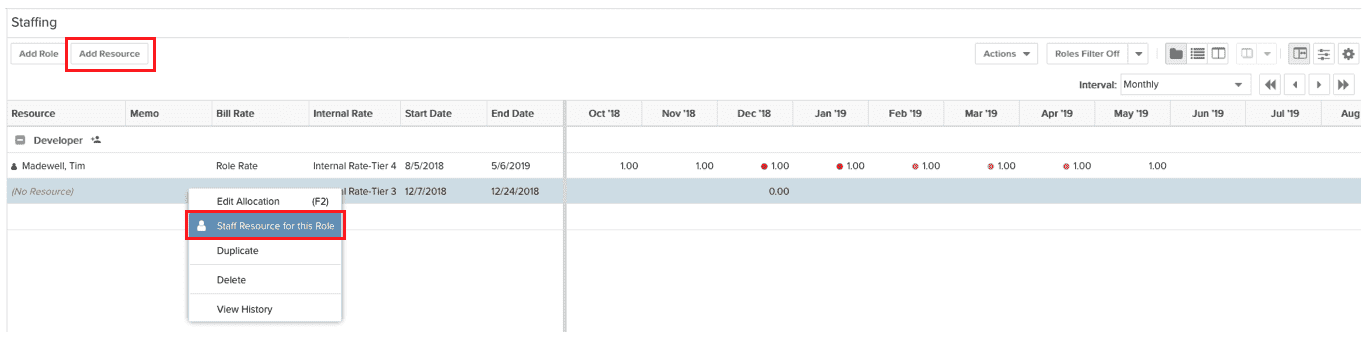
- Propose resource, staff resource directly, or submit resource requests, when using Managed Staffing
Tasks Scheduling View
Project managers and users in charge of detailed task work breakdown structures will want to use the Task Scheduling view. Permitted users can schedule resources to tasks so long as the tasks' categories include Scheduling, using the:
- Inline task scheduler in the task grid
- Task Scheduling tab in the right hand side for a selected task
- Task Actions > Bulk Schedule Resources menu option for a selected task
Note again that if you are using project-level planning mode, the resources and roles presented to you in these tools are driven off the allocations created in the Staffing screen. You have the option to find resources and assign roles outside of those allocations through task scheduling; allocations will be created automatically for those resources that do not already have allocations. Note that allocations cannot be created automatically for tasks with a duration greater than 10 years. You would have to create the allocation manually on the Staffing screen, and then create the schedule.
If you are using task-level planning mode you typically have no allocations to start with. The Resource and Role lists presented in these tools are driven off of project Team members; you have the option of finding roles and resources outside of the team. After you create the schedule, a corresponding allocation is recorded on the Staffing screen (in read-only mode).
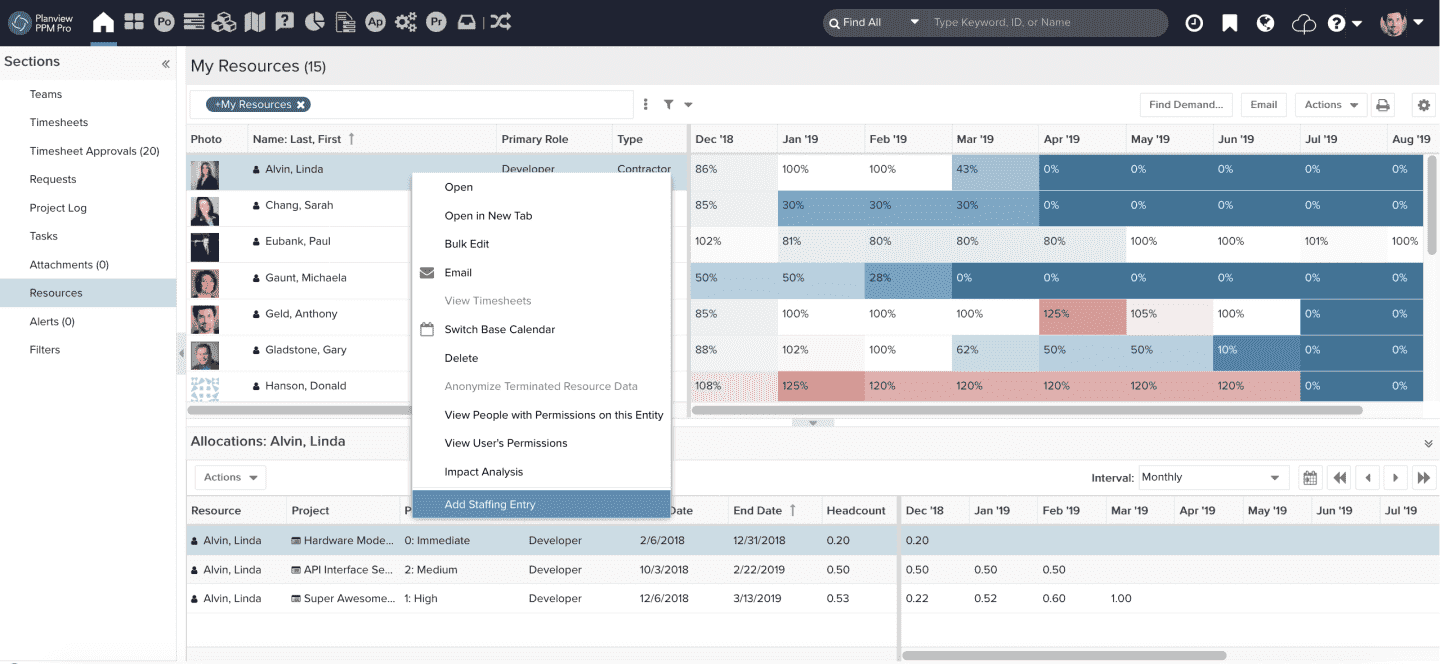
Resource Workbench
Resource managers and users who tend to consider staffing from the resource point of view will likely want to use the Home/Resources, or Resource Workbench, view. The workbench provides a single place to view/edit/delete allocations across many (open) projects, allowing resource managers to make allocation edits in bulk, rather than visiting the staffing page for each project allocation. Users with appropriate permissions (project owner or on project team with Project > Edit > Staffing permission, if using Managed Staffing, must have Staff Directly permission) can add staffing entries directly from the resource workbench to projects that are configured to use project-level planning. Projects in task-level planning are read only and can not have staffing entries added to them.
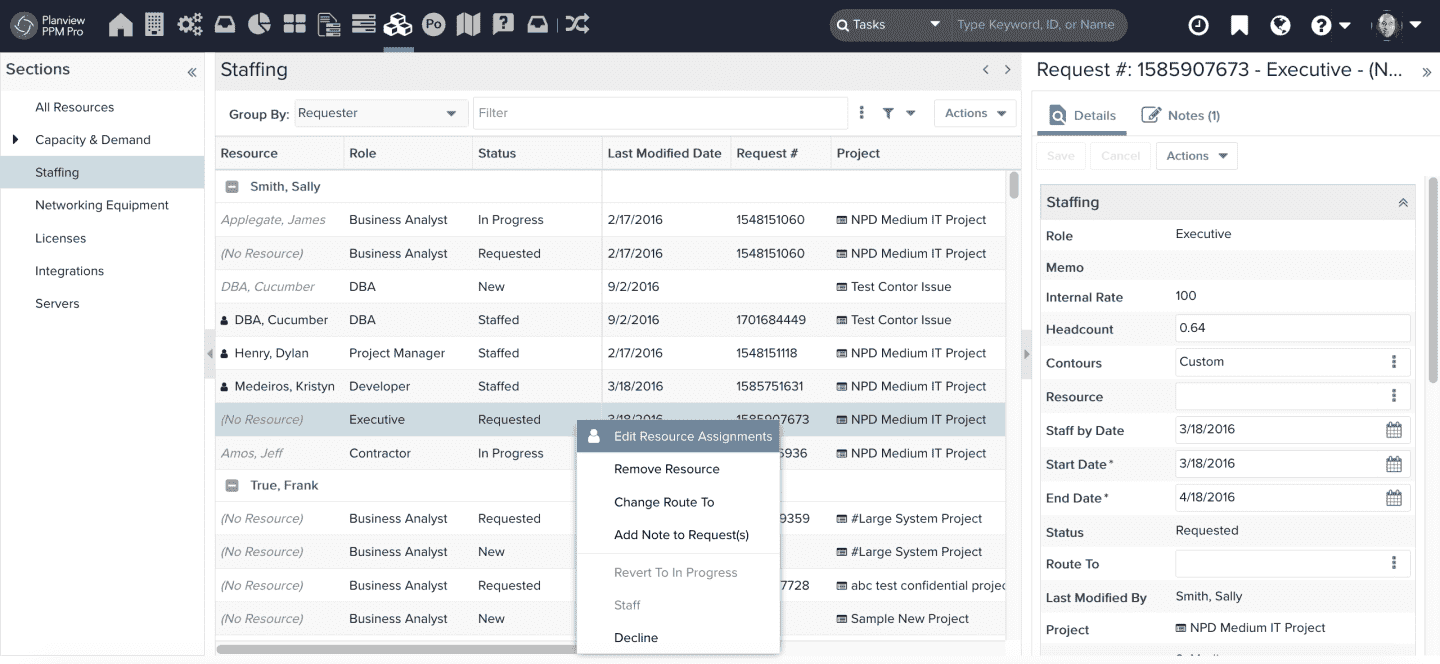
Resource Staffing View (Managed Staffing Only)
Resource managers and users who are using managed staffing, with the need to view all staffing requests that have been routed to them, will want to use the Resources Staffing view. In addition to fulfilling requests, within this view a resource manager can modify, reject, or route a request to a different staffing manager. The Resource Staffing screen is similar to the project Staffing screen, but has additional features for analyzing capacity and fine-tuning allocations.
Step 3: Analyze the Basics
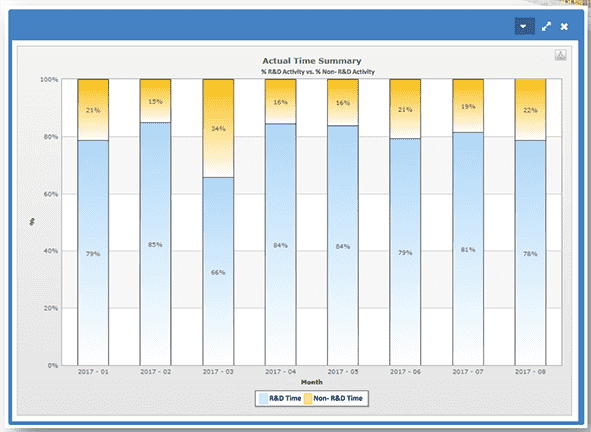
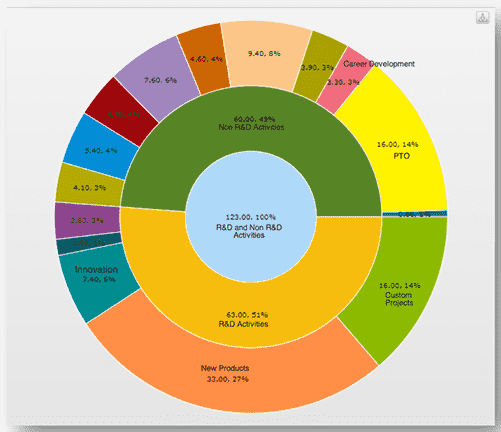
Once you have your people resources within PPM Pro and assigned to projects and tasks, you can begin reaping the rewards of knowing what and how they are working towards your organization's goals and needs. Following are some basic analytics you can perform right away using reports.
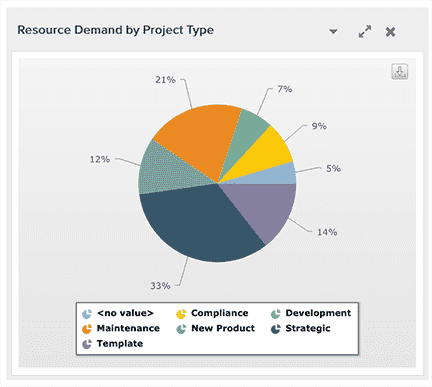
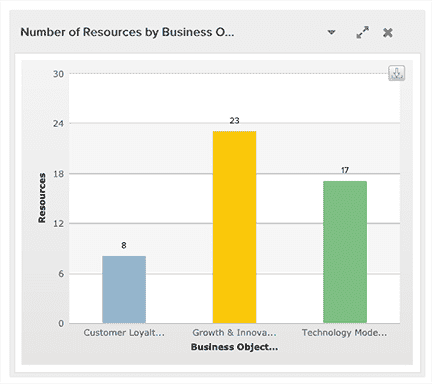
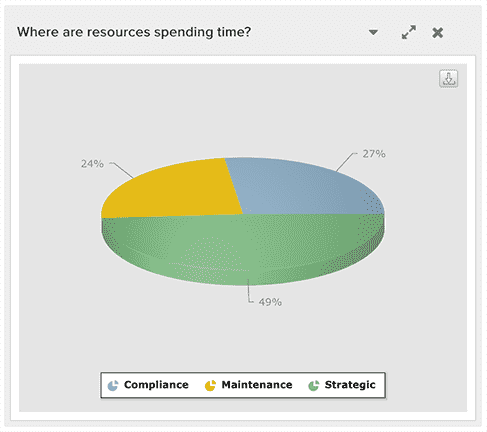
Alignment of Resources to Strategic Projects
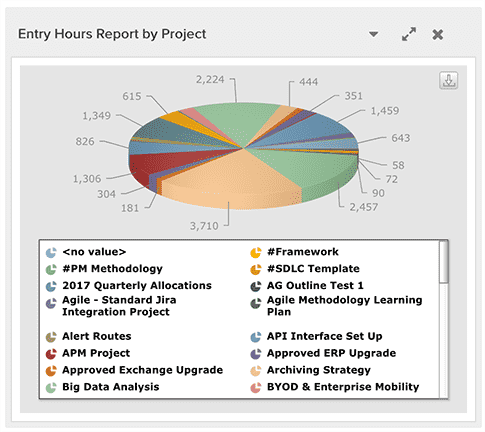
Depending on what your goals are, you can report on resources and roles by project type, portfolio, business objective, you name it, to monitor and ensure alignment to your company's goals. If you are using timesheets you can use the report category Time to also check where actual hours are being spent to ensure top priority projects and work have the right level of effort. Note that for Time report sources you will need to provide a filter or date range when you run a report because there is generally so much data. If you are not using timesheets, you can still see where resource demand allocations are made as well as any scheduled hours, again using Resource Planning.
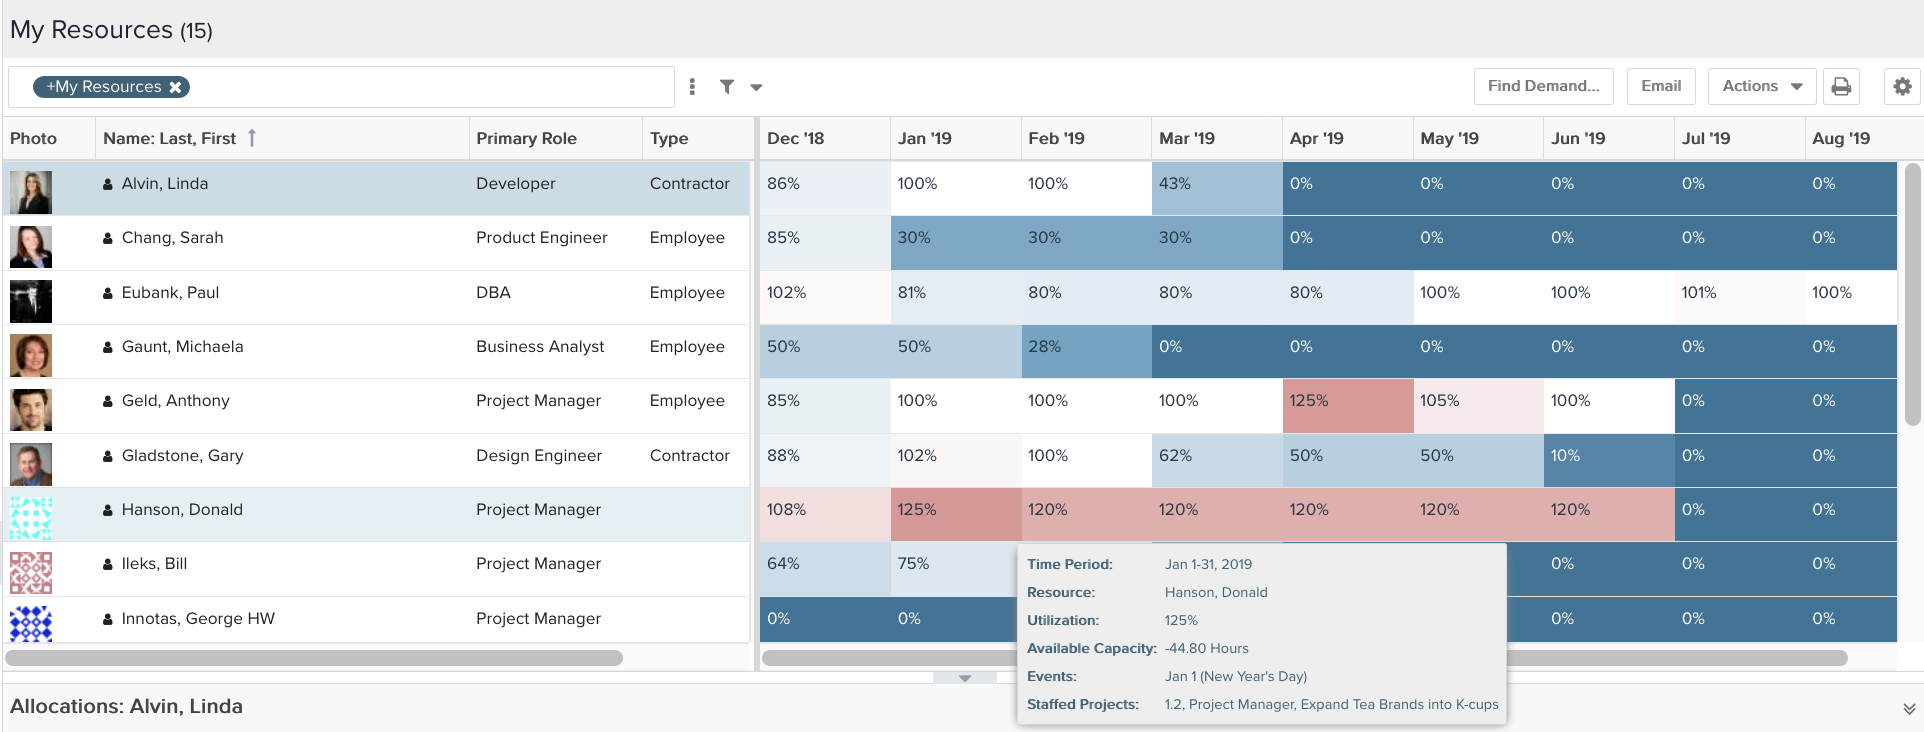
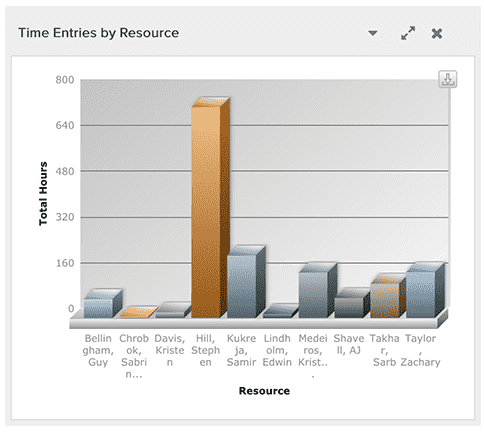
Resource Workload Balance
Just reviewing your Resource Workbench (Home/Resources) will highlight when your resources are over (or under) utilized. If you are using timesheets, you can also use the report category Time to report on the actual work your people are doing, again to make sure they are not over (or under) worked. If you are not using timesheets, you can still report on resource demand at whatever level in your organization is most meaningful using the Resource Planning report category.
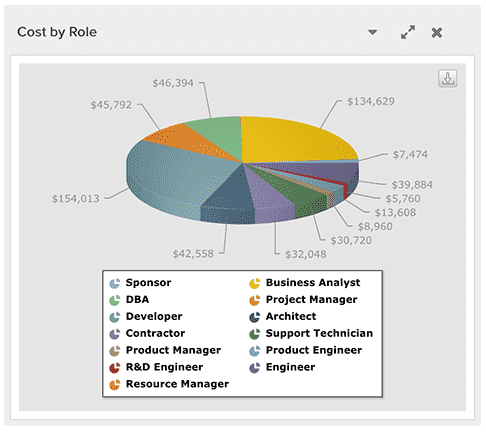
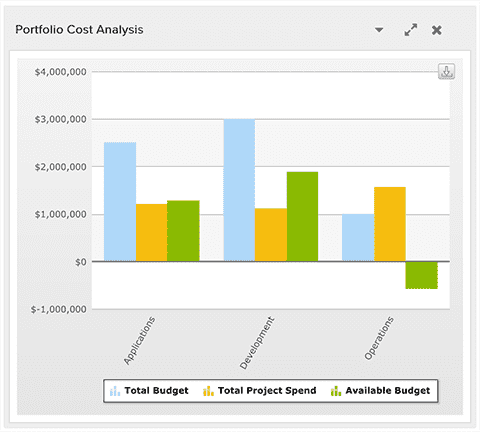
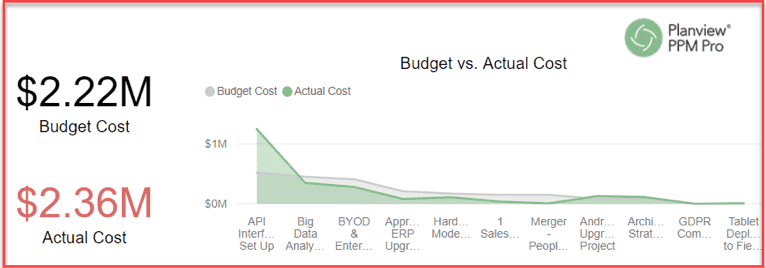
Resource Planned vs. Actuals Cost Analysis
One of the primary benefits of work resource management is capturing and including the cost of people in your financial assessments. Because each role and resource has an internal rate, PPM Pro automatically calculates the costs associated with their allocations and scheduled time. If you are using timesheets you can more precisely show the costs of actual hours spent working on your portfolios and projects. If you are capturing whether or not tasks are capitalized, then you can categorize labor costs as capital or non-capital and report on these using your task scheduled work and timesheet entries. This enables you to quantify the true cost of project work, analyze CapEx versus OpEx, contrast budgets to forecasts, and compare past forecasts to actuals so you can adjust future work appropriately. Use similar report categories mentioned earlier, particularly those including "Financials" in the report source labels.
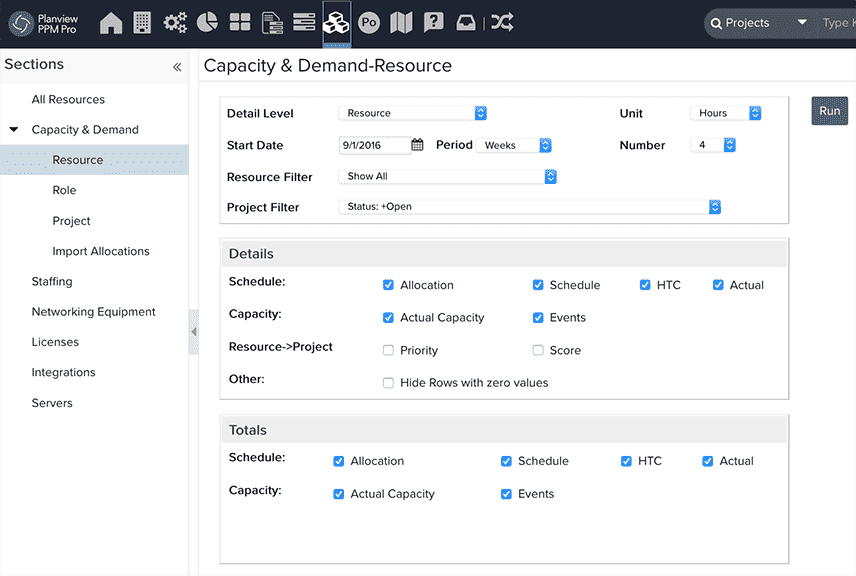
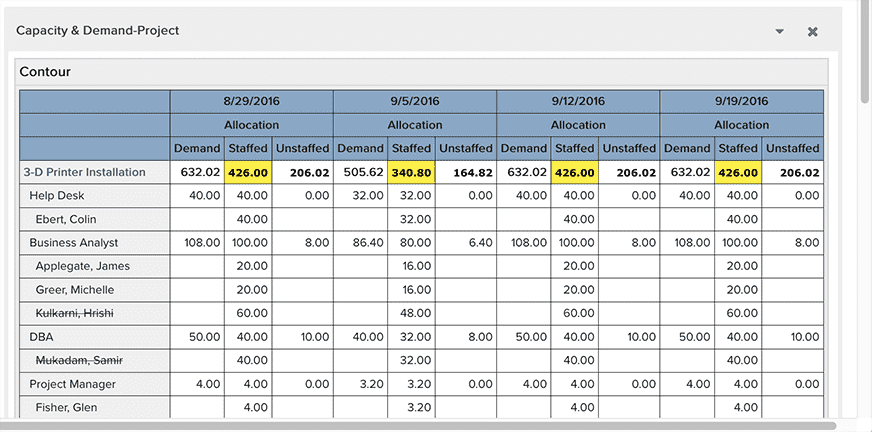
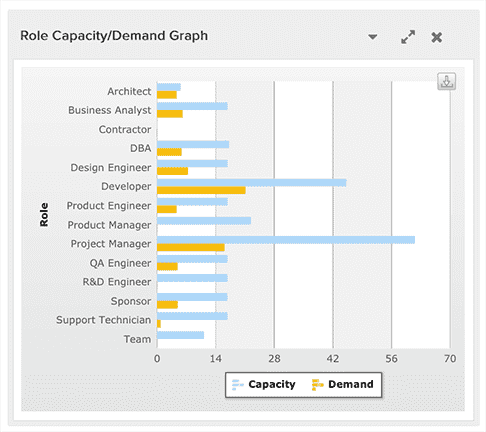
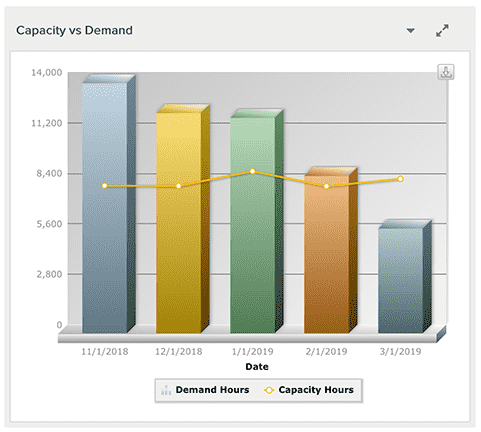
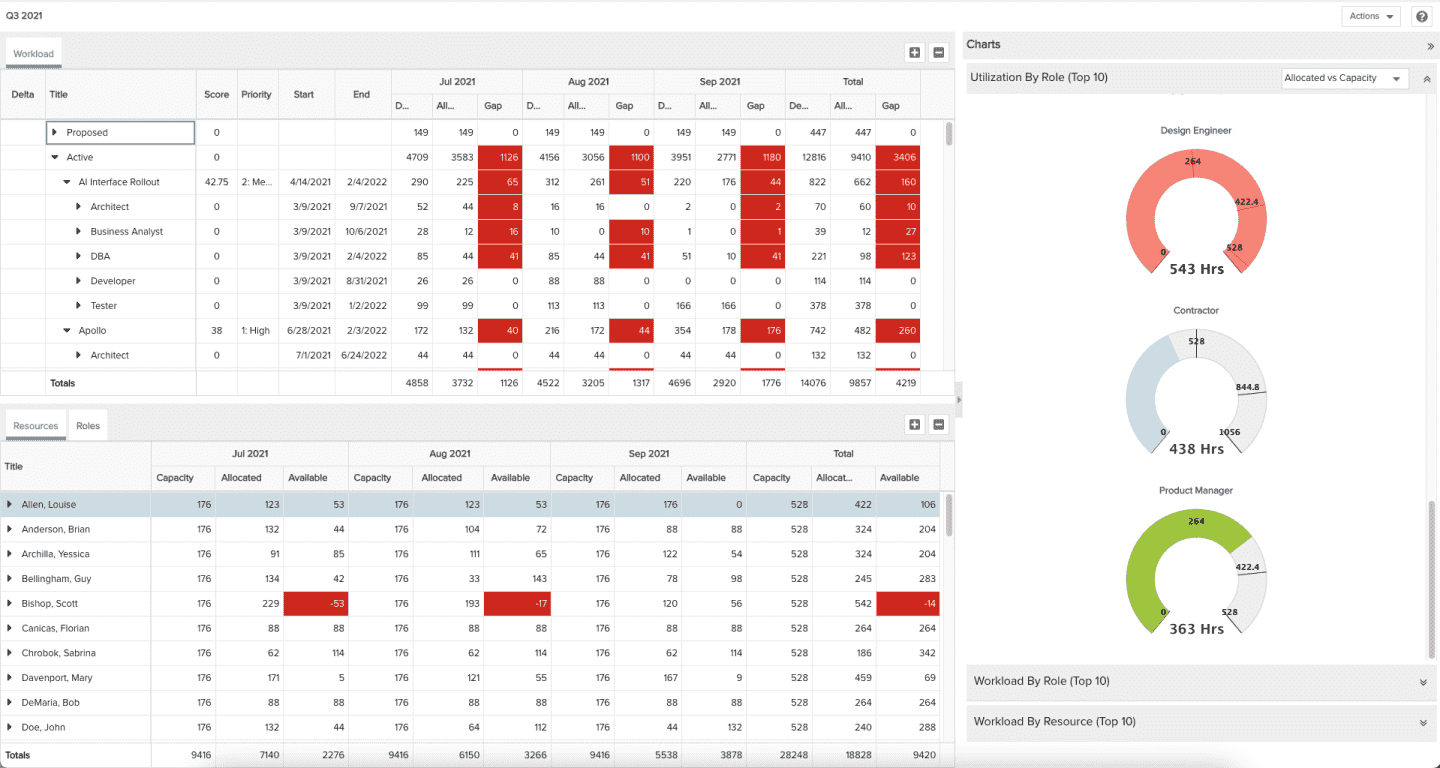
Step 4: Analyze Capacity and Demand
Gain visibility into which projects and tasks need staffing attention, as well as forward-looking information about project and task demands on the organization, through analyzing your people's capacity and demand. PPM Pro has a built in Capacity & Demand facility that allows you to generate basic reports to show demand from projects and tasks, as well as resource capacity. You can view this information based on role, resource, or one or more projects. If you need other details in these types of reports, you can use build similar capacity and demand reports using the Resource Planning category.
Step 5: Predict and Strategize for the Future - What If vs. Predictive Portfolio Analysis (PPA)
Try out different scenarios for rebalancing and optimizing your people assignments to projects and work. There are two different ways to see impacts: What If analysis (which is more tactical) and Predictive Portfolio Analysis (PPA, which is more strategic).
What If
What If scenario planning allows you to create a resource allocation plan based on the scenario you create. It enables you to understand the impact of potential changes before they occur and plan your resources based on available data. You can use What If planning to understand the impact of unplanned work on the portfolio, toggle resource and portfolio scenarios without impacting production data, and instantly access information for forward-looking resource scenario planning and resource optimization by portfolio, project, role, or individual. Some tips when using the What If feature:
- The What If Workbench can return up to 24,000 records for performance reasons. If your results exceed this limit, use a filter to reduce the results set. See About Filters and Creating Filters for more information.
- Depending on your goals and key constraints, experiment with moving resources around, shifting project dates, and excluding projects and/or roles to try out different scenarios.
- When you are satisfied, print the list of the changes you made to the original scenario so that you have a guide for actually implementing the changes when and if you choose to do so.
PPA
Predictive portfolio analytics, or PPA, automatically builds the highest value project and application portfolio based on your resource and budget constraints. It recommends your optimal portfolio by accurately predicting what you can get done with the resources that you have available, generating scenarios based on variables that are critical to your organization. PPA allows you to re-plan your portfolio when resource needs or availability changes, automate building and aligning the highest value project and application portfolios based on existing constraints, and avoid time consuming manual analysis. Note that if you do not see the PPA top navigation option in your environment, you will need to contact Customer Care to turn on this feature. Some useful information and tips when using PPA:
- Before you begin creating your scenarios:
- Set up your PPA environment by choosing your potential optimization values from your project pool (applies to all scenarios). Consider other settings such as Grouping Fields (fields by which to group the scenario Chart output) and Thresholds and Defaults (what percentage of a project must fit in the time horizon to be able to include the project in a scenario, and the heatmap type to display by default).
- Choose the project field you want to use for your optimization field, ensuring that the projects you are evaluating use this field.
- Ensure the projects you want to include in the scenario have role demand; they do not have to have allocated resources (no need to staff individuals to the project roles). The PPA engine looks at all roles and will potentially allocate a resource to any role he or she has in order to include a project and increase the value of the scenario result. There is no distinction made between primary and secondary roles for PPA. See Interpreting Capacity for more details.
- Set up key project dependencies before running the scenario. The PPA engine respects soft project dependencies, and will make sure predecessor projects are scheduled prior to successor projects. The engine will also consider the score of the entire set of dependent projects during the scheduling process.
- Note that there is a 250 project and 500 resource limit. If this is a concern, contact Customer Care.
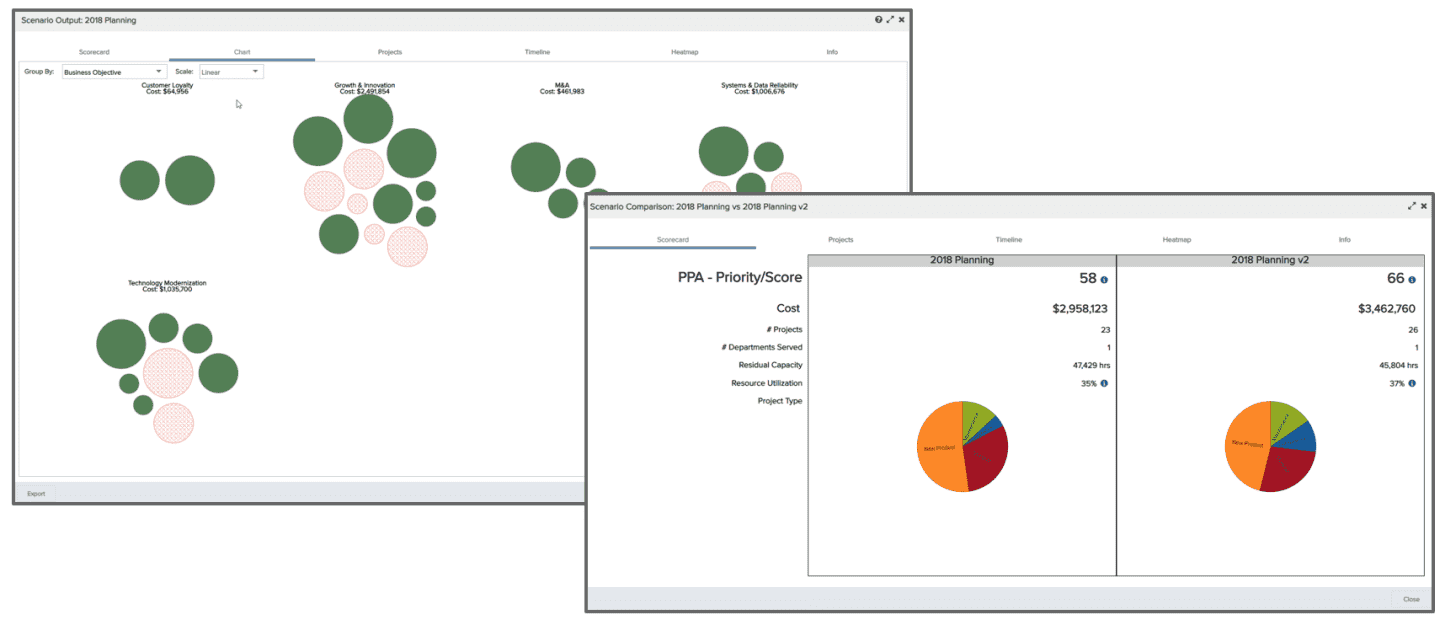
- Create and run your scenarios. Each scenario will provide a set of output for you to analyze:
- Scorecard - provides a high-level overview of the output, including overall optimization score, cost, and various high level details about the includes and excluded projects.
- Chart - provides a bubble chart to visually represent the optimization results, with options to group results by various field values (as set up with Grouping Fields).
- Projects - displays a list of included and excluded projects, including exclusion reasons and contours.
- Timeline - displays a Gantt chart showing % utilization (allocated hours / capacity hours * 100) for each period for all the included projects (see Interpreting Capacity for more information), along with a bar chart of the top four Roles (based on highest utilized roles).
- Heatmaps - provides visualization of role/resource utilization over a time horizon, with various role, resource and optimization options.
- Info - displays a summary of all the information that was fed into the recommendation engine
- Compare scenarios as appropriate and use the different PPA scenario output to share and collaborate with other stakeholders. The user preference Display "Presentation" UI theme was made specifically to support presentations of PPM Pro results such as the PPA scenarios.
- When you are satisfied, export the scenario results so that you have a guide for actually implementing the changes when and if you choose to do so.
Step 6: Maintain & Terminate Resources (Considering GDPR)
As people change and grow in your organization, consider how each resource's permissions, group membership, location within your organization hierarchy, roles and skills profiles, and other individual details also need to change (see Step 1 again, from a maintenance perspective). For resources who are no longer in your organization, you can effectively remove them from being able to be assigned to work and represented in the system by providing a termination date on their resource details:
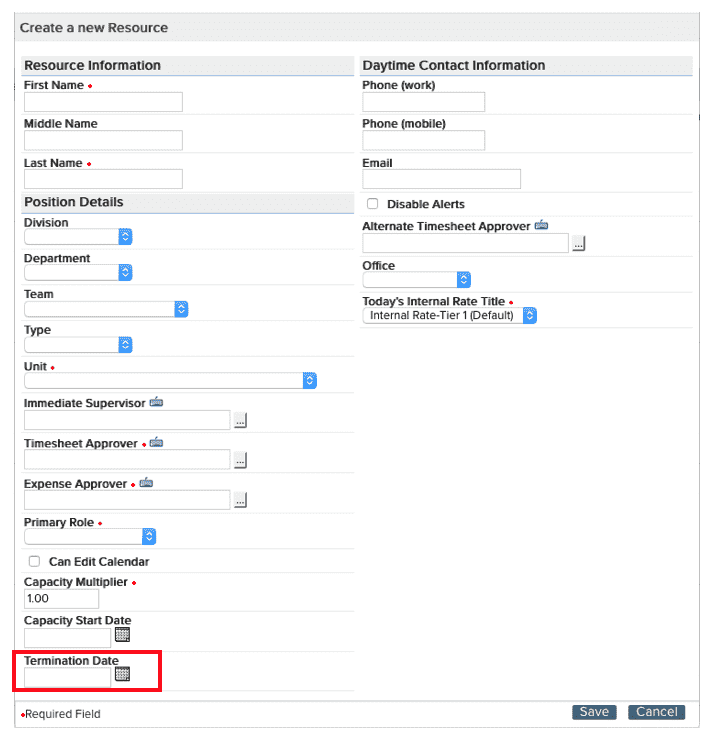
Note that although a resource has a termination date, that person will still exist within PPM Pro to account for past work and for historical purposes. If you need or want to be able to protect a terminated resource's rights to privacy, PPM Pro provides a GDPR feature to help with this. Note that this feature is not on by default; you will need to contact Customer Care to turn on this feature.