
Specifying basic details for calculated fields
In addition to naming the calculated field, the Basic Details screen also present options for setting the data type and determining how to make the fields available to reports and filters.
- Navigate to Organization and click the Organization/Calculated Fields section.
- Click the New button.
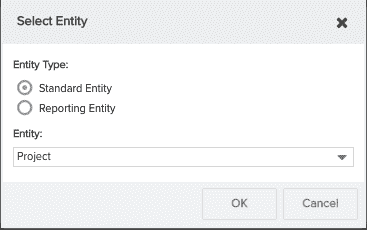
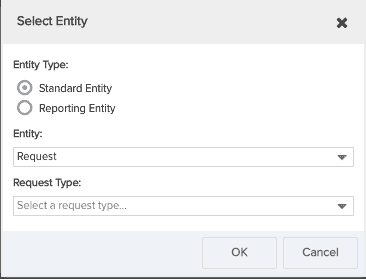
- In the Select Entity dialog, choose the entity for which you want to create the calculated field.
- Use Standard entity if you plan to use the field on an entity Details section/tab or general entity report. You will be required to pick the entity type.
- Use the Reporting entity if using the field in one of the Legacy report source categories, such as Resource Planning or Project Audit. You will be required to pick the report Category and the entity type. For new reporting (replacement for Legacy reports), the Reporting entity does not apply, so please create Standard entity types for use in new reports.
Note that if you choose the Request entity, you will also be asked to choose the request type. When you build your calculated field based on a request, you will see an additional folder that contains fields specific to that request type.
- Click OK. The Calculated Fields wizard opens.
- Fill out the form as follows:
|
Field Name |
Description |
|---|---|
|
Title |
(Required) Enter the name of the calculated field. You cannot leave this screen until you enter a name. |
|
Data Type |
Select the type of data the field will contain. Default is String. For a list of supported types, see Supported data and display types |
|
Display Type |
Select the display type for the calculated field. Default depends on the selected Data Type. For a list of supported types, see Supported data and display types |
|
Report Visibility |
Determines if and where to display the calculated field in the Report Wizard. If you are not ready to make the field available for reporting, set Report Visibility to No. When the field is ready for use in reports, specify where the field will appear in the Field Selection tab for report creation: either in the Display in All Fields folder or the Display in Common Fields folder. |
|
Filter Visibility |
Determines whether to make the calculated field available for use in filters. Choose Yes or No; No is the default. Note that any field that uses one of the following functions cannot be used in a filter: GetChildEntityValue In addition, calculated fields that reference another calculated field cannot be used in filters. Note: System performance may be adversely affected when calculated fields are used in filter expressions. |
|
Description |
Enter additional descriptive text. This text appears only on the Calculated Fields List page, in the Description column. |
- Now you can create your field in the Formula Editor. Note that you cannot save your work until you have a validated formula in the Formula Editor.