
Timesheet Tips
The following is information we think is particularly helpful when using the timesheet interface
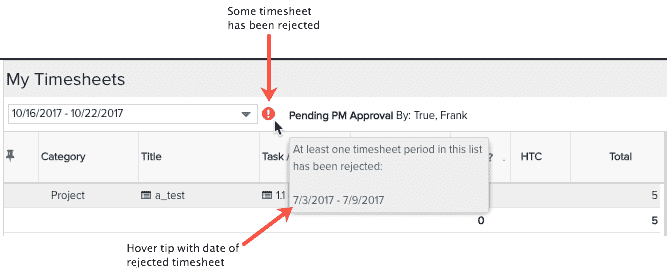
1. The ![]() one or more timesheet in the list has been rejected; hover over the icon to show the specific timesheet period.
one or more timesheet in the list has been rejected; hover over the icon to show the specific timesheet period.
2. If you are using 2-step approval and a PM rejects a timesheet entry (or entries) and the rest of the timesheet is approved, you will only be able to edit the rejected entries; all approved entries will be read only.
3. The Total time feature is enabled by default. If you enter a value, it will be spread evenly across the timesheet days configured in the timesheet settings. Your organization can disable this feature if you do not want to use it (it is an organization-wide setting). Even if the feature is enabled, you can skip this field and simply enter hours in the daily entry pane (after you save the entry the cursor will skip the Total field and jump to the first day).
4. If your organization is using the Total time feature and want to clear out all the hours in the daily fields, enter 0 hours in the Total field.
5. To create a new entry, use Alt+N on your keyboard (for Windows) or Option+N (for Mac).
6. You don’t have to click on Save button each time you complete a new entry, you can press the Return/Enter key,
7. You can single-click to edit a daily entry field. Use Tab and Shift+Tab to move left and right within a row, use Up and Down arrow keys to move within a column (like a spreadsheet).
8. You can "pin" an entry, which causes the entry to appear in all future timesheets (as long as the entry satisfies the timesheet filters). See Pre-loading Timesheet Entries.
9. An entry become unpinned when any of the following happen:
-
you unpin it
-
the task or project is deleted
-
the entry no longer satisfies the timesheet rules as configured by the timesheet filters. For example, if the task filter includes "task and timesheet dates must overlap" and the task has a complete date, the pin will not appear on timesheets past the task complete date. However, if you do not have the above clause in the timesheet filter, the entry will remain pinned going forward, even if the task has a complete date, until the pin is removed for some other reason. Another example: the project filter excludes the project.
-
the task is set to "Inactive"
10. When using New > Entries From Previous Timesheets, the modal defaults to showing all entries from the prior timesheet forward. If you change the selector to a different timesheet, the modal will show all relevant entries from *that* timesheet forward (that you don’t already have in your timesheet).
11. If you want to add an entry that is very similar to an existing entry, note that you cannot use Browse/Search or Load Previous Entries modal to add a duplicate entry to timesheet. Because the Browse/Search and the Load Previous Entries modals only show entries that are NOT already on your timesheet, you will need to use the Add Entry (or New button) to create a new entry and enter the duplicate information and change a value to differentiate it from the original entry.
12. Entries with 0 hours are deleted at Submit time unless they have a note attached or are pinned. If there is a note, then an empty entry will be submitted, and the time approver will see both the empty entry and the note. If pinned, the entry will carry forward into subsequent timesheets provided the entry still satisfies timesheet rules.
13. You can View History to see when various actions have happened, such as when a timesheet was submitted, when rejected or approved, and so on.
14. You can view the user assigned to approve your timesheet (Timesheet Approver) on your Resource Info tab. To view the Project Owner (if entering project time), choose Actions > Open Project Quick View.
For Approvers/Managers:
1. If you are a manager, go to Organization/Manage Time & Expense to see a list of timesheets for your direct reports.
2. If you are a project owner, go to My Arena/Approvals for a list of timesheets waiting for approval for your project team
3. If you are a member of the Admin Timesheets team (Time Admin), go to Organization/Manage Time & Expense/Resource Time to view all users' timesheets.
4. A Time Admin can reject an entire timesheet to make all entries editable for a user. For example, if a user has submitted a timesheets and had it approved, but then realized that the timesheet required changes, the Time Admin can reject the timesheet, putting all entries into an editable state.
Keyboard Shortcuts
Timesheet grid (LHS):
-
F2
-
Tab between cells, down arrows to open and move through droplists, Enter/Return to select
-
Alt+N on your keyboard (for Windows) or Option+N (for Mac) for new entry
-
Enter/Return to Save
-
Delete key to delete an entry
Daily contours panel (RHS):
-
Tab between cells
-
Down/Up arrows between rows