
Creating Categories for Projects
This video demonstrates how to set up entity categories. Duration 6.5 min.
Categories are types, or variations, of an entity (task, issue, portfolio, asset and so on). You use categories if you need to have different versions of an entity. Different categories can have different set of fields displayed on the entity's Detail panel, as well as different set of component tabs such as Notes, Attachments, Alerts, and Team. For projects, each category can have different sections as well. End-users will need appropriate permissions to view/edit certain project categories, as well as permissions to view/edit certain sections. Note that in order to change the category while editing a project, the user must have Project > Create permission for the target category (the category the user is changing to).
If there is only one project category the end user will never see any mention of a category on the entity grid since there will be only one entity "type". When configuring the category Details, the Category droplist will not be visible (since you only need to configure one Details section), and the Category property will not appear in the Details. If you have multiple categories, you will need to configure a Details page for each category to define its associated Details panel; as a result, the end-user will be able to create entities from each category "type," provided the categories are active and the user has Project > Create permission either globally or for the specific category they want to use for creating the project.
Note: Fields will retain their data even if you convert an instance of an entity to a category that does not include that field. For example, if the Priority field is shown on the Details pane for Category A but not for Category B, the Priority field will show data for all reports, regardless of the entity's current category. Data always stays with the field.
Category Components
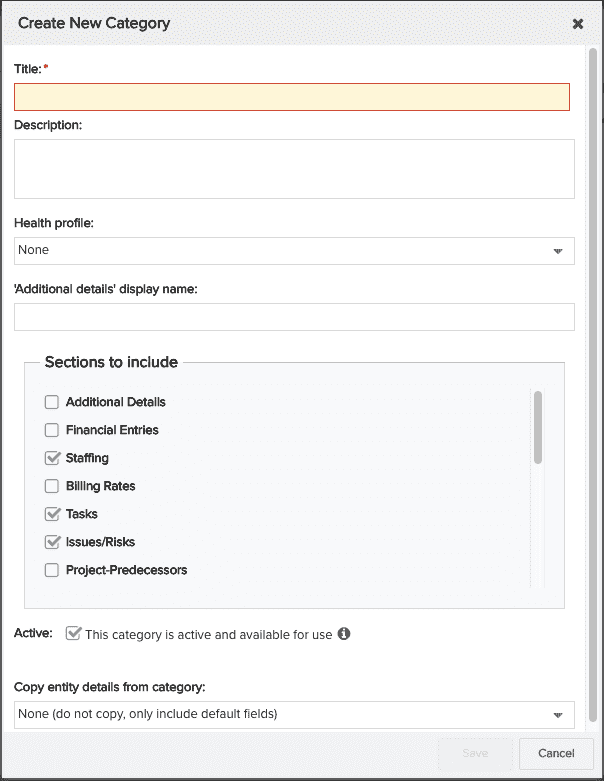
You configure each component when you create a new category, or edit an existing category (see below).
- A meaningful Title.
- Optional Description. If you enter a Description, it will be shown to users in a tooltip if they hover over the category title when selecting it from the New project menu.
- Optional Health profile. If you do not see a health profile in the drop list or if you do not see a desired profile, you will need to create one.
- The Project entity is designed a little differently than other entities in that it has sections (pages that you navigate to by clicking a link) instead of tabs. See Working the with Project View. All categories have a Details section. Optional Sections to Include are listed below:
- Overview - This section displays a project dashboard. The default dashboard is configured in the project category; the dashboards available for display are specified in the dashboard designer's Scope tab.
- Additional Details - This section and its fields can be hidden from certain users or because it makes sense to logically separate Details fields from Additional Details fields. If you would like to display a different name than "Additional Details", enter that name in the 'Additional details' display name field.
- Financials - Provides for the management of project-level financial entries (forecasts and actuals) and the financial summary, for permitted users. For your users to be able to use this project section, you will need to make sure at least one financial entry category has been configured (with details for its forecast and actuals).
- Staffing - Provides for directly allocating roles and resources, for permitted users. For your users to be able to use this project section, you will need to make sure that relevant roles have been configured and relevant resources have been added to the system (see Stepping into Resource Management topic's Ensure your People Resources are in the System).
- Billing Rates - Provides for managing billing rates, for permitted users. Note that your organization must have the billing rate feature enabled in order to use this feature.
- Tasks - Provides for managing tasks, for permitted users. For your users to be able to use this project section, you will need to make sure at least one task category has been configured.
- Project Logs or Issues/Risks - Provides for managing project logs or issues/risks, for permitted users. For your users to be able to use this project section, you will need to make sure at least one project log category has been configured.
- Project-Predecessors - Provides for managing predecessor projects, for permitted users.
- Portfolios - Provides the ability to add a project to one or more portfolios as well as to view and manage those links, for permitted users. For your users to be able to use this project section, you will need to make sure at least one portfolio class and category have been configured (see Stepping into Portfolio Management).
- Notes - The Notes section will list all the notes that permitted users can manage for a project, for permitted users.
- Status Comments - The Status Comments section will list all the status comments (identical capabilities to Notes) that permitted users can manage for a project, for permitted users.
- Attachments - The Attachments page will list the attachments for a project. Permitted users will be able to add document and hyperlink (URL) attachments, for permitted users.
- Baselines - Provides the ability to manage baselines of project details and staffing, for permitted users.
- Reports - The Reports section lists all the existing reports filtered for a current project, for permitted users.
- Dashboards - The Dashboards tab lists all the existing dashboards filtered for a current project, for permitted users.
- Rollups - Ignore this section, as it will be deprecated once a new feature 'Financial Summary' is added around the middle of 2020. It displays project financial data in a set rollup structure, for permitted users.
- Team Members - The Team section will list the users who have permissions on the specific instance of a project. Permitted users can add/remove users, or change their permission profile.
- Fixed Bids - Provides permitted users the ability to manage fixed bid invoices.
- Alerts - Allows permitted users to manage project alerts.
- Scoring - Allows permitted users to contribute to project scores, when using a scoring model. For your users to be able to use this section, you will need to make sure a relevant scoring profile has been created (see About Scoring for more details).
Making a Category Active
When creating or editing a category, select the Active checkbox to make the category available in the Admin Category dropdown when configuring Details, Additional Details, and Settings, and to a permitted end user when creating an instance of the entity. Categories are active by default. Deselect the checkbox to hide the category (will not appear in the New Project options when the user creates an instance of the entity, or in the Categories droplist when configuring Details, Additional Details, and Settings).
Note: New categories will need to be added to the pertinent permission profiles. The project category will not be automatically added to any permission profile. See Permission Profiles for more information.
Copying Project Details from an Existing Category
Every category has a corresponding set of fields that you provide to the end user on the project's Details section. When creating a category that reuses the Details fields from an existing category, you can copy those details into the new category to use as a starting point. Select the name of the category from the droplist, or use None to indicate not to copy details. If you elect not to copy details, the new category will have a default set of fields. See Designing the Details Page and Projects: Out of the Box Fields.
Creating a Category
- From Admin/Setup/All Entities/Projects/Categories, choose New > Category.
- Fill out the relevant properties in the New Category dialog as described above.
- Click Save.
Editing a Category
You can edit a Category by double-clicking it or selecting it and choosing Actions > Edit. The resulting modal is similar to the one above, without the option to "Copy entity details from category".
Copying a Category
You can copy a Category by double-clicking it or selecting it and choosing New > Copy....The resulting modal is similar to the one above, except that the "Copy entity details from category” option is automatically set to the selected category. Use copy if you want to copy everything from an existing category to save time, such as details, health profile, sections, and other properties.