
Configuring Timesheet Rules and Settings
There are two main aspects of timesheet configuration:
-
A pair of filters that determine which projects/tasks are eligible to charge time to. These filters are referred to as "timesheet rules".
-
A group of settings that control various aspects of timesheets, including timesheet period lead/lag time, configuration of an "overdue" setting, and whether or not to allow all hours for an timesheet to be entered in a single field (referred to as "bucket entry").
The filters and settings can be found on Admin/Organization/Timesheet Settings.
Note: Timesheet settings can be edited by users with administrative privileges only (members of Admin standard group). In addition, these settings can be made non-editable to even those users (typically after the settings have been configured). If you are interested in this, please enter a Community case.
Timesheet Rules (Filters)
When users search for a project against which to enter time, the projects that appear in the New Project Time window are determined by the timesheet rules configured by your organization:
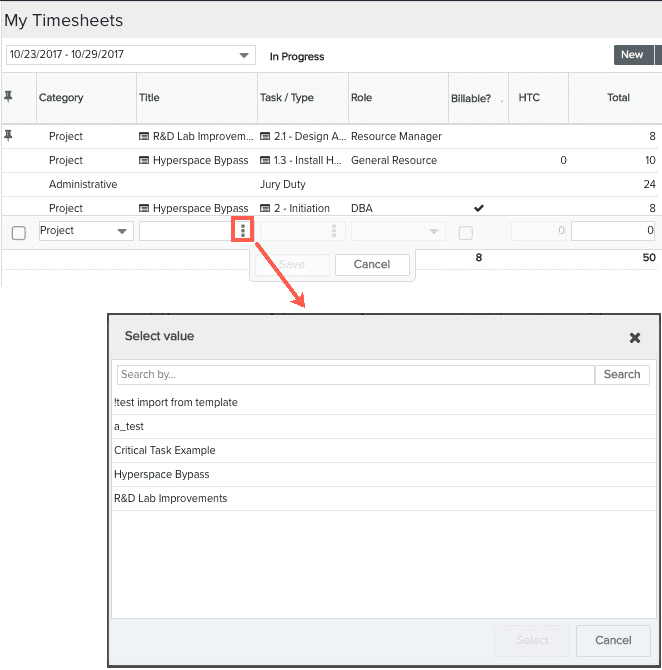
Timesheet entry rules are controlled by 2 filters: one for projects and one for tasks. These filters determine what makes a project/task eligible to charge time. In addition, you can also extend by a specified number of days any filters that uses date criteria. PPM Pro supplies a set of basic filters, and you can also create your own.
To set up your organization's timesheet entry rules, you will:
-
decide whether to use pre-defined filters or create custom filters (note that timesheet filters must be shared with the All Users standard group)
Pre-defined Filters
There is a set of pre-defined filters (four project and three task) – use them as is, modify them to suit your business needs, or create new filters. These filters can be found in the Project Filters or Task Filters droplists on Admin/Organization/Timesheet. These filters are shared with the All Users standard group.
Note: You cannot edit timesheet filters that are currently in use. If you need to edit the current timesheet filter (project or task), you must first temporarily assign a different filter, make your edits, and then reassign the edited filter in the timesheet settings. Otherwise, the current filter is grayed out in the list of filters and is not editable.
A project must have at least one eligible task. If there is no eligible task, the project will not be available for time entry.
|
Entity |
Filter |
Description |
|---|---|---|
|
Project |
Timesheet: Fully Qualified |
The following conditions must be met for the project to be eligible: - Project dates must intersect with the dates in the timesheet |
|
Project |
Timesheet: Project & Timesheet Dates Overlap |
If the project dates intersect with the dates in the timesheet, then the project is eligible. |
|
Project |
Timesheet: Project & Timesheet Dates Overlap & Resource is Allocated |
If the project dates intersect with the dates in the timesheet AND the resource is allocated (assigned to a role) to the project, then the project is eligible. |
|
Project |
Timesheet: Project & Timesheet Dates Overlap & Resource is Team Member |
If the project dates intersect with the dates in the timesheet AND the resource is a member of the project team, then the project is eligible. |
|
Task |
Timesheet: Fully Qualified |
The following conditions must be met for the task to be eligible: - User must be scheduled to the task |
|
Task |
Timesheet: Task & Timesheet Dates Overlap |
If the task dates intersect with the dates in the timesheet, the task is eligible. |
|
Task |
Timesheet: Task & Timesheet Dates Overlap & Resource is Scheduled |
If the task dates intersect with the dates in the timesheet AND the resource is scheduled to the task, the task is eligible. |
Creating Custom Filters
If you decide you want to create your own filters, you will create them for the Project and/or Task entity. Any filter with visibility of All Users can be selected as a timesheet filter. Remember to share the filter(s) with the All Users standard group.
The following fields are useful for creating timesheet filters:
|
Task Filter Fields |
Project Filter Fields |
|---|---|
|
Current User is Owner |
Current User is Owner |
|
Current User is Team Member |
Current User is Team Member |
|
Current User is Scheduled |
Current User is Allocated |
|
Current User is Scheduled for Timesheet Period |
Current User is Allocated for Timesheet Period |
|
Task Dates Overlap with Timesheet Period |
Project Dates Overlap with Timesheet Period |
|
Complete Date is before Timesheet Period |
Project Dates Overlap with Timesheet Period |
|
Current User's Task Role is the same as the User's Project Role |
|
|
Current User has no Role for the Task |
|
Note: Project Dates are defined by Start Date and Completion Date. If no Completion Date exists, then the Target Date is used. If both Completion Date and Target Date are null, then time cannot be logged against that project if the filter specifies Project Dates overlap with Timesheet period.
Example: Creating a filter
You create timesheet filters like you would any other filter; see Creating Filters for more information.
The example below illustrates how to create a project filter that allows any user to enter time against a maintenance project, and for other types of projects requires users to be allocated to the project in order to enter time. A recommended best practice is to start all filters with a clause that requires the project dates to intersect the timesheet date range. Because you can only have one active project filter, the filter must handle multiple cases. It is a good idea to build your filters as efficiently as possible (for example, pulling out the Dates criteria rather than repeating it in each decision block), to avoid potentially causing the product to lag when accessing timesheets.
- Navigate to your favorite place for creating filters - Home/Filters or any ad hoc filter.
- Choose Project from the Entity drop-down list to see the existing project filters.
- Click the New button and select the Project entity.
- Create a filter with the following criteria :
-
Project Dates Overlap with Timesheet Period and Project Type equal to Maintenance
-
or
-
Project Dates Overlap with Timesheet Period and Project Type not equal to Maintenance and Current user is allocated for Timesheet Period
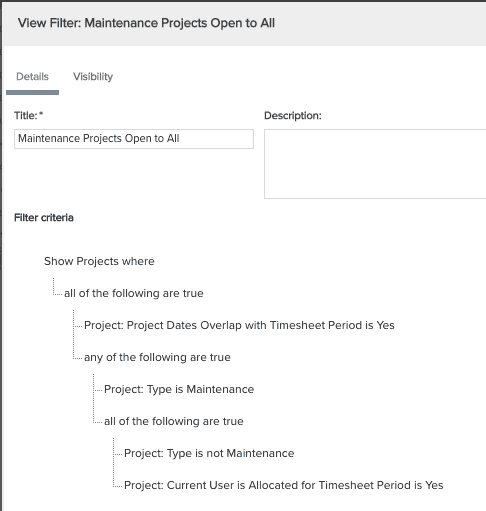
- Name the filter Maintenance Projects Open to All.
- Click Save.
- Right-click the filter and choose Edit.
- Click the Visibility tab and add the Admin group to the filter along with the appropriate permission profile (such as Full Edit).
Once you have the filters you want, you set them in Admin/Organization/Timesheet Settings, as shown below. These filters apply to all projects/tasks in your organization, and can only be edited by users with administrative privileges (the filters themselves can be edited by users with appropriate permissions, provided the filter is not in use).
Configuring the Timesheet Settings and Filters
- Navigate to Admin/Organization/Timesheet Settings
- In the Timesheet Settings page, select the filters you wish to use, and, optionally, configure other settings, as described below.
- Click Save.
Timesheet Settings
|
Timesheet Setting |
Description |
|---|---|
|
Filters |
|
|
Project Filter |
Select the filter that controls when projects are available for entering time. Several filters are provided by PPM Pro, and you can create your own custom filters. |
|
Task Filter |
Select the filter that controls when tasks are available for entering time. Several filters are provided by PPM Pro, and you can create your own custom filters. |
|
In addition to the filters, you can build in lead/lag time to any filter that uses Dates. The value you specify extends the date range in both directions by the number of days specified. For example, imagine your Project Filter is "Project Dates Overlap with Timesheet Period", and you set "Number of days..." to 3. This means that the timesheet period can end 3 days before or start 3 days after the Completion Date of the project. |
|
|
Track Time For Admin/Project/Portfolio |
Select at least one type of time to track. |
|
Allow users to edit 'Total' hours |
Enabled by default. When enabled, the user is allowed to enter hours in the 'Total' cell for a timesheet entry, and those hours will be spread evenly across each timesheet day that is configured to be included in the contouring (see Configuring_the_Daily_Entry_Pane). Otherwise, the 'Total' cell will be read only. The user will still be able to enter and edit values for individual days regardless of whether this setting is enabled or disabled. |
|
Allow users to indicate if billable |
Disabled by default. Enable to display the Billable? column on timesheets. Billable reflects whether or not the entered hours are billable, and applies only to tasks types 'Not to Exceed' and 'Time & Materials.' If disable, column will not appear on timesheet. Contact your engagement manager for more information about the Billing feature. |
| Automatically adjust Task hours to complete (HTC) based on timesheet actuals | Enabled by default. Tells the system to automatically adjust HTC based on timesheet actuals WHETHER OR NOT the HTC is displayed in the UI. You can use this setting alone or in conjunction with the setting described below. |
| Allow users to view and edit HTC on timesheet entries |
Enabled by default. Displays the HTC on timesheet entries and allows users to edit. You can use this setting alone or in conjunction with the setting described above. |
|
Show if task is Capitalized |
Enabled by default. Displays the Capitalized column on timesheets. This will be a read-only field, and will contain a checkmark if the summary task is capitalized. If disabled, column will not appear on timesheet. |
|
Allows users to indicate if: 'Productive' |
Disabled by default. Enable to allow users to track productive time. In addition, the label is editable, so some customers use the field to track other properties. If disabled, column will not appear on timesheet. |
|
Allows users to select: 'Work Location' |
Disabled by default. Enable to allow users to select work location. You cannot change the lookup list associated with this field, but you can edit the field title and add/delete list values by clicking Edit Location Options. Note that if you edit the field name, the edit link will reflect the new name. In addition, when this property is enabled you have the option to make the field required by checking "Make 'Work Location' a required field". |
|
Allows users to select: 'Company'' |
Disabled by default. Enable to allow users to select company. You cannot change the lookup list associated with this field, but you can edit the field title and add/delete list values by clicking Edit Company Options. Note that if you edit the field name, the edit link will reflect the new name. In addition, when this property is enabled you have the option to make the field required by checking "Make 'Company' a required field". |
|
Show weekend days on timesheets by default |
Disabled by default. Enable to show Saturday and Sunday on the daily time entry panel. This can be overridden at the user level (see Configuring_the_Daily_Entry_Pane), but some organizations like to determine whether the weekend days appear by default. |
|
Time Management Options |
|
|
Include Project Managers in approval process |
Enabled by default. Resource Managers (also known as "Final Timesheet Approvers") will be responsible for approving non-project time entries only (for example, Admin or Portfolios), and Project Managers will be responsible for approving time entered against their projects. This is referred to as the "2-step approval process". All project time must be approved before timesheets are ready for final approval. If this option is not enabled, then Resource Managers will be responsible for all approvals. |
|
Automatically approve # days after submission |
Enable to allow timesheets to be automatically approved after a specified number of days. If Auto-approve timesheets is enabled, timesheets set to 0 will be automatically approved within one hour. If Auto-approve timesheets is set to a number (N) greater than 1, timesheets will be auto-approved approximately N x 24 hours after being submitted. For example, if this option is selected and set to "0", when the approval job runs, any unapproved submitted timesheets will be approved automatically within one hour. If this option is selected and set to "3", when the approval job runs any unapproved timesheets that were submitted 3 days ago will be approved automatically. |
|
Allow cost normalization on timesheets |
When enabled, presents two settings on the resource record allowing you to normalize costs for a resource (prorates the hourly rate up or down, based on the number of hours the resource worked, keeping the cost of the resource the same). Normalize Cost - Enables the feature for the resource Timesheet Period Cost - The cost for the resource for the timesheet period. See Normalizing Costs. |
|
Allow maximum hours logged per week to be limited |
When enabled, adds a field to each resource's Info page called "Max Hours Per Week". The resource's Immediate Supervisor or members of either the Admin Resource or Admin Org team can edit this field to limit the number of hours the resource can enter per week. If you do not see this setting, contact Customer Care to have it turned on for you. |
| Allow timesheet hours to be limited to working hours |
When enabled, adds a field to each resource's Info page called "Limit timesheet hours to working hours". The resource's Immediate Supervisor or members of either the Admin Resource or Admin Org team can enable this field to limit the number of hours a user can enter daily to a timesheet to the working hours of the resource calendar (ignoring events). If you do not see this setting, contact Customer Care to have it turned on for you. |
|
Show timesheet guidelines |
When enabled, presents a rich text editor into which you can enter your company's timesheet policies or any other information that would be helpful when entering time. Users can view the guideline by choosing Actions > View Timesheet Guidelines from the timesheet screen. |
|
Mark unsubmitted timesheet overdue (hours) |
The timesheet will be considered overdue if it has not been submitted within the specified number of hours (max 336 hours) after the timesheet period ends. Overdue unsubmitted timesheets appear in the Timesheet Approvals page Unsubmitted tab, and have a indicator in the Overdue column (you can sort on this column). |
|
Mark PM approvals 'overdue' (hours) |
Timesheets in need of PM approval will be considered overdue if the timesheet has not received PM approval within the specified number of hours (max 336 hours) after the timesheet period ends. Overdue timesheets needing PM approval appear in the Timesheet Approvals page At PM Approval tab or My PM Approval tab (if you are the PM approver), and have a indicator in the Overdue column (you can sort on this column). |
|
Mark Final approvals 'overdue' (hours) |
Timesheets in need of Final approval will be considered overdue if the timesheet has not received Final approval within the specified number of hours (max 336 hours) after the timesheet period ends. Overdue timesheets needing Final approval appear in the Timesheet Approvals page My Final Approvals tab, and have a indicator in the Overdue column (you can sort on this column). |
"Customizing" the Timesheet Columns
Currently you cannot add or remove columns from the grid, or group items. However, there are three fields that you can include as timesheet columns and customize a bit: Productive (a checkbox field, so yes or no), Work Location (lookup list), and Company (lookup list).
If you are not already using these for other situations or on your timesheet (see descriptions in table above), then an Admin can go to Admin/Organization/Timesheet Settings and turn these on/off, or provide a different name (for example, change "Is Productive" to "Financial Report?") and/or different lookup list entries. These would appear across all timesheets, so any columns you add would be seen by all - you can make optional so that users who don't need them don't have to enter a value (they could also resize the column smaller to make it less noticeable). If you add one of these fields, you could use it as a way to "group" entries by sorting on the field.
Customizing Timesheet Periods
By default, the timesheet period is Weekly (Mon-Sun). This handles the majority of our users' needs. Users can adjust the actual days displayed in the Settings dialog.
If your organization requires a different configuration, enter a Support case. PPM Pro supports the following timesheet periods - note that changes to timesheet periods do not affect other time intervals such as those involving Capacity and Demand.
-
Weekly (Mon-Sun) Timesheets are submitted weekly. A week begins on a Monday and finishes on the following Sunday
-
Semi-Monthly Timesheets submitted twice a month. The pay periods are 1st to 15th and 16th to end-of-month.
-
Weekly (Sun-Sat Timesheets are submitted every week. A week begins on a Sunday and finishes on the following Saturday.
-
Weekly (Sat-Fri) Timesheets submitted every week. A week begins on a Saturday and finishes on the following Friday.
-
Weekly (Wed-Tue) Timesheets are submitted every week. A week begins on a Wednesday and finishes on the following Tuesday.
-
Weekly (Thurs-Wed) Timesheets submitted every week. A week begins on a Thursday and finishes on the following Wednesday.
-
Weekly (Friday-Thursday) Timesheets submitted every week. A week begins on a Friday and finishes on the following Thursday.