
Working with the Card View
This video demonstrates how to navigate the request list and card views. Duration: 7.5 min.

The Card view is a "kanban" board that allows users to move cards (requests) from lane to lane, and generally provides a visual workflow that some users prefer. You can group the lanes by any list field. If you plan to drag cards from one lane to another, remember that the field that defines the lane must be on the request Details (because moving lanes is essentially updating the value on the Details). Note that you cannot drag cards to different swim lanes if you are using gated requests and are grouping by Gate Status. Because each lane represents a gate status, you must take the appropriate workflow action (such as Approve, Reject, Send Back to Prior Gate) to move to another gate. For gateless requests, you can use the simple Status field and drag cards between lanes because no workflow is required.
You can toggle between the List view and the Card view as often as you like.
Whatever view is displayed prior to navigating away from the Requests entity will persist; that is, if you choose the Card view and then navigate to the Reports grid and then navigate back and click the Requests icon, the Card view will be displayed.
The cards that populate this view are determined by your permissions:
- If you have global permission to view or edit all requests, then you will see all the requests for your organization.
- If you do not have global view or edit permissions, then you will see all requests that you are involved with:
- requests you have created
- requests you have requested (are the requester for)
- requests you are asked to approve
- requests you are asked to score
Note that you can also view request cards on Home/Requests (then click the Card view icon), but you are limited to requests that you created, can approve, or can score.
The Card view is the starting place for creating requests, as well as approving and scoring requests (provided you have the appropriate permissions) . You can also create requests from the List view.
Anatomy of the Card View
The Card view is divided into "lanes" which reflect a list field values - you can select which list values to show or hide (see Configuring the Columns/Lanes below for more information about configuring lanes). For example, the Gate Status list can represent the lanes. If you configured color for a status list, the color will be used along the left-hand edge of the card; if you have not configured colors, default colors will be used. You can use filters and the Category droplist to hide/show cards. Note that the Category droplist is not visible if only one category is defined.
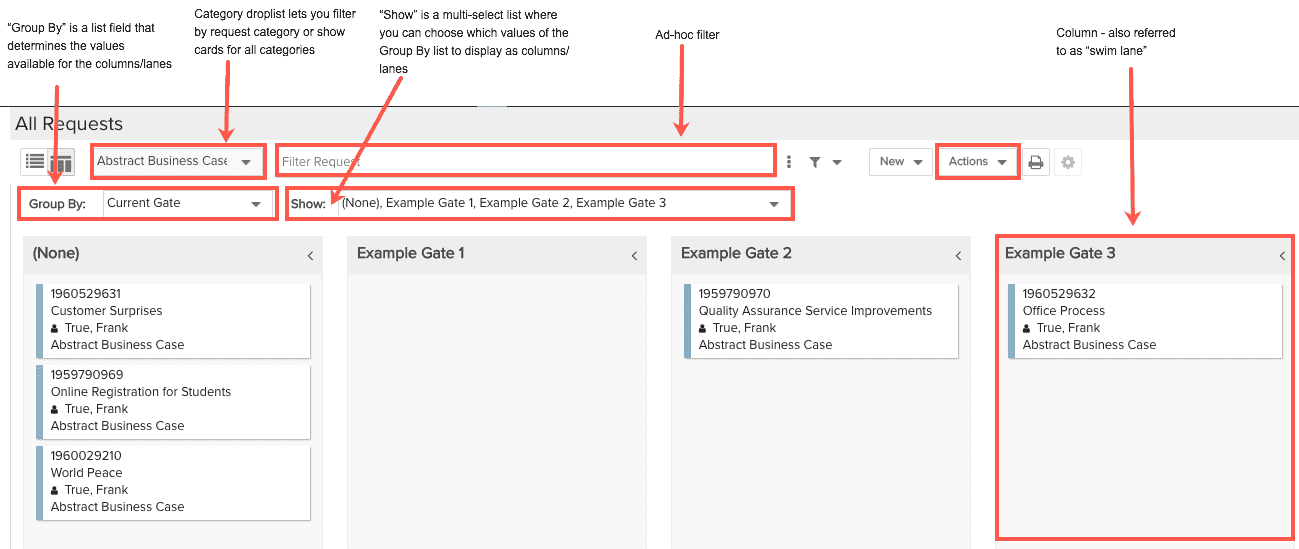
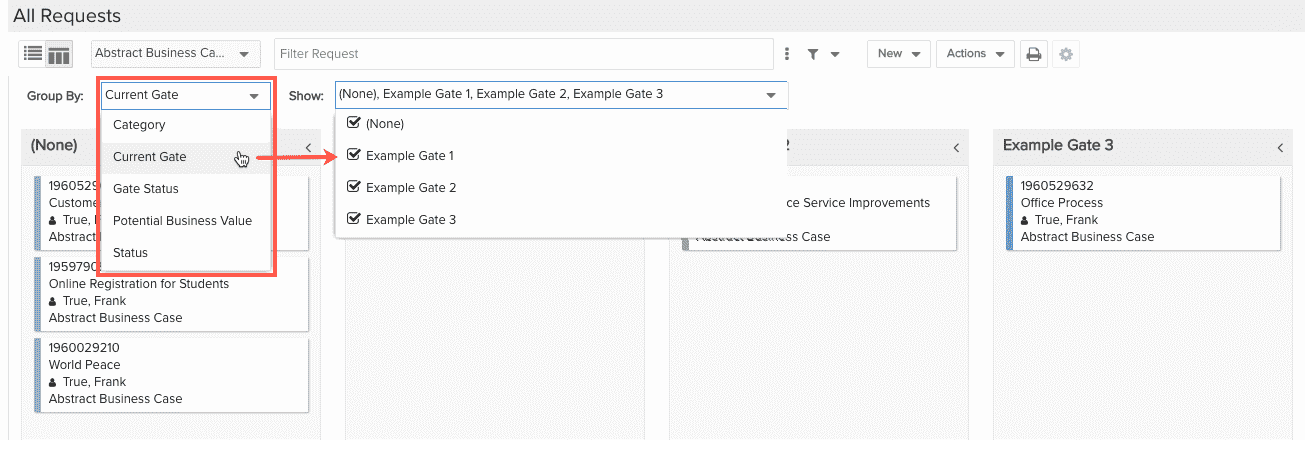
Configuring the Columns/Lanes (Group By)
To determine the columns/lanes to display, you'll use a combination of the Group By and Show droplist values. The Group By droplist is populated with any single-selection lookup list fields that are available to be placed on the grid (this means your administrator has made them available by adding them to the Grid Columns page when configuring the request entity). If you wish to remove certain fields from the Group By droplist, remove them from the Requests grid. In the example above, the Group By field is Current Gate, which means all the valid values for Current Gate field are available to show as columns. The Show droplist is a multi-select list that lets you choose which values you want to appear as columns/lanes. In the screenshot below you can see the fields available in the Group By list - the selected field is Current Gate, and the Show droplist contains all the valid values for Current Gate. Select any or all values.
 About the (None) Column and Gate Status
The (None) column is home for “everything not in any of the other lanes”. For example, when Group By = Gate Status, the (None) column includes any requests that do not have a gate status. You can also hide “(None)” via the Show options if all categories have gates such that the column would never have any cards. Another example: whenever Group By is Current Gate, “(None)” would include all request cards that are not at a gate, such as those whose statuses are New, On Hold, Approved, and Rejected. Any card that has empty/no status would show up in the None column.
Note that Current Gate and Gate Status should not be used if you are working with gateless requests - those fields will have no values without gates.
The New Menu
The New menu contains the list of request categories from which you can create a request. Choose New > <category name> to create a new request. If your organization uses just one request category, then simply click the New menu to create a request.
The New menu is also home to the Copy... feature. See Copying Requests.
Editing Cards
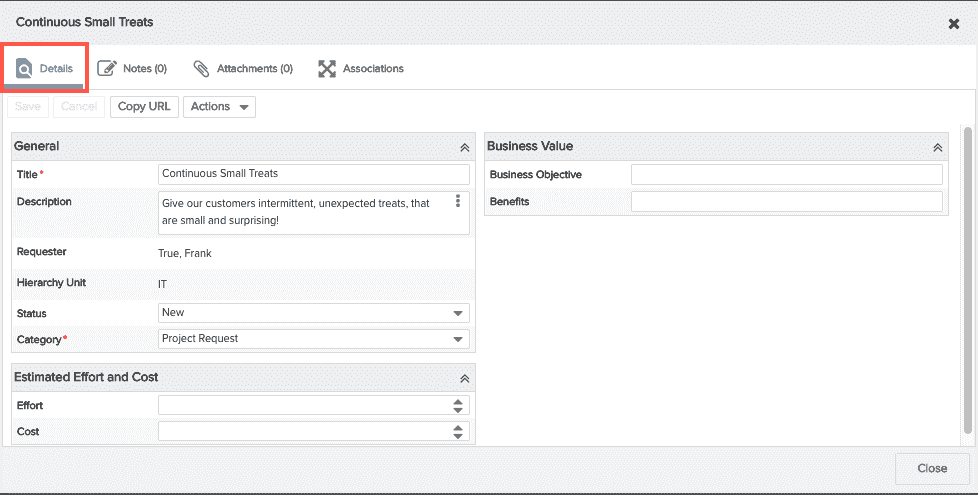
Double-click on a card to display a modal that minimally contains the request Details tab, and optionally the Notes, Attachments, Associations, Scoring, and Activity Log tabs.
You can edit card fields by double-clicking on a card to invoke the request modal. All fields on the grid are displayed in the Details tab of the modal, where you can edit fields that you have permission to edit (there may be additional fields in the Details tab that are not displayed in the grid). If using gates, the cards cannot be edited if the request has a status of In Progress; requests On Hold may be edited.
Below is a screenshot of a request modal, with the Details tab selected:
Once in the request modal, you can use your mouse and/or keyboard navigation. Tab moves you from field to field and to the Save/Cancel Buttons. Use arrow keys to move you through drop lists and suggested matches (for picklists) and use Return/Enter to make your selections. Click the Save button or use Ctrl-S to save.
Selecting Cards
Select single cards by single-clicking; use shift-click to select multiple cards (or hold down the shift key and hit the down arrow key repeatedly). When you select more than one record, the message "n items selected" is displayed (temporarily) in the footer of the page. This is useful if you want to select a range of records and want to know the count.
Number of Cards Displayed
The maximum number of cards displayed in the kanban view for Requests, Projects, Issues/Project Logs, and Tasks will be 1,000.
The Actions Menu
The Actions menu at the top-right of the screen holds all operations that you can perform on requests based on your user permissions. You can also access this menu by right-clicking on a request in the grid, or, if using the card view, by clicking the vertical ellipsis.
|
Actions menu |
Action |
Description |
|---|---|---|
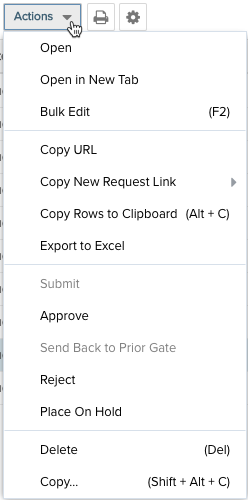 |
Open |
Opens a new window that displays the selected request's Details tab and other component tabs, if any (notes, attachments, for example). You can also double-click the request to open it, or right-click on the selected request and choose Open (or Open in New Tab). |
|
Open in New Tab |
Opens the selected request in a new tab displaying its Details tab and other component tabs, if any (notes, attachments, for example). |
|
| Bulk Edit | Opens an editor that allows you to edit multiple requests. Select the requests (Shift-click or Ctrl-click to select multiple rows) and then choose Bulk Edit. See Bulk Editing for more information. | |
| Copy URL | Copies the URL to the current request. | |
| Copy New Request Link |
Copies the New request link to the clipboard. If you have multiple request categories then you'll see a sub-menu with the category names; if just one category, you won't see the sub-menu. This is useful if your organization provides this link in a common area accessible outside of PPM Pro where users can initiate their requests. Note consumers of this link will still need to log into PPM Pro - ideal for organizations who use SSO. |
|
|
Copy Rows to Clipboard |
Copy the selected rows to the clipboard. (Shift-click or Ctrl-click to select multiple rows.) |
|
| Export to Excel | Export a maximum of 5000 list rows to Microsoft Excel. If you export 5000+ rows, you will be notified that your export will be truncated and encouraged to run a report to accommodate the large number of rows. Reports can handle up to 50,000 rows. See Printing the Requests List. | |
| Submit | Sends the request into the approval workflow. Current user must have Request > Submit permission. Request must have valid values for all required fields to enable Submit button. | |
| Approve | Provides one approval for the request. If only one approval is required, request moves to the next gate, or if at the last gate becomes "Approved". Current user must be implicit approver (derived from approval criteria) or explicit approver (has Approve/Reject/Send back to Prior Gate profile permission). If there are multiple approvers required, request will not move on to next gate until all approvals are performed. | |
| Send Back to Prior Gate |
Sends the request to a gate specified by the current user (will pick gate from list provided in modal). Gate must be "behind" the request (not a future gate). Once sent back, the request can flow forward through a different gate based on changes in the request, but cannot be sent back to a gate that was skipped (see Configuring Gate Flow). Current user must be implicit approver (derived from approval criteria) or explicit approver (has Approve/Reject/Send back to Prior Gate profile permission). |
|
| Reject | Takes the request permanently out of the workflow and gives a status of "Rejected". Current user must be implicit approver (derived from approval criteria) or explicit approver (has Approve/Reject/Send back to Prior Gate profile permission). Rejected requests cannot be revived, but can be copied and re-submitted. See Copying Requests. | |
| Place on Hold | Takes a request out of the work flow. Current user must be implicit approver (derived from approval criteria) or explicit approver (has Place on Hold/Place Back in Progress profile permission). Request can be edited while on hold. | |
| Place Back in Progress |
Puts a request back into the workflow at the gate where it was placed On Hold. Current user must be implicit approver (derived from approval criteria) or explicit approver (has Place on Hold/Place Back in Progress profile permission).
|
|
| Delete |
Deletes the selected request. Current user must have Request > Delete permission, and request must have New, Approved, or Rejected status. |
|
| Copy... |
Creates a copy of the selected request, replicating the structure of the request (sections to include) and optionally the values in each section. The ability to copy a request comes in handy if you reject a request, or simply change your mind, and want to resurrect it - you can make a copy and resubmit. See Copying Requests |
Filter/View Requests