Entering Time
Timesheets are generated by PPM Pro once your timesheet activation date is set. Typically your PPM Pro administrator will set your Timesheet Activation Date when setting up your PPM Pro resource. If you don't see any timesheets, contact your administrator to make sure your PPM Pro account is configured properly.
Once you select a timesheet, you can add entries to it. The app lets you configure your timesheet view several different ways, and you'll probably settle on one that best suits your needs. Each view and instructions for using it are described below.
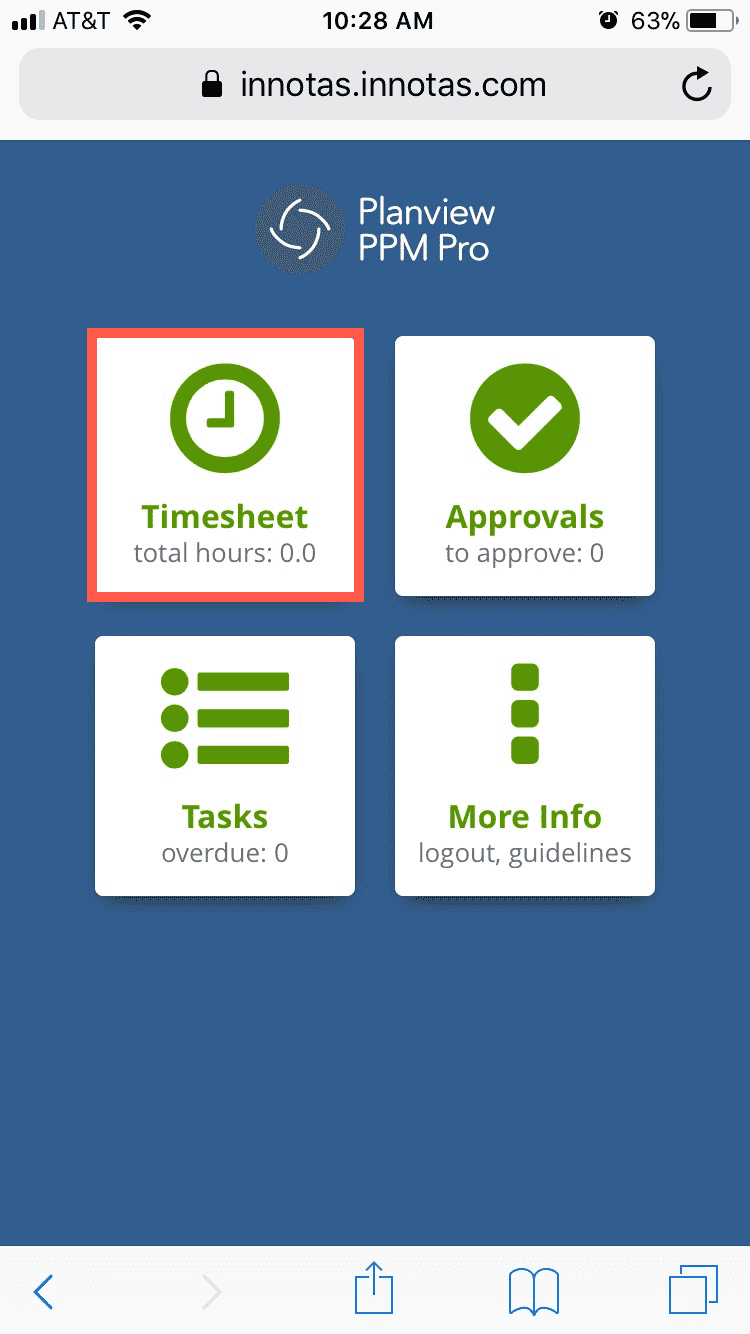
To access the mobile timesheets, click the Timesheets icon from the home page.
There are 3 time entry views: Daily Entry, Full Timesheet, and Total Time Entry.
-
The Daily Entry view shows entries for one day at a time. You tap a day at the top of the screen to view its entries.
-
The Full Timesheet view shows all entries for the selected timesheet period, grouped by day. You can scroll through all the days in the timesheet period.
-
The Total Time Entry view shows all the tasks you have added to a timesheet and allows you to simply enter a lump sum of the time you worked on each task. You don't need to switch views, but if you do, PPM Pro displays the hours evenly divided across the days that are configured for the daily/timesheet views. For example, imagine you worked on one task for an entire timesheet period (assume Mon-Fri) and entered 40 hours in the Total Time Entry view for that task. If you switch to Daily Entry view, that 40 hours will be divided equally across the 5 days - 8 hours a day.
You can toggle between the views and can enter time using any view at any time. All views provide the same information. Some users prefer a calendar-based method of clicking through a timesheet day by day, others prefer to scroll up and down through all the entries for the time period. Still others don't need to enter time daily, but would rather just enter it per task. You can play around with each view to see which you prefer using.
The following shows the basic screen elements for the time entry views of PPM Pro for Mobile:
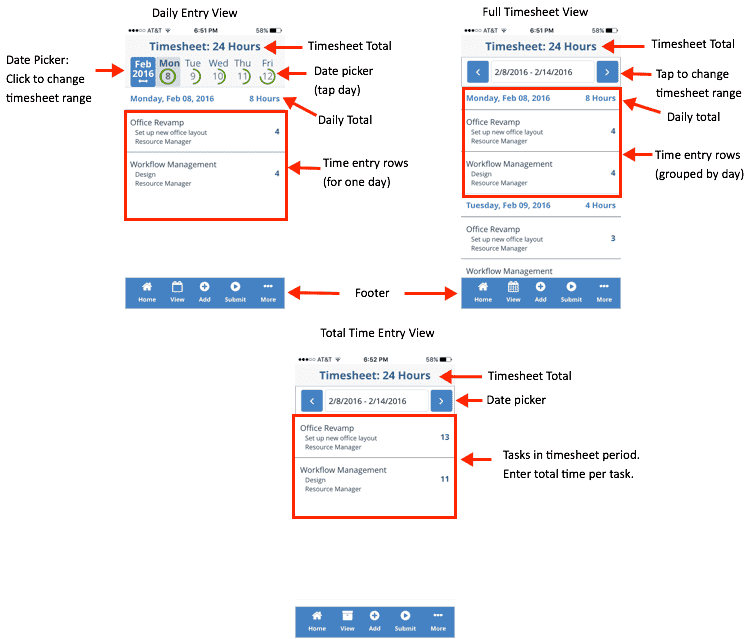
The mobile views contain the following elements:
-
Date Picker - Displays the controls for picking a specific day or timesheet period. To change the days displayed on the Daily Entry, click the Month/Year in the top-left corner of the screen to bring up the Timesheet Range picker. In the Full Timesheet and Total Time Entry views, pick the period from the date picker at the top of the screen.
-
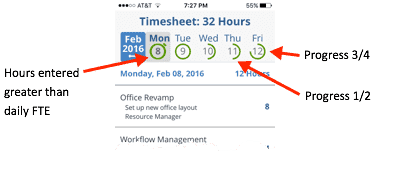
Progress indicators - As you enter in the Daily Entry view, a green circle renders around the date and indicates a (visual) completion percent. For example, if your company's FTE hours/day = 8 and you have entered 8 hours for a day, then a full circle will render around the date. 1/2 circle represents half of the hours (4 out of 8, for example), and so on. The screenshot below shows several days at various stages of completion:
-
Timesheet Entry Rows - one day (Daily Entry view) or entire period, grouped by day (Timesheet view)
-
Footer - contains Home button, View selector (Daily, Timesheet, Total Time), Add (entry) and Submit buttons, and the “…” (More menu), which provides access to other functions including Logout, Switch to Desktop App, and Guidelines.
Timesheet Period
By default, the timesheet period is Weekly (Mon-Sun). This handles the majority of our users' needs. You can configure the days to display in the mobile timesheet in the More Menu, Preferences tab.
If your organization requires a different configuration, please enter a Community case.
Adding Timesheet Entries
To add a timesheet entry from any view, tap Add, which invokes the screen that provides several options for adding entries.
You can add entries from existing timesheets, or if you are looking for a particular entry you can browse a list of existing entries to find the one you are looking for.
To add entries from an existing timesheet:
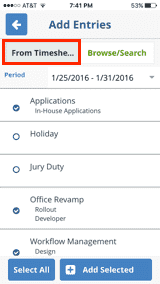
- Tap From Timesheets to display the entries from the selected timesheet.
- Select which specific entries to add. All entries are selected by default, but you can simply deselect the ones you don't want. For example, if you pick all Admin tasks, you probably only want the one the reflects your time - Jury Duty or Holiday, for example. After you make your selection, tap Add Selected. The Select All button toggles between Select/Deselect All.
- After you add the entries you are returned to the timesheet entry screen where you can now edit the entries.
To Browse/Search for an entry
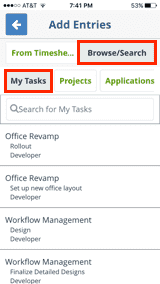
- Tap Browse/Search to find entries from My Tasks, Projects, and Admin.
a) My Tasks lists all task entries that you are allowed to charge time to for the relevant timesheet period. This is analogous to My Projects on the web UI, but represents both projects and tasks, and was thus renamed My Tasks. To select one of these entries, tap it and the relevant entry details will be displayed so you can enter time and save the entry.
b) Projects allows you to browse or search for a project - only those to which you have access are displayed. You can scroll through the list, or enter text in the Search field matching the project you want. When searching, any project names that contain the text you entered will appear below the field. Tapping a project opens a screen listing all the tasks for that project for which you are allowed to charge time to for the timesheet period. Top a task and the relevant entry details will be displayed so you can enter time and save the entry.
c) Admin lists all administrative time entries that your organization allows you to charge time to. Tap an Admin entry and the relevant details will be displayed so you can enter time and save the entry.
|
|
|
|


- After you have saved the entry you'll be returned to the timesheet view.
Entering Time
You can enter time once you have the timesheet set up with the appropriate entries (or you might have entered time when you initially added the entries). The Edit Entry screen for each timesheet view is the same; the only difference is how the timesheet period is displayed (Daily, Full Timesheet, or Total Time entry).
Daily Entry
The Daily Entry view displays the time entries for one day at a time. Use the date picker at the top of the screen to navigate between the days of the week. The current day is displayed by default. The graphic circling the date indicates the percentage of hours entered for that day (compared to the FTE hours/day specified by your organization). Add/Submit buttons are in the footer.
To enter daily time:
- Select Daily Entry from the Timesheet View picker.
- Tap the day.
- Tap anywhere in a time entry row to bring up the Edit Entry screen.
- In the Edit Entry screen, enter the hours and any other relevant data:
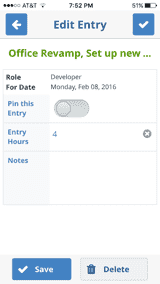
a) The Role is populated by default. If you have multiple roles, select the role for which you are entering time (if it is not the default).
b) Enter the hours.
c) Billable - whether this field is editable or not is determined by your organization.
d) Enter optional details in the Notes.
- Tap Save.
Timesheet Entry
The Timesheet view presents the entire timesheet for the timesheet period, grouped by day. You can scroll between days. The date picker at the top of the screen allows you to pick the timesheet to display. The same Add/Submit buttons are displayed in the footer.
To enter time in the Full Timesheet view:
- Select Full Timesheet from the Timesheet View picker.
- Scroll to the day/entry you want to enter time for.
- Tap anywhere in a time entry row to bring up the Edit Entry screen.
- In the Edit Entry screen, enter the hours and any other relevant data:
a) The Role is populated by default. If you have multiple roles, select the role for which you are entering time (if it is not the default).
b) Enter the hours.
c) Billable - whether this field is editable or not is determined by your organization.
d) Enter optional details in the Notes.
- Tap Save.
Total Time Entry
Total Time view presents just the entries for the timesheet period. The date picker at the top of the screen allows you to pick the timesheet to display. The same Add/Submit buttons are displayed in the footer.
To enter time in the Total Time view:
- Select Total Time from the Timesheet View picker.
- Tap the entry you want to enter time for.
- In the Edit Entry screen, enter the hours and any other relevant data:
a) The Role is populated by default. If you have multiple roles, select the role for which you are entering time (if it is not the default).
b) Enter the hours.
c) Billable - whether this field is editable or not is determined by your organization.
d) Enter optional details in the Notes.
- Tap Save.
About Saving and Deleting
If you decide you don't want to save this timesheet entry - maybe you are on the wrong day, or need to leave the screen for some reason - click the arrow to the left of "Edit Entry". Or, if you click Save and then realize that you were on the wrong task, simple zero out the hours. If you click Delete, you will delete that project/task from the entire timesheet.
Submitting Timesheets
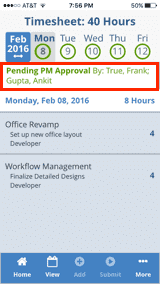
To submit a timesheet, tap Submit from either the Daily Entry or Timesheet view. A confirmation screen will appear,, where you can optionally add notes. Depending on your organization has configured PPM Pro, you might see some hard or software warnings. Hard warnings describe conditions that prevent the submit; soft messages are informational and allow the submit. Tap Submit to submit the timesheet.
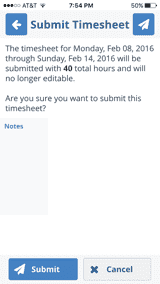
After you submit, you'll see a confirmation message and the name of the approver, also shown below. Once you submit a timesheet you can no longer edit its entries.