
Working with the Requests List
This video demonstrates how to navigate the request list and card views. Duration: 7.5 min.

Note: If you do not see the Requests nav icon but expect to, ask your PPM Pro administrator to give you the correct permissions - minimally Requests > View (global or category-specific).
There are two ways to view requests: the List view, which is similar to other entity grid views, and the Card view.
This topic discusses the List view. Click the Card View icon to switch to the card view, and click here to read about it.
The Requests List is the screen that displays when you initially click the Requests navigation icon. Whatever view you display prior to navigating away from the Requests entity will persist; that is, if you choose the Card view and then navigate to the Reports grid and then navigate back and click the Requests icon, the Cards view will be displayed. You can format request grid data (for example, add color, format dates, time, and currency) using the "Display Data As..." feature - see Formatting Column Values below.
The requests that populate this grid are determined by your permissions:
- If you have global permission to view or edit all requests (or permission for specific categories of requests), then you will see the appropriate requests.
- If you do not have global (or per category) view or edit permissions, then you will see all requests that you are involved with:
- requests you have created
- requests you have requested (are the requester for)
- requests you are asked to approve
- requests you are asked to score
Note that you can also view a list of requests on Home/Requests, but you are limited to requests that you created or requested, pending my approval, or can score. Note that these results correlate to the out of the box filters (prefaced with a +).
The Requests List is the starting place for creating requests, as well as approving and scoring requests (provided you have the appropriate permissions). You can also create requests from the Card view. Depending on your permissions and any filters you are applying, the Requests List can display all or a subset of requests that exist in your system. Note that requests titles do not need to be unique.
Anatomy of the Requests List
Below is a screenshot of the Requests List:

Customizing the List Contents by Category
Note: Category droplist not visible if only one category is defined.
The Request List can display requests from different categories. Since categories don't necessarily include the same fields, the list might include fields that are relevant for one request but not for another. You can filter by category AND display a set of columns specific to the category by using the Category droplist at the top-left of the screen.

Select a category and add, remove, and rearrange columns. Repeat for each category. The column configurations will persist for each category.
The All Categories selection shows requests from all categories in one list. Choose the category you are interested in working with, and the list will filter out entities of other category types and will display the list contents according to how you configured it.
The New Menu
The New menu contains the list of request categories from which you can create a request. Choose New > <category name> to create a new request. If your organization uses just one request category, then simply click the New menu to create a request.
The New menu is also home to Copy..., which allows you to copy a request. See Copying Requests.
Editing
Select single records by single-clicking; use shift-click to select multiple records (or hold down the shift key and hit the down arrow key repeatedly). When you select more than one record, the message "n items selected" is displayed (temporarily) in the footer of the page. This is useful if you want to select a range of records and want to know the count.
Double-click on a request to display a modal that minimally contains the request Details tab, and optionally the Notes, Attachments, Associations, Scoring, and Activity Log tabs.
You can edit grid fields by double-clicking on a record to invoke the request modal. All fields on the grid are displayed in the Details tab of the modal, where you can edit fields that you have permission to edit (there may be additional fields in the Details tab that are not displayed in the grid). Below is a screenshot of a request modal, with the Details tab selected:
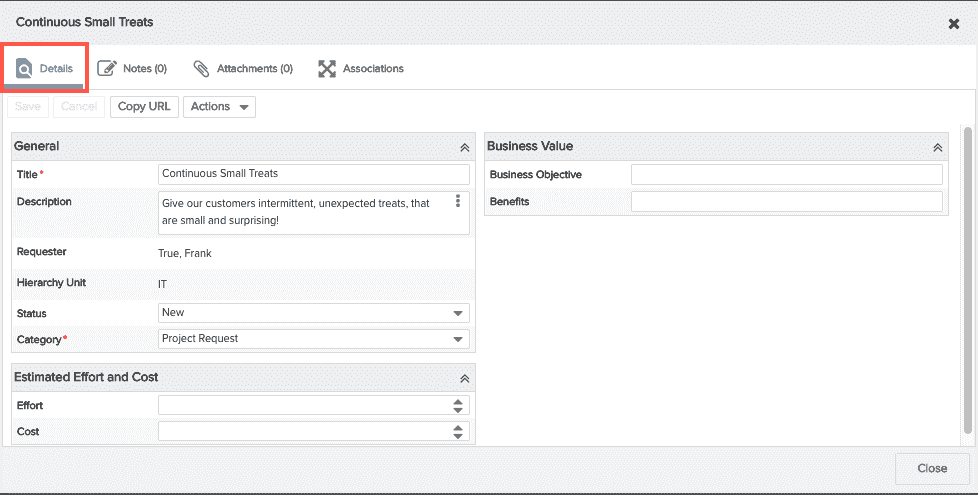
Once in the request modal, you can use your mouse and/or keyboard navigation. Tab moves you from field to field and to the Save/Cancel Buttons. Use arrow keys to move you through drop lists and suggested matches (for picklists) and use Return/Enter to make your selections. Click the Save button or use Ctrl-S to save.
Selecting Requests
Select single grid records by single-clicking; use shift-click to select multiple records (or hold down the shift key and hit the down arrow key repeatedly). When you select more than one record, the message "n items selected" is displayed (temporarily) in the footer of the page. This is useful if you want to select a range of records and want to know the count.
The Actions menu
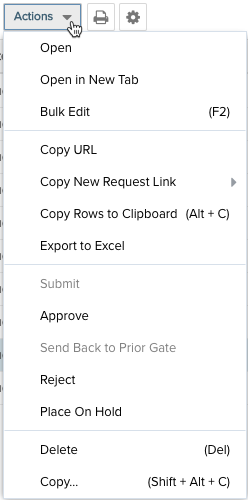
The Actions menu at the top-right of the screen holds all operations that you can perform on requests based on your user permissions. You can also access this menu by right-clicking on a request in the grid, or, if using the card view, by clicking the vertical ellipsis.
|
Actions menu |
Action |
Description |
|---|---|---|
 |
Open |
Opens a new window that displays the selected request's Details tab and other component tabs, if any (notes, attachments, for example). You can also double-click the request to open it, or right-click on the selected request and choose Open (or Open in New Tab). |
|
Open in New Tab |
Opens the selected request in a new tab displaying its Details tab and other component tabs, if any (notes, attachments, for example). |
|
| Bulk Edit | Opens an editor that allows you to edit multiple requests. Select the requests (Shift-click or Ctrl-click to select multiple rows) and then choose Bulk Edit. See Bulk Editing for more information. | |
| Copy URL | Copies the URL to the current request. | |
| Copy New Request Link |
Copies the New request link to the clipboard. If you have multiple request categories then you'll see a sub-menu with the category names; if just one category, you won't see the sub-menu. This is useful if your organization provides this link in a common area accessible outside of PPM Pro where users can initiate their requests. Note consumers of this link will still need to log into PPM Pro - ideal for organizations who use SSO. |
|
|
Copy Rows to Clipboard |
Copy the selected rows to the clipboard. (Shift-click or Ctrl-click to select multiple rows.) |
|
| Export to Excel | Export a maximum of 5000 list rows to Microsoft Excel. If you export 5000+ rows, you will be notified that your export will be truncated and encouraged to run a report to accommodate the large number of rows. Reports can handle up to 50,000 rows. See Printing the Requests List. | |
| Submit | Sends the request into the approval workflow. Current user must have Request > Submit permission. Request must have valid values for all required fields to enable Submit button. | |
| Approve | Provides one approval for the request. If only one approval is required, request moves to the next gate, or if at the last gate becomes "Approved". Current user must be implicit approver (derived from approval criteria) or explicit approver (has Approve/Reject/Send back to Prior Gate profile permission). If there are multiple approvers required, request will not move on to next gate until all approvals are performed. | |
| Send Back to Prior Gate |
Sends the request to a gate specified by the current user (will pick gate from list provided in modal). Gate must be "behind" the request (not a future gate). Once sent back, the request can flow forward through a different gate based on changes in the request, but cannot be sent back to a gate that was skipped (see Configuring Gate Flow). Current user must be implicit approver (derived from approval criteria) or explicit approver (has Approve/Reject/Send back to Prior Gate profile permission). |
|
| Reject | Takes the request permanently out of the workflow and gives a status of "Rejected". Current user must be implicit approver (derived from approval criteria) or explicit approver (has Approve/Reject/Send back to Prior Gate profile permission). Rejected requests cannot be revived, but can be copied and re-submitted. See Copying Requests. | |
| Place on Hold | Takes a request out of the work flow. Current user must be implicit approver (derived from approval criteria) or explicit approver (has Place on Hold/Place Back in Progress profile permission). Request can be edited while on hold. | |
| Place Back in Progress |
Puts a request back into the workflow at the gate where it was placed On Hold. Current user must be implicit approver (derived from approval criteria) or explicit approver (has Place on Hold/Place Back in Progress profile permission).
|
|
| Delete |
Deletes the selected request. Current user must have Request > Delete permission, and request must have New, Approved, or Rejected status. |
|
| Copy... |
Creates a copy of the selected request, replicating the structure of the request (sections to include) and optionally the values in each section. The ability to copy a request comes in handy if you reject a request, or simply change your mind, and want to resurrect it - you can make a copy and resubmit. See Copying Requests |
Printing the Requests List
See Printing the Entity List for information.
Formatting Column Values
NOTE
The ability to format column values is available for list reports and entity grids (Issue/Project Log List, Portfolio List, Project List, Request List, and Task List). Since this feature works the same way in either context, we are covering it in one topic. You might see references to both entity grids and list report columns.
For entity grids, the formatting is specific to each user - there is not currently a way to specify global formats. Note that if you choose Reset To Default Settings from the resource menu, you will lose your formatting entity grid formatting.
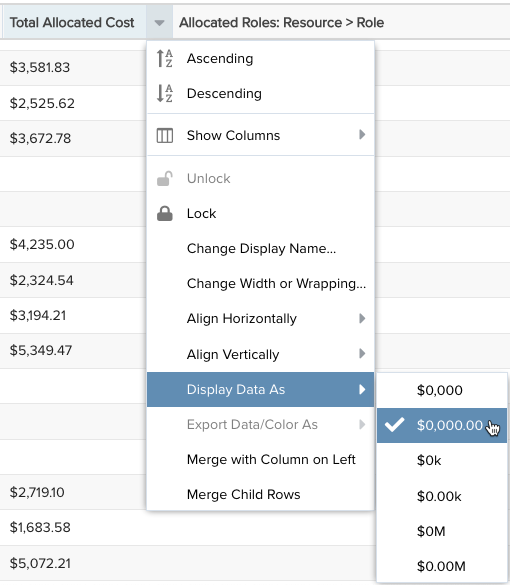
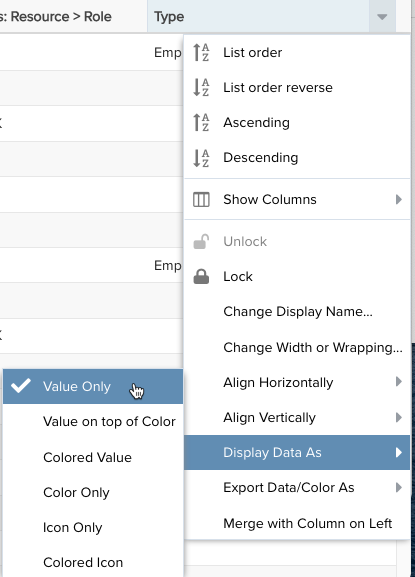
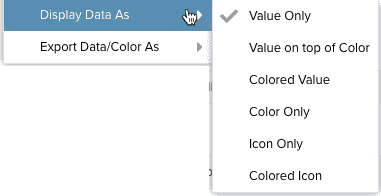
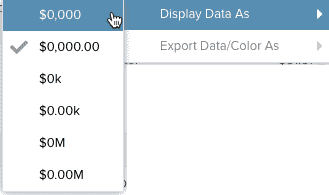
In the context of a List report or the entity grids mentioned above, an extensive header menu option called "Display Data As" is available for applying formatting to list fields, number fields, and date/time fields. The screenshot below (left) shows the Display Data As menu for a numeric fields with a currency data type; the screenshot below (right) show the Display Data As menu option for a list field:
|
Display Data As for numeric (money) fields
|
Display Data As for list fields
|
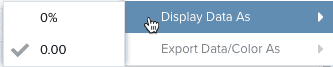
Formatting Data - "Display Data As"
The Display Data As menu header item is dynamic - it displays different menu items depending on the type of field you have selected. For example, select a lookup list and choose Display Data As to apply color to the value in the field, or the background, or both. If you select a numeric field, you'll get various options to specify things like the number of decimal places or currency indicator, whether to format percent fields to display whole numbers or decimals...and so on.
The Display Data As menu options for the different fields types are described below. Note that this menu is also available for entity grids, such as the Projects List, the Requests List, and the Tasks list.
Fields Types:
The formatting options for the above field types are described below:
| Menu Item | Description |
|---|---|
|
Lookup lists can be assigned a color and/or an icon for each list value. When using a lookup list in a report/grid that is configured to use color/icon, you can choose the visual treatment to apply to the list field value by configuring the "Display Data As" setting. Note that Pie charts and Column charts automatically use any lookup list color assignment.
|
Lookup List Examples: The Display Data As list field options are shown below, along with an example of each:
|
|
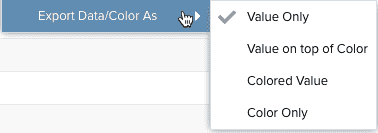
Export Data/Color As If you plan to export a report/entity grid that makes use of lookup list values that render color and/or icons, this options lets you specify how to treat the value/color when exporting. Note that icons cannot be exported as they only exist within PPM Pro.
|
Options are (see Display Data As, above, for examples):
|
|
Note: You can format numeric data values of non-list reports by using the Field Options modal. The following number types can be formatted with the Display Data As menu item: Percent Choose to show decimals or round to whole number.
Float Choose to show decimals or round to whole number.
Money Choose no decimals, 2 decimal places, thousands (k) and millions (M) representatives.
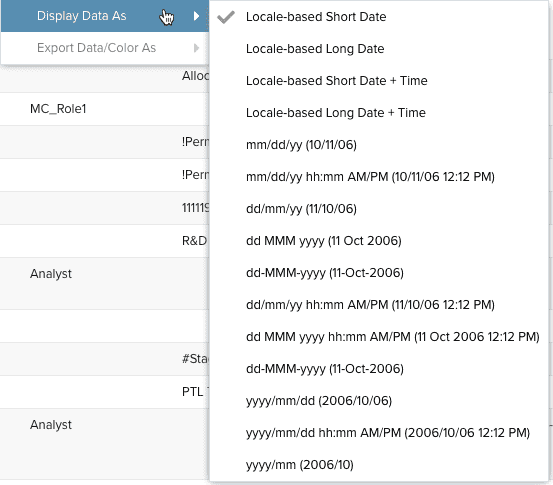
Choose from a large variety of date and date/time formats. Remember that as you choose a format it renders immediately in the Preview Pane, so try out different options. The date format examples are represented in each option label.
|
Values round up using conventional rounding standards - round up at a value of 5 or higher. Understanding the rounding is important when choosing the level of precision you want to use.
Percent Example: 32% or 32.36%
Float Example: 432 or 432.05
Money Examples: $0k $0.00k $0M $0.00M
|


Add/Remove/Rearrange and Sort Columns
You can determine the columns that appear in an entity grid using the Configure Column Settings dialog. Click the Configure Columns gear icon to display the dialog.
![]()
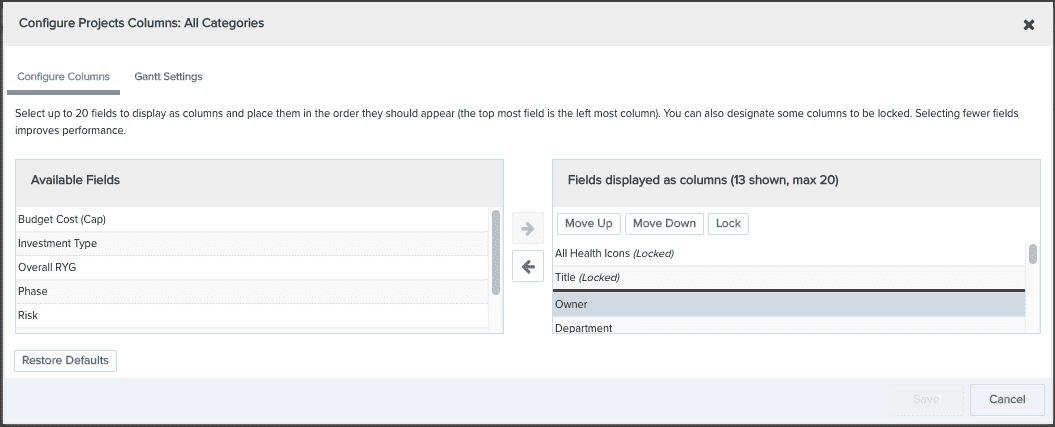
- To add columns to the grid, select them in the Available Fields pane and then click the right-arrow. To remove columns, select them in the right-hand panel and click the left-arrow. You can display 20 columns max. The list of fields available in this dialog is determined by the project category, which is configured by an PPM Pro administrator.
- You can select one or more columns to remain "locked" to the left of the screen in the non-scrolling region, preventing them from scrolling out of view. The Title field for an entity is locked by default. To lock an additional column, select the field and click the Lock button. To move a column into the scrolling section of the grid, select it and click the Unlock button (on appears once you select a locked column other than Title).
- You can move columns to any position in the grid by simply dragging the column header in the grid. Or, you can change their position by clicking the Configure Settings icon and using the Move Up/Move Down buttons to reorder the columns.
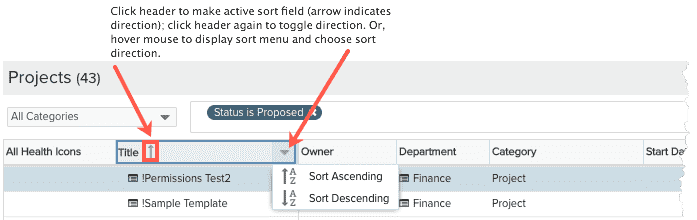
Sorting
To sort a list, simply click on a header. An arrow pointing up indicates ascending sorting; down indicates descending. Alternatively, click your cursor in the header to display the sort menu and choose the sort order - ascending or descending.
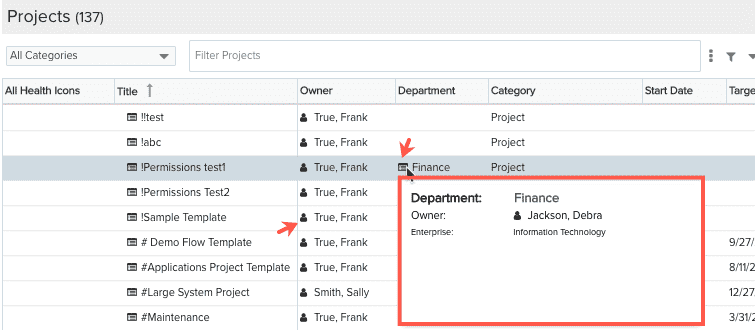
Entity Info Quick View
You can quickly display important information about other entities related to a project without having to navigate away from the Projects lists. Click the ![]() icon next to the name of any entity (such as business unit, department - the resource icon looks like
icon next to the name of any entity (such as business unit, department - the resource icon looks like ![]() ) to display a snapshot for the selected entity. Click the entity name link to navigate to the Info screen of the entity.
) to display a snapshot for the selected entity. Click the entity name link to navigate to the Info screen of the entity.
Filter/View Requests
Use the ad-hoc filter facility at the top of the page to manipulate the list to display the different ways you can be associated with a request. See Ad-Hoc Filters for more information.
-
Use the +Requests I Created filter to see the list of requests you created.
-
Use the +Request I Requested: filter to see the list of requests for which you are requester.
-
Use the +Requests I Can Approve filter to see a list of requests awaiting your approval.
-
Use the +Requests I Can Score filter to see a list of request you are expected to score.
Once you locate the request you want to act on, double-click it and take the appropriate action. See Managing Requests.