
Working with the Financial Entries Grid
This video provides an overview of project-level financial entries. Duration: 6 min.

The project Financials section contains the Financial Entries grid, which displays the forecasts and actuals for the project. The ability to view/edit forecasts and actuals depends on your project permissions. If you do not see a Financials link in your project's left-nav, or if you do not see/cannot edit entries that you should, please contact your PPM Pro administrator and have your permissions adjusted.
Anatomy of the Financial Entries Grid
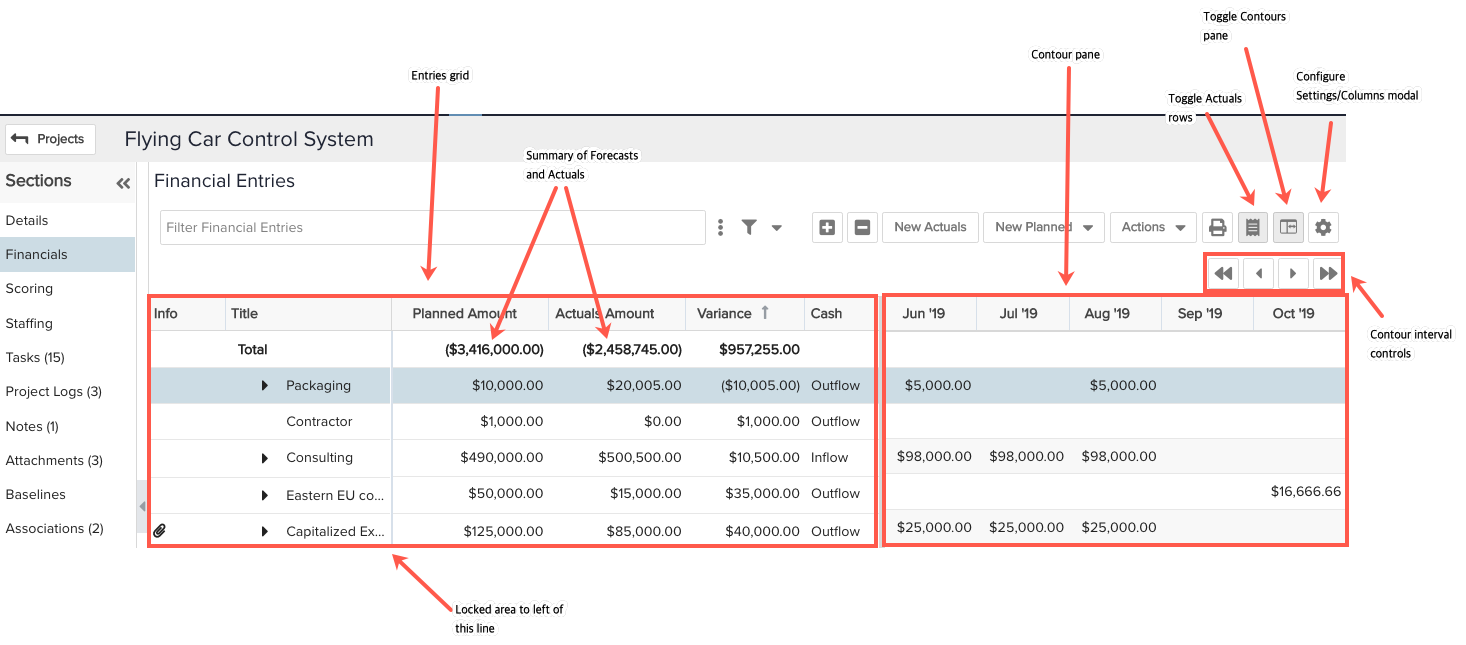
The Financial Entries grid provides a list of all forecasts and actuals entries on the left-hand side, and an optional "contours pane" that you can use to distribute amounts in monthly intervals. You can hide/show the contours by clicking the Contours icon shown in the screenshot below.
The first row of the grid shows the total forecast and actuals amounts, as well as totals for any numeric user-defined fields. The Info column displays an icon if the entry has one or more associations, notes, or attachments (respectively, as shown in screenshot below).
The New Actual and New Forecast buttons are described in Creating Forecasts and Entering Actuals.
The Actions Menu
The Actions menu at the top of the grid holds operations that you can perform on the list of financial entries. Note that if you only have permission to view forecasts, then you will not see an Actions menu.
 |
Menu Item | Description |
| Edit Entry | Select and entry and choose Edit Entry to invoke the Edit modal where you can edit the entry Details such as Title, Amount, From Date, and the other fields included in the modal. This is also where you can manage the entry's Notes, Attachments, or Task Associations, if available. | |
| Edit Contour | Select an entry and choose Edit Contour to open the inline editor for the contour. | |
| Add Actual | Right-click on a forecast and choose Add Actual to display the New Actual modal (same as selecting the forecast and clicking the Add Actual button). This menu item is not available from the Actions menu. | |
|
Expand All Collapse All |
Expand All opens every entry and displays all child entries. Collapse All closes the tree to show only top-level forecast entries (actuals not visible). |
|
| Delete | Select an entry and choose Delete to delete the selected entry. You cannot delete a forecast that has one or more actuals. | |
| Export To Excel | Downloads the current Financial Entries grid as an Excel file. Includes every column visible in the grid plus every month visible in the Contours pane. You need permission to view forecasts or actuals to see this option. | |
| Import From Excel | Updates existing financial entries from an Excel file. Opens a file picker to select the Excel file to upload. You need permission to edit forecasts or actuals to see this option. |
Customizing the Grid and Distribution Contours
Your PPM Pro administrator configured a set of default columns for the entries grid. For example, in the screenshot above, the Title, Forecast Amount, Actuals Amount, Entry From Date and Entry To Date fields were configured to appear by default. You can make a variety of modifications to the default grid, including:
- Adding/removing columns
- Reordering columns
- Placing columns in non-scrolling region (lock)
- Sorting
- Setting the number of months to display in the Contours pane
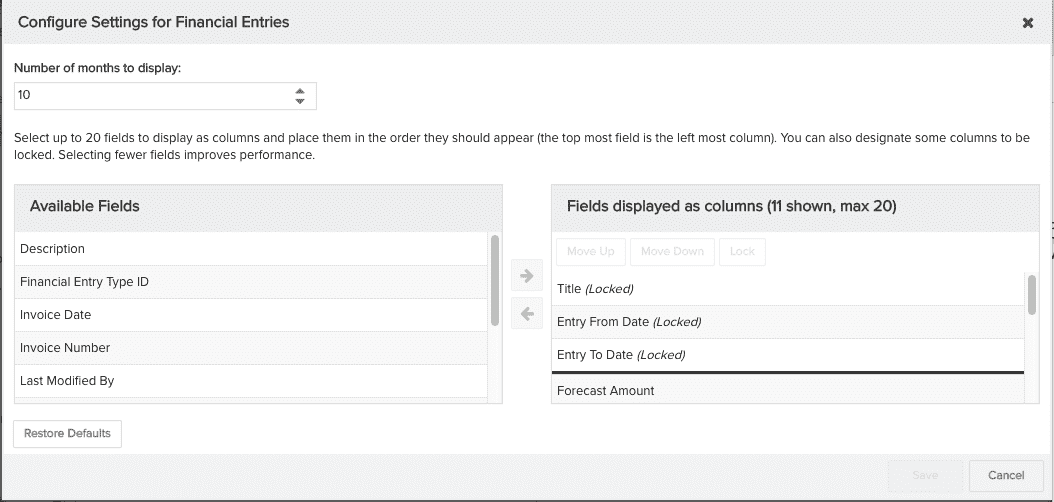
All of the above are configured in the Configure Setting dialog, as shown below:
Add/Remove Columns
A maximum of 20 columns can be displayed on the grid.
To add columns to the Financial Entries grid, click the gear icon to display the Configure Settings dialog. Choose the fields you wish to display in the grid by selecting the field in the Available Fields panel and clicking the right arrow (or double-clicking the field). The field will be positioned in the unlocked area (below the dark line).
To place a field in the locked section of the grid, select it and click the Lock button to move the field to the right-most position in the locked area. Note that by default the Info column appears in the left-most column on the grid. You can reposition it by dragging and dropping it. The Info field does not appear in the Configure Columns dialog because it is required to be on the grid.
Move/Reorder Columns
To move columns, simply drag and drop to the desired position on the grid, including the "locked" region. The locked area is to the left of the vertical bar. Alternatively, you can open the Configure Settings dialog, select the field to move and click the Move Up or Move Down buttons until the field is in the desired position.
Sorting
To sort the grid, simply click on a header. An arrow pointing up indicates ascending sorting; down indicates descending. Alternatively, click your cursor in the header to display the sort menu and choose the sort order - ascending or descending.

Set Number Contours/Months
You set the number of months to display in the Contours pane by entering a value for the "Number of Months to Display" setting. The minimum number of months to display is 10.
What's Next?