
How Do I Grant Units Access to Specific Projects
You can limit access to a unit via an Association rule or a Team rule (see About Profile-Based Permissions for information about rule types).
- Use an Association rule if you want to limit access to a Unit AND your organization has very clear, overarching rules that can be applied to any projects associated with the Unit. Associations are defined by "types"; for example, you might have 10 projects associated with a unit using one type. All 10 projects would be governed by the same permissions. There are 4 association types, so you can use up to four profiles for each unit (one profile for each association type).
- Use a Team rule if you want very granular control over each and every project. You can have a different profile for each project that you give the unit access to, or you can use the same one, or have a couple of different profiles - infinite possibilities. Team rules can be applied to units and groups.
Association Rule
You can establish unit relationships to multiple projects, giving the same permissions to each project. Then as you add unit members, they will automatically be provisioned with the appropriate project access. And, as you add new projects, the unit members will be given the same access to any project associated with the unit with the specified Association rule type.
Check that your Organization Hierarchy is filled out. See Creating/Populating Org Hierarchy.
- Navigate to Admin/Organization/Hierarchy and select the unit you'd like to grant access to specific projects.
- Click the Associations tab.
- Expand the Project section and click the Add button.
- In the Add Project dialog, choose the project(s) you want to associate with the unit (use Shift-click or Ctrl-click to multi-select).
- At the bottom of the dialog, choose the association type. For this example, let's choose Funded by Unit.
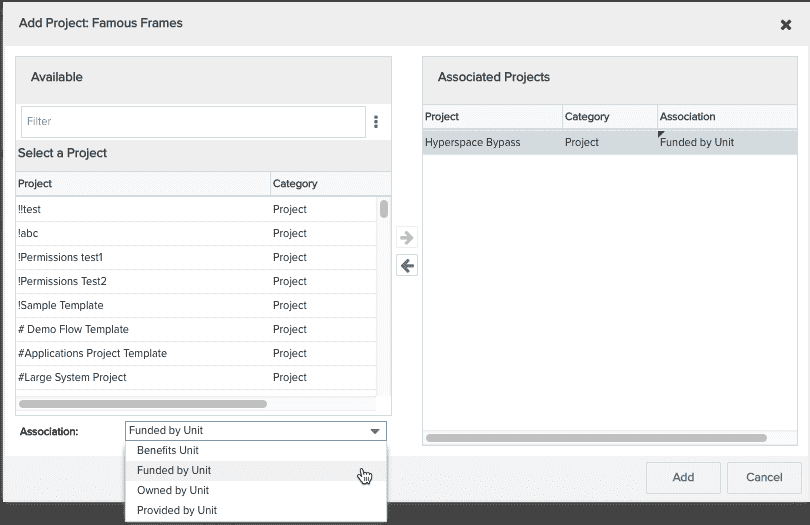
- Click Add.
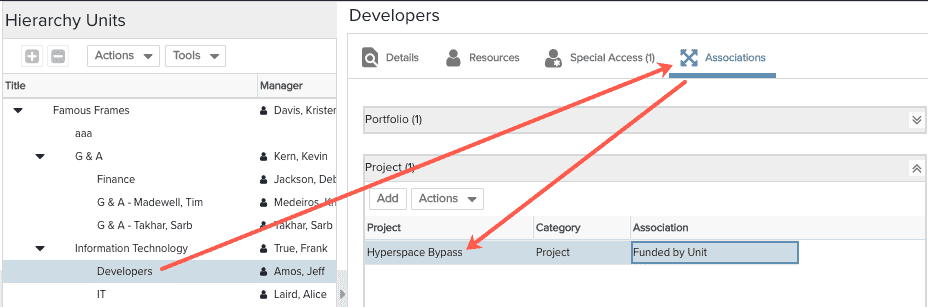
The screenshot below shows the Developers unit, its Associations tab, and the Funded By Unit association with the Hyperspace Bypass project.
Once you establish the association, create a permission rule that is based on the association, and then configure the permissions you want to grant to the Unit members for the projects involved in the association.
- Navigate to Admin/Permission Profiles.
- Above the Profiles list, click the New button.
- Enter a title for the profile like "Projects Funded by Developers Unit".
- Configure the permissions; for example, expand the Project branch and click the Edit checkbox.
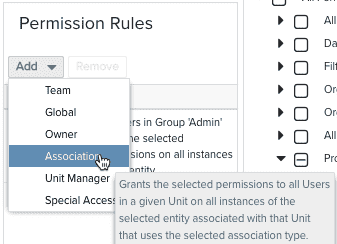
- Add an association rule by choosing Add > Association from the Permission Rules section.
- In the Add Permission dialog, choose the association type that you configured for the unit. For this example, choose Unit/Project/Funded By Unit.
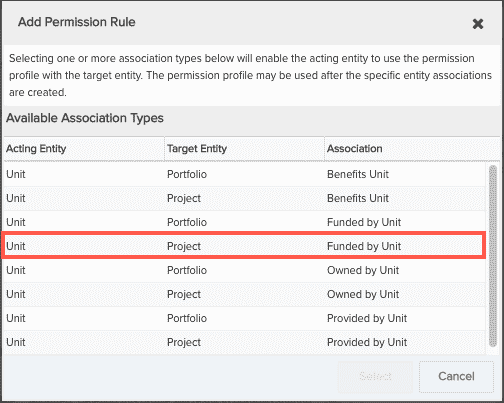
- Click Select.
- Click Save at the top of the page.
Now, members of the Developers unit have the permissions in the Funded by Developers Unit profile for any project that has the Funded By Unit association. Note that you can create the association either from the unit (as shown in this example) or in the project's Associations section. See Associating Units with Portfolios or Projects.
Team rule
As mentioned above, this approach can get as granular as you want it. You can create a profile with different permissions for each project, or perhaps a set of projects. You can then add the unit or group to each project (use the Bulk Add Team member feature). Or, you can create a template for certain types of projects and put the unit/group on the team of the template. Then each time you create a project from the template, the permissions will be set up. The example below shows how restrict access to certain projects to a specific unit; members of the Developers unit will be restricted to viewing projects of category "Research" only.
Check that your Organization Hierarchy is filled out. See Creating/Populating Org Hierarchy. Note that these instructions apply if you want to use a group instead of a unit.
- Above the Profiles list, click the New button.
- Enter a title for the profile like "Research Project Permissions".
- Configure the permissions; for example, expand the Project branch and click the View checkbox.
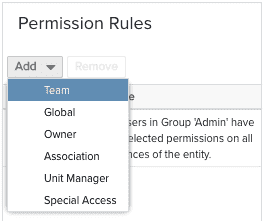
- Add a Team rule by choosing Add > Team from the Permission Rules section.
- Click the Project checkbox in the Add Entity Type dialog.
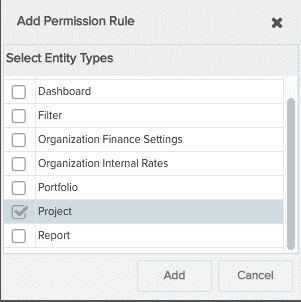
- Click Add.
Now you can add the Developers unit (or a group) to all projects using the Research category.
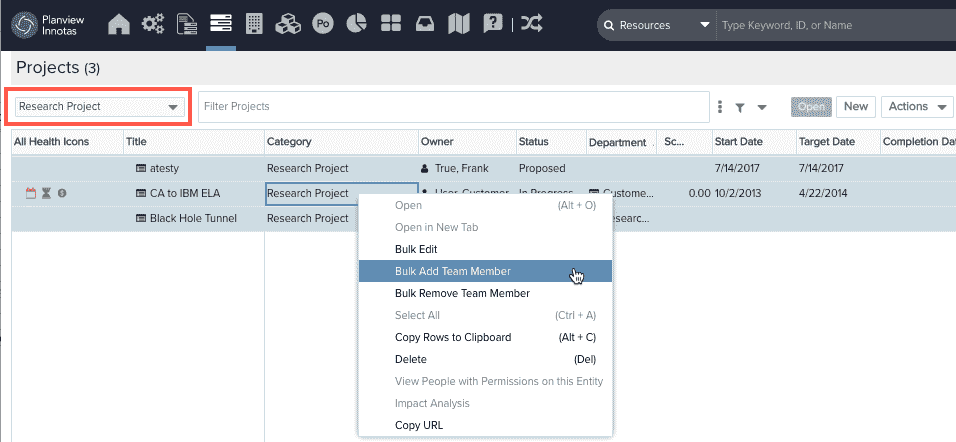
- Navigate to the All Projects page.
- Filter the page to show all project with category = Research. You can use the category droplist at the top-left of the Projects lists.
- Select all the projects and choose Actions > Bulk Add Team Member, or right-click and choose Bulk Add Team Member.
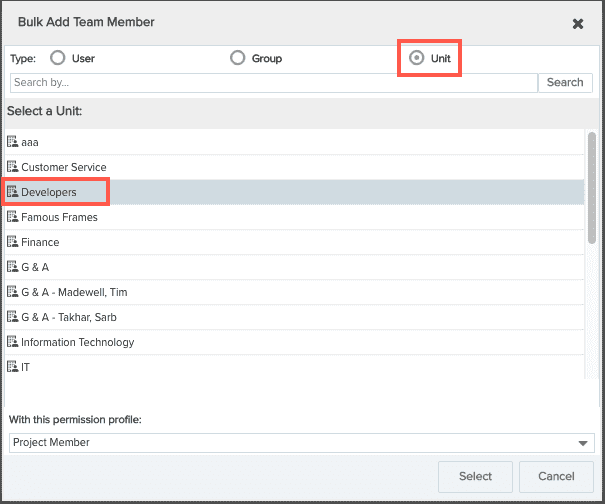
- In the Bulk Add Team Member dialog, click the Units radio button, select the unit, and click Select.
You have given the Developers unit permission to view all project with the category Research Projects. When you add additional members to the Developers unit, they will automatically get permissions on the appropriate projects. However, if you create a new Research projects, you'll have to add the Developers unit again, unless you create a template for Research projects and put the Developers unit on the template team. Then, when you create projects from the template, they will have the correct team members automatically (remember to copy the Team members from the template).