
Creating a scenario
You develop What If scenarios by loading your capacity and demand data into the workbench and then manipulating it. To load the data, you configure a set of filters to determine the date range and frequency, and then you specify the project, roles, and resources. The weekly frequency is limited to one quarter (13 weeks), and the monthly frequency is limited to one year (12 months).
You can use the Capacity and Demand filter defaults (None) to quickly establish an initial scenario that contains all the projects available to you with an implied status of OPEN, and all roles/resources scheduled or allocated to those projects - just click the Run button.
In addition, you can use custom filters to return more specific data. For example, you can create a filter that returns all users with a primary Organization role of Architect, or all users that are at a particular location (close to the project), or all projects with a status of Deferred. A common approach to use a project filter along with the default resources and roles to give you an initial view of demand and allocations. If the project is under-allocated, then you can add resources from within the workbench to enlarge your pool of resources. If the project is over-allocated, you can add another project from within the workbench.
Note: If you create a filter for projects and use the defaults (None) for resources and roles, you will get all the resources and roles scheduled or allocated to the projects returned by the projects filter.
Existing project, resource, and role filters are displayed in the drop-down lists; you can create new filters at runtime by choosing (manage). See About Filters and Creating Filters for more information.
Once you configure the filters, click Run to display the workbench, fully populated with the data you described. Now you can use the What If Workbench to experiment with the workload by including or excluding specific projects and resources, shifting dates, and adding capacity and/or demand. If you decide you want to save a scenario, you can do so from within the workbench.
The Options tab contains settings for configuring some display details in the What If Workbench.
To configure What If filters
- Navigate to the What If tab.
- Click the Create button to invoke the What If filters dialog.
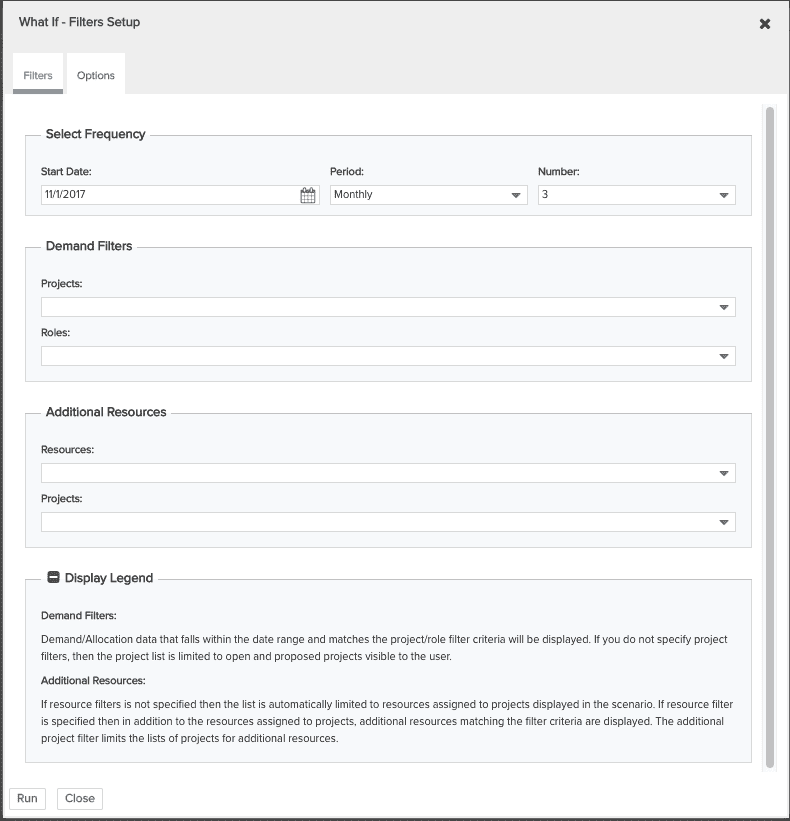
- Set the frequency by setting the Start Date and choosing Period: Weekly or Monthly.
Note that the Period you choose will be used in the Workbench to set the increment for shifting projects, resource, and roles. For example, if you choose Weekly, then you can shift one week at a time. Choose Monthly to allow shifts of monthly increments.
- Choose the number of intervals in the Number field. Weekly is limited to 13 weeks; Monthly is limited to 12 months.
- Demand Filters defaults of None to select all projects that are available to you and all roles allocated to the project(s).
If you wish to work with a single project or role, or set of projects or roles described by a filter, choose the filter from the droplist. For example, you might want to see only project with a status of proposed.
You can create custom filters to add to the default data by clicking (manage filters). For example, you can create a project filter to include all deferred projects (in addition to those with an implied status of open), or a resource filter to include all resources that report to you (in addition to all resource scheduled to the returned projects). See About Filters and Creating Filters for more information.
- Use the Additional Resources filters defaults of None to select all resources scheduled to the project(s).
The Resources filter lets you include additional resources based on the specified filter; these resources are in addition to any resources already scheduled to the projects specified by the Projects filter.
The Projects filter allows you to constrain the list of projects displayed in the resources and roles grids. For example, you might use the default of None in the Projects filters, which returns all projects with an implied status of open or proposed. You could use a project filter specifying that you only want to see resources scheduled to projects with a status of open.
Note: If you used the default None for the Projects filter, and do not use a filter for Projects (Additional Resources), the workbench displays resources/roles scheduled or allocated for ALL projects, not just projects with a status of open or proposed. Use the Projects filter to display resource/roles for exactly the projects you want.
- Click Run.
Once you display the Workbench, you can re-run the workbench with your original filters (if, for example, you made changes that you want to discard and start again), or you can reconfigure the filters and re-run the Workbench. See The Actions Menu for more information.