Working with Filters
This video provides an overview on using filters. Duration 2.5 min.
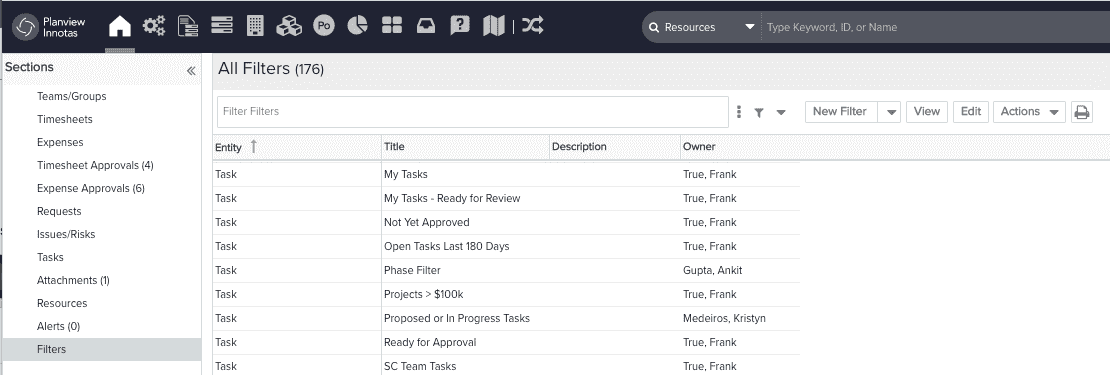
The Filters list page is the screen that displays when you click Home/Filters or Admin/Setup/Filters. This page all filters available to you, and allows you to copy, edit, delete, share - provided you have the appropriate permission. You can create new filters from this screen.
Anatomy of the Filters List page
Below is a screenshot of the Home/Filters List page. The Admin/Setup/Filters page uses the same interface.

Viewing Filters
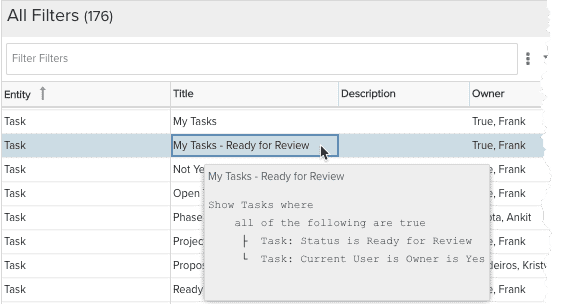
To view a filter's definition, select it and click the View button, double-click the filter record, or hover your cursor over the title (shown below):

Note that you can also select the filter, right-click and choose View from the context menu.
Filter List Actions menu
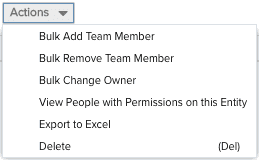
There is a set of common actions that you can perform on filters from the Filters List page. These actions are contained in the Actions menu, as well as the right-click context menu.
| Action | Description | |
|---|---|---|
 |
Bulk Add Team Member | Use to add users, groups, or units to the teams of multiple filters to quickly provision permissions. See Bulk Sharing Permissions. |
| Bulk Remove Team Member |
Use to remove users, groups, or units from the teams of multiple filters. See Bulk Sharing Permissions. Note that the Bulk Remove Members dialog displays a list of all users/groups/units in the system, and does not reflect actual team membership. |
|
| Bulk Change Owner | Use to assign a new owner to the selected filters. Useful if current owner has been terminated, or inactivated, and you want to reassign ownership to active user. | |
|
View People with Permissions on this Entity |
(Admin only) Brings up the Permissions Explorer and lists resources with permissions on the selected filter. See Using the Permissions Explorer. |
|
| Export to Excel | Exports the Filters List page to Excel. | |
| Delete | Deletes the selected filter(s). |
Copying, Editing, Deleting Filters
Filters can be copied, edited, and deleted by users with the appropriate permissions.
Copying a Filter
You can copy any filter that is present in your list of filters by selecting it and choosing Copy from the New Filter split-button, or right-clicking on the filter and choosing Copy from the context menu. Copying a filter can be useful when you need to make a slightly different version of an existing filter. You can simply copy the existing filter, make the changes, and save the copy as a new version of the original filter.
You can copy a filter to use as a starting point for a new filter.
To copy a filter:
- Navigate to Home/Filters, Admin/Setup/Filters (if an Admin), or choose (manage filters) from the bottom of a Filter droplist.
- Right-click the filter you wish to copy and choose Copy.
- In the Edit Filter window, make any changes to the filter by adding or deleting elements.
- The original title has been prefaced with "Copy of" - you might want to change the title, and optionally include a description.
- Note that any team members on the original filter have been copied to the new filter - check the Visibility tab and make any adjustments.
- Click Save.
Editing Filters
Note: You cannot edit timesheet filters that are currently in use or filters used in filter-based groups. If you need to edit the current timesheet filter (project or task), you must first temporarily assign a different filter, make your edits, and then reassign the edited filter in the timesheet settings. Otherwise, the current filter is grayed out in the list of filters and is not editable.
- Navigate to Home/Filters, Admin/Setup/Filters (if an Admin), or choose (manage filters) from the bottom of a Filter droplist.
- Right-click the filter you wish to copy and choose Edit.
- In the Edit Filter window, make any changes to the filter by adding or deleting elements.
- Check the Visibility tab and djust the team membership, if necessary.
- Click Save.
Deleting Filters
- Navigate to Home/Filters, Admin/Setup/Filters (if an Admin), or choose (manage filters) from the bottom of a Filter droplist.
- Right-click the filter you wish to copy and choose Delete.
- A confirmation dialog will prompt you to confirm or cancel the delete.


