
About the Resource Workbench
This video demonstrates how to navigate the Resource Workbench. Duration: 6 min.

See also: Resource Planning Terms and Influences
The Resource Workbench is designed to give resource managers the ability to see the workload and assigned staffing for their resources, so that they can manage resource assignments more effectively. The workbench provides a single place to view/edit/delete allocations across many (open) projects, allowing resource managers to make allocation edits in bulk, rather than visiting the staffing page for each project allocation. In addition, users with appropriate permissions can create staffing entries from the workbench.
The Workbench shows overall resource utilization, the specific project allocations for each resource, and allows editing of resource allocations across projects. Note that:
-
the Resource List (upper pane) bases its calculations on the Resource calendar
-
the Allocation Details pane (lower pane) bases its calculations on the Project calendar
-
only open project are considered
The Workbench also provides a facility for helping you find unstaffed demand that is suitable for a selected resource. For example, if you see an under-utilized resource in your list, select it and click the Find Demand... button, which displays a facility to help quickly look for demand. See Finding Eligible Demand for more information.
Below is a screenshot of the Resource Workbench:
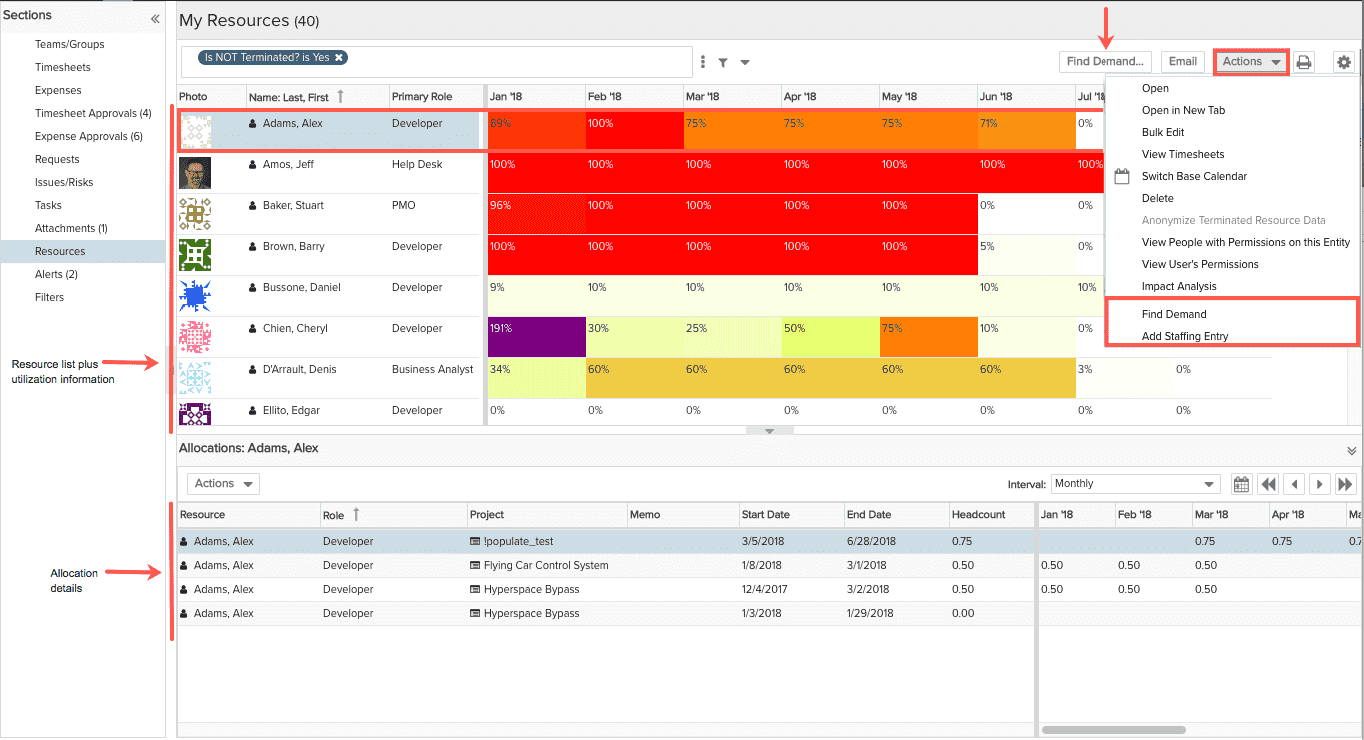
Resource Utilization Pane (Upper)
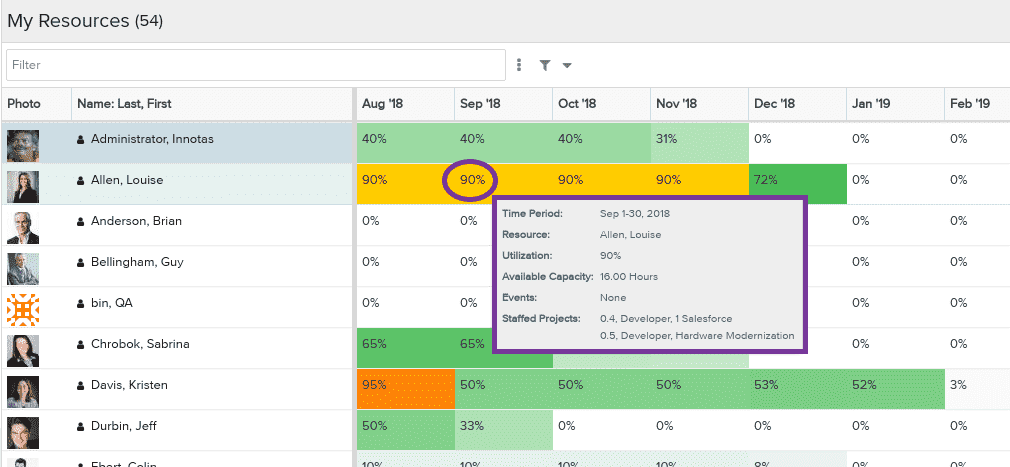
Utilization is color-coded, providing you a quick visualization of resource utilization. Utilization percentages are derived from the resource's calendar and are calculated as the resource's allocation hours divided by their calendar capacity hours. If you are curious about why the utilization value may not match the allocation value in the lower pane for a given month, see Why Don't the Numbers Match?
The heat map colors can be configured by an PPM Pro administrator in Admin/Organization/Resource Settings (see Resource Settings for more information). You can configure the time interval and whether to display demand in Hours or Headcount (see Configuring the Resource Workbench). Hover over any utilization cell to see a quick view of that resource's staffing details for that time period, as shown below (note that Available Capacity = Actual Capacity minus current allocations):
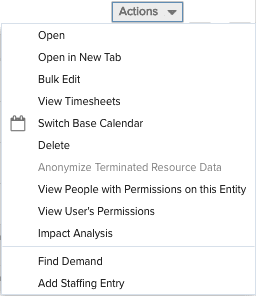
Actions Menu - Resource Utilization Pane
The Actions menu for the Resource list provides some common operations for working with resources. Select the resource and then select one of the following from the Actions menu (you can multi-select resources for Bulk Edit):
 |
Menu Option |
Description |
|
Open |
Opens selected resource's Info page in the same window |
|
|
Open in New Tab |
Opens selected resource's Info page in new tab |
|
|
Bulk Edit |
Opens modal displaying info for selected resources (shift-click or ctrl-click to multi-select) |
|
| View Timesheets | This option is only available if you have permission to see/approve the selected resource's timesheets (timesheet approver/alternate approver, Final or PM) or are the resource's Immediate Supervisor. Selecting this option opens a new tab displaying the selected resource's timesheet for the current period. | |
|
Switch Base Calendar |
Change the base calendar used for the resource. By default, the resource calendar is the Organization calendar. |
|
| Copy Rows to Clipboard | Copy the selected rows to the clipboard. (Shift-click or Ctrl-click to select multiple rows.) | |
| Delete | Deletes the selected resource. | |
| Anonymize Terminated Resource Data | Available if selected resource has a termination date of today's date or earlier and current user has administrative privileges. Invokes a dialog asking to confirm intent to anonymize selected resource's personal field values. See General Data Protection Regulation (GDPR) for more information. | |
| View People with Permissions on this Entity | Displays the Permissions Explorer with the focus on the current resource (who has permissions on this resource). See Using the Permissions Explorer. | |
| View User's Permissions | Displays the Permissions Explorer from where you can browse entities the current resource has permissions on. | |
|
Impact Analysis |
Invokes the Impact Analysis tool in a new window with the currently selected resource as the focal point. See About Impact Analysis. |
|
| Find Demand | Allows you to quickly visualize the availability of resources. See Finding Eligible Demand. This feature available only if you have permission to staff (Staff Directly permission if using managed staffing; otherwise Edit permission on Project > Staffing screen). | |
|
Add Staffing Entry |
Allows users with appropriate permissions to create an allocation. This feature available only if you have permission to staff (Staff Directly permission if using centralized staffing; otherwise Edit permission on Project > Staffing screen). |
In addition, click the Email button to bring up a window from which to send an email message to the selected resource. Note also that you can print the upper grid.
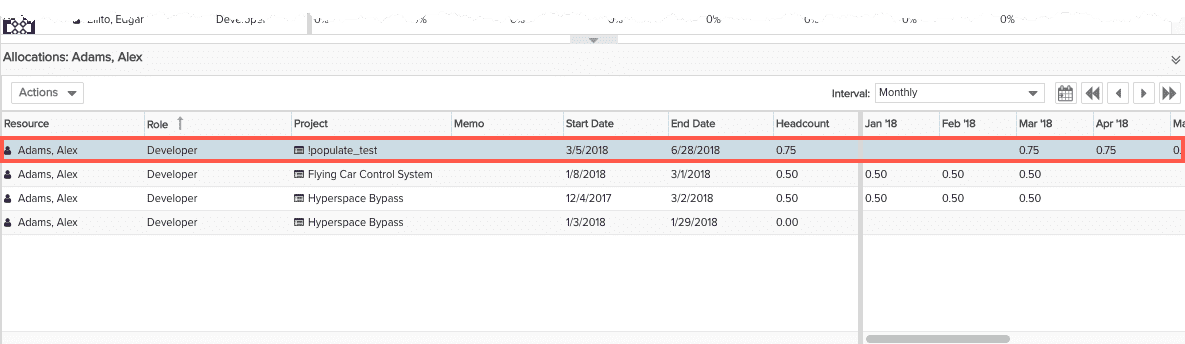
Allocation Details Pane (Lower)
Select a resource from the resource list (upper pane) to view all staffed allocations for that resource (lower pane); you can multi-select to see allocations for multiple resources in case you want to contour them at the same time. Each allocation displays the total headcount as well as monthly contours. Allocation percentages are derived from the project calendar. If you are curious about why the utilization value in the upper pane may not match the allocation value for a given month, see Why Don't the Numbers Match?
Note: If Managed Staffing is enabled, allocations that have been proposed or requested will also appear in the Allocation Details panel. In addition, you can add a "Status" column to the grid that reflects the status of each record: New, Requested, and Staffed. Since the Resource Utilization pane only reflects utilization numbers for staffed allocations, the numbers in the upper and lower panes might not match.
You can edit an allocation provided you have the appropriate permissions and the project is in Project-level planning mode. (Projects in Task-level planning mode are read only). If using Managed Staffing, you must additionally have the Staff Directly permission (See About Staffing Permissions for more information). If using ad-hoc project staffing, you must have edit permission for the project and the project must be in project-level planning mode. You can adjust the columns to display in this pane (see Configuring the Resource Workbench).
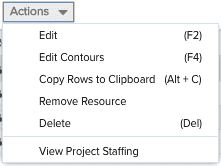
Actions Menu - Allocation Details Pane
The Actions menu for the Allocation Details pane provides some common operations for working with allocations. Select the allocation and then select one of the following from the Actions menu (note that all allocation edits, including adding and deleting allocations, require the project to be in Project-level planning mode):
 |
Menu Option |
Description |
|
Edit (F2 or fn-F2 for the Mac) |
Enter edit mode for the selected row. |
|
|
Edit Contours (F4 or fn-F4 for the Mac) |
Enter edit mode for the contours in the selected row. |
|
| Copy Rows to Clipboard | Copy the selected rows to the clipboard. (Shift-click or Ctrl-click to select multiple rows.) | |
|
Remove Resource |
Removes the resource from (unstaffs) the allocation. This action is not permitted if the allocation has task schedules associated with it. |
|
|
Delete |
Deletes the allocation. If time has been charged to this allocation and it has task schedules, the charged time will not be reported against any allocation and the task schedules will also be deleted. |
|
|
View Project Staffing |
Brings up the project Staffing screen for the project to which the selected allocation is for. |