
Creating a Scenario
This video demonstrates how to create a scenario in PPA. Duration 4.5 min.
To create a scenario you configure information about what value to optimize for (see Setting up the PPA environment for tips on optimization fields) over a specific time horizon, the types of projects you want to include in the optimization, resource and budgetary constraints, and what kind of project manipulation you will accept. You create scenarios from the PPA tab list page.
Click the Create button at the top of the Scenarios list page. You are presented with a 3-panel configuration wizard. Fill out the panels as described below:
Step 1: Enter general information
|
Setting |
Description |
|---|---|
|
Title |
(Required) The name of the scenario. The title appear on the List page. |
|
Description |
(Optional) Supporting information about the scenario. |
|
Optimize for |
(Required) The value on which to base the optimization. The drop list is populated with the fields you specified in the Scenario settings dialog. If you did not specify any fields, then all numeric project fields are listed. See Setting up the PPA environment for tips on optimization fields. |
|
Start Date |
The date that begins the planning horizon. Note that scenario evaluation always begin on a Monday. So if you specify a date that is a Wednesday, the scenario will start the Monday of that week (2 days earlier). |
|
Period Size |
The interval that defines the planning horizon. Options are Week, Month, Quarter. Note that whatever Period Size you choose to represent the time horizon, for efficiency PPA always analyzes in weeks and the end date will always be a Sunday. So if you specify a Period Size of Month, and the month ends on a Friday, the scenario will not end until the Sunday of that week (2 days later). Any resulting adjustments to Start Date and End Date will be displayed at the bottom. |
|
# of Periods |
The number of intervals in the planning horizon. |
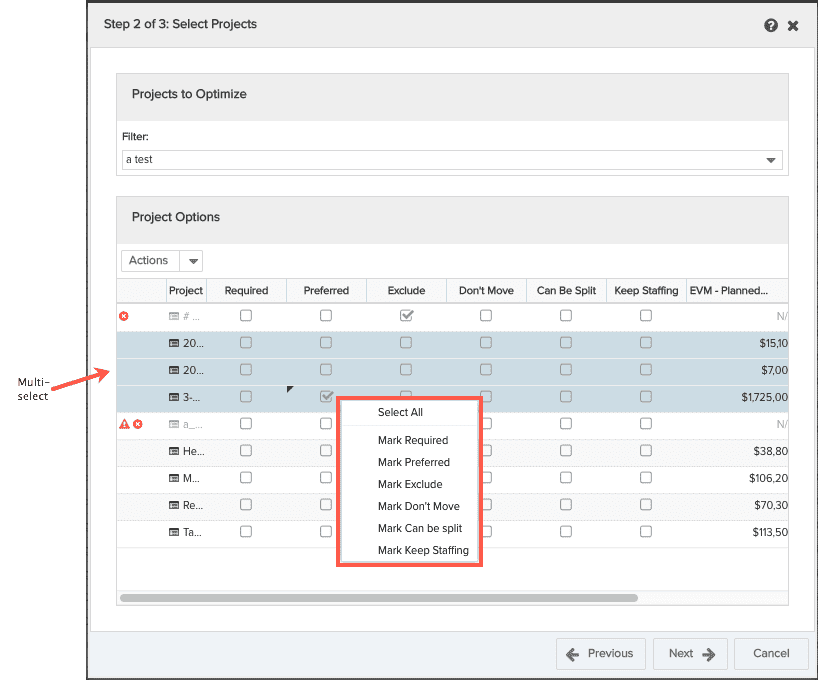
Step 2: Select Projects
Select the filter that displays the superset of projects you want evaluated in the scenario. For example, you likely want to use a filter that pulls in one or more portfolios of projects and that excludes closed or on hold projects. If the number of projects or resources exceeds the maximum allowed (250 projects/ 500 resources), an error message will display and you will need to select a different filter. This limit has nothing to do with the total number of projects/resources in your instance (unless no filter is used) nor the number of projects in a portfolio (unless the only filter condition is that portfolio).
A best practice is to select projects whose time horizons (start to target dates) are around half the size of the PPA planning time horizon, allowing for some to be shorter or longer as needed of course. Or conversely, to use a PPA planning time horizon (see earlier step) that is twice as long as most of the projects. This allows the engine room to fit the various projects. For example, if most of your projects are 6 months or less, running a 12-month planning horizon is good. If you have projects that are 5 years long, try to break them down a bit to get better value out of PPA. One 15-month project out of 100 on a 12-month planning horizon isn't going to cause an issue, but if all of them are in the 15-month range you will see a lot of excluded projects.
You can optionally select settings (described in the table below) for the projects in the scenario. Be sure about any selections you make as the scenario results will likely be less optimal when you explicitly force a project to Keep Staffing, make it Required, and so on. You can select the checkboxes for one project at a time, or you can select multiple projects and use the right-click context menu to select a property and apply it to the selected projects.
|
Setting |
Description |
|---|---|
|
Filter |
(Required) Choose a project filter. The filters are populated by your Project filters. If there is a filter you know you want, create it on the Project page in PPM Pro; you cannot create new filters in the Select Projects step. Note there is a 250 project limit, so be sure to use the project filter accordingly. |
| Excluded project indicators |
If one or more projects will be automatically excluded due to missing information, a column with icons will appear. Hover over each icon to see the exclusion reasons, for example a project will be automatically excluded if it does not have a value in the optimization field or if it does not have allocated roles:
|
|
Project |
The name of any project that satisfies the filter. |
|
Required |
Select this checkbox only if a project must be included in the scenario, even if it causes over-allocations. A project can only be Required, Preferred, or Excluded, not a combination of these. Required projects are scheduled before other projects by the PPA engine. In the event that there is insufficient capacity to staff all projects marked as "required," the engine will schedule projects so as to minimize the over-allocation. Resource placeholders titled "To Be Staffed" will be included in the scenario result to cover the resource shortfall necessary to schedule the project. Note that this can result in total allocations exceeding total capacity for some or all time periods in the scenario result. |
|
Preferred |
Select this checkbox only if a project should be given priority and be considered first in the scenario analysis. For example, a project has really high value to the organization and it would be good to get it done if it fits in the scenario. A project can only be Required, Preferred, or Excluded, not a combination of these. Preferred projects should be scheduled before projects that are not marked "Required" or "Preferred". Such projects might still not be included in the scenario result if there is insufficient capacity to staff them at all, but they won't be displaced by projects that are neither "Required" nor "Preferred". |
|
Exclude |
Select this checkbox only if a project should not be included in the scenario analysis. A project can only be Required, Preferred, or Excluded, not a combination of these. |
|
Don't Move |
Select this checkbox only if the start/end dates of a project cannot be shifted. |
|
Can be Split |
Select this checkbox only if the allocations for a project do not have to be contiguous. That is, a project can be started, stopped, and started again. For example, when a project is set to "Can be Split", the scenario results could change the project to be started March 1 and stopped on April 28 and then restarted on July 3 and end on September 19, such that no work is done for the project from April 29 through July 2. |
|
Keep Staffing |
Select this checkbox only if there are existing resource allocations on a project that must be kept intact (do not delete or replace). Note that the only way to ensure a staffed project is included in the scenario output is to also use the Required property. For example, if Project A has allocations and "Keep Staffing" checked, and Project A's allocated resources are also needed for higher-value projects, it may cause Project A to be excluded. |
|
Optimization Parameter (title varies) |
The value of the optimization field you chose on the general information page of the Create wizard (Step 1). |
Step 3: Enter constraint information
|
Setting |
Description |
|---|---|
|
Resource Filter |
(Required) Choose a resource filter. The filters are populated by your Resource filters. If there is a filter you know you want, create it on the Resource page in PPM Pro; you cannot create new filters in the Constraints panel. Note a max of 500 resources is supported - use the resource filter to control the resource pool. |
|
Use Full Resource Capacity |
Select this option only if you want to free up resource capacity from projects outside of the scenario. When selected, PPA treats resources as though they are not currently assigned to any projects. If this is unselected, then whatever resources are already allocated to projects outside of the scenario will remain committed to those projects. Regardless of this option, projects with Implied Status of Closed are always excluded. For example, imagine a resource that has 40 hours of capacity and is allocated 20 hours to project A. However, the scenario is run with project B; project A is not included in the scenario. As a result, if this option is selected then the resource would have 40 hours available capacity for the scenario. If you left this property unselected the user will have only 20 hours of capacity. |
|
Apply Budget Constraint |
Select this option and enter a budget value in the text field only if you need to include a budgetary constraint. The prorated value of the projects selected for the scenario is displayed below the budget text field. The labor portion of the prorated cost is based on role rates. This prorated value helps in determining if you should enter a budget constraint. For example, if the prorated cost of the selected projects is $876,480 and you know your budget is $800,000, you'll likely want to include a budget constraint for this amount. If however you do not have a budget constraint or your budget is greater than $876,480, you do not need to set a budget constraint. If a project would otherwise be excluded after PPA evenly allocates the budget across the time horizon, the engine will try to "borrow" up to six weeks of funds (forwards or backwards) to reallocate to weeks with a budget deficit, if this results in the project being included. This mimics how an organization would typically spend the overall budget unevenly throughout a quarter. |
|
Project Duration Threshold |
Specify what percentage of a project must fit in the time horizon to be able to include the project in a scenario. For example, if you are planning a one year project and the threshold is set to 75%, then roughly 9 months of that project must take place during the horizon (PPA always evaluates in weeks, so this is approximate). This setting enables you to control home much of a project is ok to begin but not end within the timeline, as with the 75% example you may not want a project that will have more than 25% still to be done. |
Click OK to start the optimization engine. You'll see a progress bar on the Scenarios list page. You can cancel a processing optimization by right-clicking on the scenario and choosing Delete from the menu.