Published Dashboard Authentication and IP Restrictions
There are several types of access control that you can use to ensure your dashboard viewers are authorized. You can also publish dashboards without any security measures.
You can configure published dashboards to:
- require an access code
- require a PPM Pro login (directly or via SSO)
- restrict access by IP
Remember that you can update these settings at any time, and either republish with same URL, or publish with new URL.
Configuring Published Dashboard Access
By default, no authentication is required to view a published dashboard - users can just click the URL.
NOTE
If you choose "Do not require authentication", this applies just to the published dashboard itself; the dashboard viewer must be logged in to PPM Pro to view drilldowns.
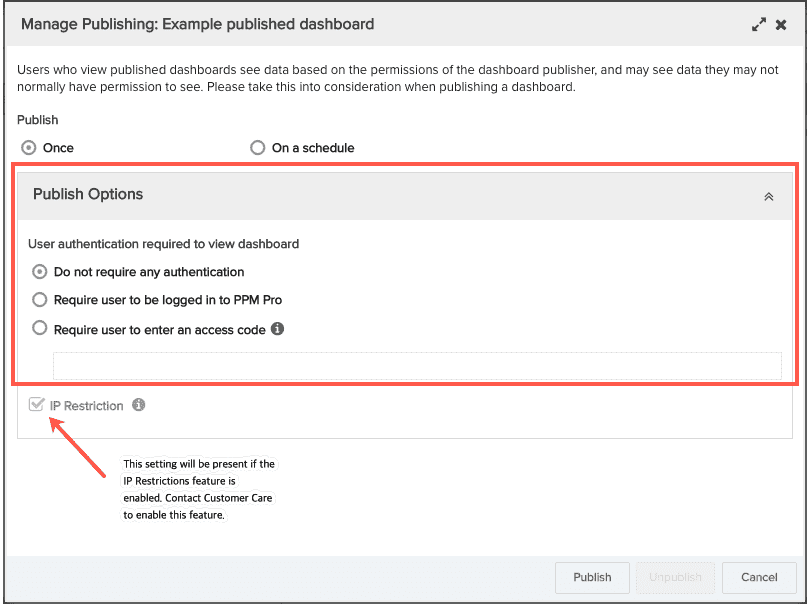
You configure authentication by selecting the appropriate radio button, as shown in the screenshot below.
- Do not require any authentication - The default, tells it like it is.
- Require user to be logged in to PPM Pro - Applies to the dashboard itself, user must be logged in to traverse drilldown links.
- Require user to enter an access code - Codes can be up to 20 characters - the field will become editable once you select the radio button. The access code can be updated at any time by a user with Dashboard > Edit > Publishing permission:
- Select the published dashboard and choose Manage Publishing.
- Update the access code and click Republish.

Applying IP Restrictions
To add another layer of security, PPM Pro provides an optional feature that allows you to limit access to a published dashboard from a specific IP address, or range of addresses specified by your PPM Pro administrator. If you do not have this feature enabled, please enter a support case at customercare@planview.com and request that it be turned on - ideally work with the Care team to get your IP ranges set up.
You can apply this restriction on a dashboard by dashboard basis, or you can configure this restriction globally for any published dashboard (assuming the feature is enable and IP ranges defined):
- To apply IP restrictions on a dashboard by dashboard basis, check the IP Restriction setting in the Manage Published modal for the appropriate dashboard(s).
- To apply IP restrictions globally, navigate to Admin/Organization and enable the setting Enforce IP Restrictions on Published Dashboards. Once this setting is enabled, the Manage Publishing modal for every dashboard will have the IP Restriction setting enabled and view only; every published dashboard will enforce IP restrictions.
Note that IP restrictions are organization-wide. In other words, you can't restrict one dashboard with one range, and other dashboard with another range. See IP Restrictions.

