Getting Started with Reports
- Last updated
- Apr 19, 2022
- Save as PDF
- Getting Started
- Responding Quickly in Times of Change
- Getting the Most out of PPM Pro
- What's Cookin'?
- Strategies
- PPM Pro Business Value
- Savvy PMO Guides
- Encouraging Adoption by Project Managers, Resource Managers, and Others
- Encouraging Adoption by Time Users and Timesheet Approvers
- Stepping into Centralized Project Management
- Stepping into Portfolio Management
- Stepping into Resource Management
- Stepping into Work Intake and Requests Management
- Stepping into Reports and Dashboards
- Stepping into Permissions Management
- Reducing Workload through Integrations
- FAQs
- Tips & Timesavers
- PPM Pro Entities
- General
- Organization
- Creating Divisions (was Business Unit)
- Creating Departments (was Program)
- Portfolios and Applications
- Stepping Into Portfolio Management
- About Portfolios
- About Applications
- Working with the Portfolios List page
- Printing the Portfolios List
- Creating Portfolios
- Editing and Deleting Portfolios
- Portfolio Finances
- Adding an Asset to a Portfolio
- Associating Portfolios to Projects and Hierarchy Units
- Creating and Moving Sub-Portfolios
- Reporting Against Projects Included in Multiple Portfolios
- Resources
- Assets
- Projects
- Encouraging Adoption by Project Managers, Resource Managers, and Others
- Project FAQs
- About Projects
- Working with the Project List page
- Printing the Projects List
- Using the Project Gantt Chart
- Status Comments
- Project Basics
- Working with the Project View
- Project Settings
- How to Control Project Time Entry
- Resource Planning Mode (project vs task)
- Creating Projects
- Creating a Project Template
- Creating Projects from a Template
- Editing and Deleting Projects
- Bulk Editing
- Copying a Project
- Deactivating Project Templates
- Creating Project Teams
- Adding a Portfolio to a Project
- Identifying roles on a projects
- Associating Projects
- Creating Soft Project Dependencies
- Baselines
- Financial Entries
- Tasks
- About Tasks
- Using Tasks for Iterative Work
- Working with the Task List
- Using the Spreadsheet-Style Task Editor
- Using the Task Gantt Chart
- Using the Task Timeline
- Calculating Project and Task % Complete
- Managing Tasks with PPM Pro for Mobile
- Task Basics
- Task Schedules and Estimates
- Task Costs, Revenue, and Budgets
- Dates
- Dependencies
- Constraints
- Project Logs/Issues
- Requests
- Request FAQs - End User
- About Requests
- Managing Requests (Workflow)
- Working with the Requests List
- Working with the Card View
- Creating, Editing, and Deleting Requests
- Copying Requests
- Tracking the Progress of a Request
- Associating Entities
- Creating New Entities From Requests
- Request Notes and Attachments
- Scoring Requests
- Alerts, Attachments, and Notes
- Time Management
- PPM Pro for Mobile
- Reports
- Reports - Transition Topics
- Report Basics
- Using the Report Designer
- Speciality Reports
- Reports Cookbook
- Actual Hours by Project Category for Past 3 Months
- Allocated Cost by Role
- Allocated Hours by Project
- Allocated Hours by Project Category for Next 3 Months
- Applications by DBMS
- Capacity and Demand Project-Role-Resource
- Capacity and Demand Resource-Project-Role
- Capacity and Demand Role-Project
- Capacity vs. Project Allocations vs. Timesheet Hours
- Financial Entries by Category
- Financial Summary Full Structure
- Financial Summary Top-Level Structure Only
- Group Membership
- Intake Pipeline
- Intake Request Risk vs. Value
- Permission Profiles allowing Create Project
- Planned versus Actuals
- Portfolio Budget and Projects
- Portfolio Costs Over Time
- Portfolio Hierarchy with Project Details Considering % to Include
- Portfolio Project Status
- Portfolio Roadmap
- Projects by Category with Priority Stacks
- Projects by Priority and Status
- Project % Complete
- Project Actuals vs Estimated Hours
- Project Financials by Business Objective for a Portfolio
- Project Financial Entries
- Project Logs
- Project Overview
- Project Permissions
- Project Scores by Scoring Category
- Project Scores with Details
- Project Staffing
- Request Associated Projects with Project Status
- Request Average Days at Gates
- Request Gate Actions
- Resources - Allocated vs Capacity Hours Time Series
- Resource Average Days at Request Gate
- Resource Average Days per Request Action
- Resource Permissions
- Resource Roles and Allocations
- Resource Workbench Allocations aka Bottom Half of Home/Resources View
- Resource Workbench Utilization aka Top Half of Home/Resources View
- Role - Allocated vs Capacity Hours Time Series
- Simple Project Financials Comparison
- Simple Project Time Series
- Task Hierarchy
- Tiles
- Timesheets for this Week
- Timesheet Entries by Project-Task-Resource
- Timesheet Entries for a Resource by Category and Entry Type
- Timesheet Entries for this Week
- Timesheet Entries Totaled by Project and Resource
- Total Cost of Ownership
- Total Forecasts and Actuals
- Unit Hierarchy
- User Login Information
- Dashboards
- Filters
- Reports and Dashboards (Legacy)
- Reports (Legacy)
- About Reports (Legacy)
- Reports and Permissions/Viewing Rights
- Working with the Reports List page
- Reporting Against Projects Included in Multiple Portfolios
- Reporting On Associated Entities
- OData Setup (Legacy)
- Creating and editing reports
- Configuring report output
- Saving and running reports
- Viewing report results
- Audit History Report
- Field Descriptions Report
- Example Report Output Types
- Capacity and Demand Report Examples
- KPI Trend Reports
- Reporting on Calendar Events
- Dashboards (Legacy)
- Reports (Legacy)
- Project Staffing
- Direct Project Resource Planning
- About Project-Level Resource Planning
- Resource Planning Terms and Influences
- Creating Allocations
- Staffing Screen Quick Tour
- Expressing Demand - Allocation Units
- Configuring the Staffing Screen Display
- Allocating Resources to Projects
- Allocating Roles to Projects
- Using Advanced Search Options
- How to Evaluate Resource/Role Availability
- Contouring Allocations
- Shifting and Extending Allocations
- Deleting/Replacing/Unstaffing Allocations
- Viewing Allocation History
- Changing Resource Planning Mode
- Synchronizing Allocations After Updating the Calendar
- Bulk Deleting Allocations from a Project
- Billing Rates
- Global Project Changes - Re-plan Wizard
- Shift/Extend Examples
- Scheduling Resources to Tasks
- Shift/Extend Examples
- Managed Project Resource Staffing
- Task Resource Planning
- Direct Project Resource Planning
- Project Financials
- Setting Up Permissions for Project Financials
- Using Project Financial Entries
- Using the Financial Summary
- Setting Up Project Financial Entries
- Transitioning from Task-Level to Project-Level Expenses
- Financial Entries Overview for Administrators
- Finance Settings
- Creating Categories for Financial Entries
- Configuring Available Fields for Financial Entries
- Creating Custom Fields for Financial Entries
- Creating Field Restrictions for Financial Entries
- Designing Details - Forecast and Actuals
- Financial Entries: Out of the Box Fields
- Laying Out the Grid Columns for Financial Entries
- Configuring Searchable Fields
- API and Data Import for Financial Entries
- Setting up the Project Financial Summary
- Calendars
- Resource Capacity Planning
- Scoring Projects and Requests
- Predictive Portfolio Analysis (PPA)
- Impact Analysis
- Planview Solution Integrations (Flex)
- PPM Pro Administrator Documentation
- Overview
- System Settings
- Organization setup
- Controlling Access: Groups, Teams, and Profile-Based Permissions
- Stepping Into Permissions Management
- Permissions Overview
- User Types/Permissions
- Confidential Projects
- Granting Administrative Privileges
- Report Source Authorization
- Reporting on Permissions
- Groups
- Profile-Based Permissions
- About Profile-Based Permissions
- Out-of-the Box Permission Profiles
- Implied Permissions for Entity Owners
- Working with Permission Profiles
- Creating Permission Profiles
- Bulk Sharing Permissions
- Using the Permissions Explorer
- Issue/Project Log Permissions
- Project Permissions
- Request Permissions
- Staffing Permissions
- Task Permissions
- Entity Team Permissions
- Timesheet Administration
- Setting Up Internal Rates
- Setting Up Entities
- Self-Service Administration (SSA)
- Self-Serve Admin Workflow
- Determining Field Values: Order of Precedence
- Required vs Mandatory Fields
- Configure Searchable Fields
- Changing Filter, Report, and Dashboard Ownership
- Importing Entity Data
- Card View Setup
- Project Logs/Issues
- Portfolios and Assets
- Creating Classes for Assets and Portfolios
- Creating Categories for Assets
- Creating Categories for Portfolios
- Configuring Available Fields
- Creating Field Restrictions
- Designing the Details Page
- Portfolios: Out of the Box Fields
- Designing the Finances Panel
- Laying Out the Grid Columns
- Laying Out the Grid Fields
- Projects
- Creating Categories for Projects
- Configuring Available Fields
- Creating Field Restrictions
- Designing the Details Page
- Projects: Out of the Box Fields
- Designing the 'Additional Details' Page
- Designing the Project Settings page
- Laying Out the Grid Columns
- Health Profiles
- Mapping Health Profiles
- About PMO Locking
- Requests
- Request FAQs - Admin, Setup
- Requests Overview for Administrators
- Permissions for Requests
- Requests: Out of the Box Fields
- Creating Categories for Requests
- Configuring Available Fields for Requests
- Creating Field Restrictions for Requests
- Creating Custom Fields for Requests
- Mapping Request Fields to Fields in Associated Entities
- Designing Request Forms (Details)
- Designing Cards for Requests
- Configuring Request Notifications
- Laying Out the Grid Columns for Requests
- Gates
- Configuring Searchable Fields
- API and Data Import for Requests
- Setting Up Request Scoring
- Tasks
- Managing Lookup Lists and Status Lists
- Setting up Managed Staffing
- Creating Calculated Fields
- Working with Health Profiles
- Creating Scoring Profiles
- Integration
- Integrating with PPM Pro
- About Web Services
- Getting Started with WS API
- Best Practices and Other Basics
- Tips for finding IDs
- Field Types and IDs
- Subtype IDs
- Examples
- Login
- Get Available Fields for a Simple Entity
- Get Available Fields for a Complex Entity
- Get Specified Field Values for an Instance of an Entity
- Return a List of Specified Field Values for All Entities of a Certain Type
- Create a New Entity (API)
- Create a User for a Resource (API)
- Scheduling a Task
- Creating a Request Using the API
- Update a PPM Pro Entity
- Reference
- Default Entity Fields
- Multi-Currency Support
- Multi-Currency: Getting Started
- Multi-Currency Overview
- Currency Permissions
- Effective Dates for Currency Exchange Rates
- Creating Currency Tables
- Assigning a Currency to a Project
- Assigning a Currency to a Request
- Assigning a Currency to Roles and Resources
- Multi-Currency and Reports, Dashboards and Filters
- Product Releases
- New Features and Release Notes
- 2022 Release Notes Archive
- 2017 Release Notes Archive
- July 2017 Patch # 1
- June 19, 2017 - Patch 3
- June 30, 2017 - Patch 4
- May 19, 2017 - Patch #2
- Release Notes - March 17, 2017
- What's New - April 21, 2017
- What's New - August 2017
- What's New - December 2017
- What's New - July 2017
- What's New - June 16, 2017
- What's New - March 17, 2017
- What's New - May 19, 2017
- What's New - November 2017
- What's New - October 2017
- What's New - September 2017
- 2018 Release Notes Archive
- 2019 Release Notes Archive
- Original WSDL vs Updated WSDL
- What's New - April 2019
- What's New - August 2019
- What's New - December 2019
- What's New - February 2019
- What's New - January 2019
- What's New - July 2019
- What's New - June 2019
- What's New - March 2019
- What's New - May 2019
- What's New - November 2019
- What's New - October 2018
- What's New - October 2019
- What's New - September 2018
- What's New - September 2019
- 2020 Release Notes Archive
- 2021 Release Notes Archive
- 2023 Release Notes Archive
- 2024 Release Notes
- 2025 Release Notes
- Newsletters and Announcements
- Planview PPM Pro Newsletters
- PPM Pro Release Process
- Announcements
- Archived Announcements
- Announcement: Changes to How Users Are Added to Groups Targeted for June Release
- Announcement: Move to Parature
- Announcement: PPM Pro Inner Circles
- Announcement: Strict XSS Protection
- Cutover to DNS Subdomains
- Planview Innotas is now Planview PPM Pro!
- Planview Investment in PPM Pro Infrastructure
- TLS 1.0 End of Life
- Upcoming API Changes: Custom Date-Time Fields and Timezones
- WS API Endpoint Change Required by March 23, 2018
- Archived Articles
- API Updates for Customers Using Profile-based Permissions for Projects
- August 28 Permissions Webinar - Recording and PPT Slides
- Creating a Cross-Project Dependency
- Improved Lookup List Admin Facility
- Internal Rates - July Update
- Life After 190 Standard Reports - Or, How I Learned to Love Timesheet Alerts
- Profile-Based Permissions for Projects: Additional Features/Updates with July Release
- Profile-Based Permissions for Projects: Additional Features/Updates with June Release
- Project Permissions Migration Guide
- Quarterly Interval Display for Staffing and Resource Availability Contours
- September 25 Project Permissions Webinar
- Winter is Coming - Protect the Wall! Migrate (Your Project Permissions) to Safety!
- Archived Announcements
- Calculated Fields: Do the Right Thing!!!
- PPM Pro Domain Name Change FAQs
- PPM Pro Renewal Process
- Planview PPM Pro Customer Webinars
- 2020 QandAs
- PPM Pro August 2020 release: Q&A Transcript
- PPM Pro July 2020 release: Q&A Transcript
- PPM Pro November 2020 Release: Q&A Transcript
- PPM Pro October 2020 Release: Q&A Transcript
- PPM Pro Q&As from February 19 2020 Release Webinar
- PPM Pro Q&As from January 15 2020 Release Webinar
- PPM Pro Q&As from March 18 2020 Release Webinar
- PPM Pro Q&As from the April 15 2020 Release
- PPM Pro Q1 2020 Roadmap Q&As
- PPM Pro Q2 2020 Roadmap Q&As
- PPM Pro Q3 2020 Roadmap Q&As
- PPM Pro September 2020 Release: Q&A Transcript
- 2021 QandAs
- PPM Pro Q&As from April 2021 Release Webinar
- PPM Pro Q&As from August 2021 Release Webinar
- PPM Pro Q&As from February 2021 Release Webinar
- PPM Pro Q&As from January 13 2021 Release Webinar
- PPM Pro Q&As from July 2021 Release Webinar
- PPM Pro Q&As from June 2021 Release Webinar
- PPM Pro Q&As from March 2021 Release Webinar
- PPM Pro Q&As from May 2021 Release Webinar
- PPM Pro Q&As from November 2021 Release Webinar
- PPM Pro Q&As from October 2021 Release Webinar
- PPM Pro Q&As from September 2021 Release Webinar
- 2022 QandAs
- Maximizing Value from PPM Pro: Customizing with Calculated Fields
- PPM Pro April 2024 Q&A
- PPM Pro August 2024 Q&A
- PPM Pro February 2024 Q&A
- PPM Pro June 2024 Q&A
- PPM Pro March 2024 Q&A
- PPM Pro May 2024 Q&A
- PPM Pro October 2024 Q&A
- PPM Pro Q&As from April 13 2022 Release Webinar
- PPM Pro Q&As from February 16 2022 Release Webinar
- PPM Pro Q&As from February 23 2022 Q1 Roadmap Webinar
- PPM Pro Q&As from January 19 2022 Release Webinar
- PPM Pro Q&As from June 15th Release Webinar
- PPM Pro Q&As from March 16 2022 Release Webinar
- PPM Pro Q&As from May 18 2022 Release Webinar
- PPM Pro Q&As from October Release Webinar
- PPM Pro Q&As from September Release Webinar
- PPM Pro QAs from August Release Webinar
- PPM Pro QAs from July Release Webinar
- PPM Pro QAs from November Release Webinar
- PPM Pro QAs from Q3 RoadmapWebinar
- PPM Pro September 2024 Q&A
- PPM Pro Q&As from November 13 2019 Release Webinar
- PPM Pro Q&As from October 16 2019 Release Webinar
- Requests End-To-End Webinar Q&As - December 4, 2019
- 2020 QandAs
- New Features and Release Notes
- PPM Pro Videos
Reports vs Reports (Legacy) in the UI
Note: This section is relevant only to customers who are still using the legacy reports. This section was written in June 2021.
Currently you can view the new reports module AND leave the legacy reports active. Remember users must have permission to view at least one report in order to see the new Reports in the navigation - easiest thing is to create a global permissions profile and grant at least Reports > View permission to the appropriate users/groups/units. See Report Teams and Permissions for more information about setting up report permissions.
When both report "modules" are active in your environment, you will see two report navigation icons in the toolbar. Hover your cursor over each icon - you will see one labeled "Reports (Legacy)", and one labeled "Reports" (the new reports). See the screenshot below:
The "Reports" icon will take you to the new reports UI; the "Reports (Legacy)" icon will take you to the legacy reports UI.
We will leave the legacy reports active unless you specifically ask us to disable them (please submit a Support Case when you are ready to turn off legacy reports and dashboards). At some point in the future (with plenty of notice), the legacy reports will be deprecated.
Overview
The mechanics of creating a new report definition are the same across report types. See Creating, Editing, Deleting Reports. It's also a good idea to read "Understanding the Field Path," which describes how to find the fields you want to include in your reports. Using the Report Designer walks you through the mechanics of creating reports while Stepping into Reports and Dashboards provides a more general overview as well as a specific example use case for how you can design, create, and manage effective reports. And finally, the Reports Cookbook provides specific examples, both of interest thematically as well as visually.
This topic provides an overview of basic report creation and supported report types, helpful tips, and pointers to additional information or examples. We hope this overview will help you along your way to successful report design. Remember - the Preview Pane is the biggest tool in your toolbox. The Preview pane is the right-hand section of the report designer - as you design your report (particularly after you have selected the minimal required data), it automatically updates with sample data to show the impact of your selections. We encourage you to take advantage of this real-time feedback to experiment with types, data selection, and formatting. If you don't like what you see, change it!
For in-depth information on report capabilities, creation, and management from start to finish (just under 1.5 hours), please see this customer webinar on PPM Pro New Reports Enablement.
Creating a Report
To create any report, do the following.
- Click the Reports top-nav link to display the Reports list, or, go to an entity such as a project that has a Reports section where you want to create the report.
- Click the New button to open the report designer. (Remember you must have permission to create reports in order to see the New button.)
- In the General tab of the report designer, select a Topic, optionally a Specialty (available for certain Topics), Type, and enter a Title, and optionally enter a Description. Not sure what type to select? The table below contains an alphabetical listing of all report types with image, usage tips and links for further information and examples.
- In the Data tab, select the reportable available fields to be visualized in the report. Depending on the topic, specialty, and type of report, you will be able to traverse various field paths to find the data you want displayed, as well as have various sections or buckets for an available field to be placed in. You can also rename and specify some data format within the field options modal.
- In the Display tab, select various options for how you want your report to appear. Depending on the type of report, you will be able to see different display option sections relating to headings, data values, axes, legends, quadrant, Gantt (zoom settings), sorting, drill downs, and/or aggregations. For report types that include list columns (List: Basic, List: Time Series, Gantt), column display options can also be set within the Preview pane. And for the Gantt report type, additional Gantt display options can be configured in the Gantt portion of the Preview pane.
- In the Variable Settings tab, specify what entity level grids you want the report to appear in, whether or not you want to allow changing the scope (entity or entity level) before or after running the report, as well as any filters and whether or not they should be allowed to be changed before or after running the report.
- In the Team tab, you can provide direct report access to individual users, groups, or units, given a selected permission profile that has a Team rule. These allow for report-specific permissions, as opposed to more general global permissions that other users may also have.
- Click Save or Save & Run the report. The rendered report will open in a new tab. When finished viewing, you can close the rendered report tab or leave it open and simply refresh it after making any further changes in the original report designer tab.
TIP
You can also create a new report by uploading an existing report definition. The Reports Cookbook has pre-made reports the you can download and add to your PPM Pro instance to help you get started.
Choosing an Appropriate Report Type
Every report has a single 'Type' that must be selected to determines what the report output will be. While you are designing, you can switch between Types to find the visualization that you like best. For example, you can see whether you prefer a column, bar, pie, donut, or spiderweb visualization for your report.
The table below shows and describes the currently available report types with usage tips and links to examples:
Report Type | Description and Usage Notes |
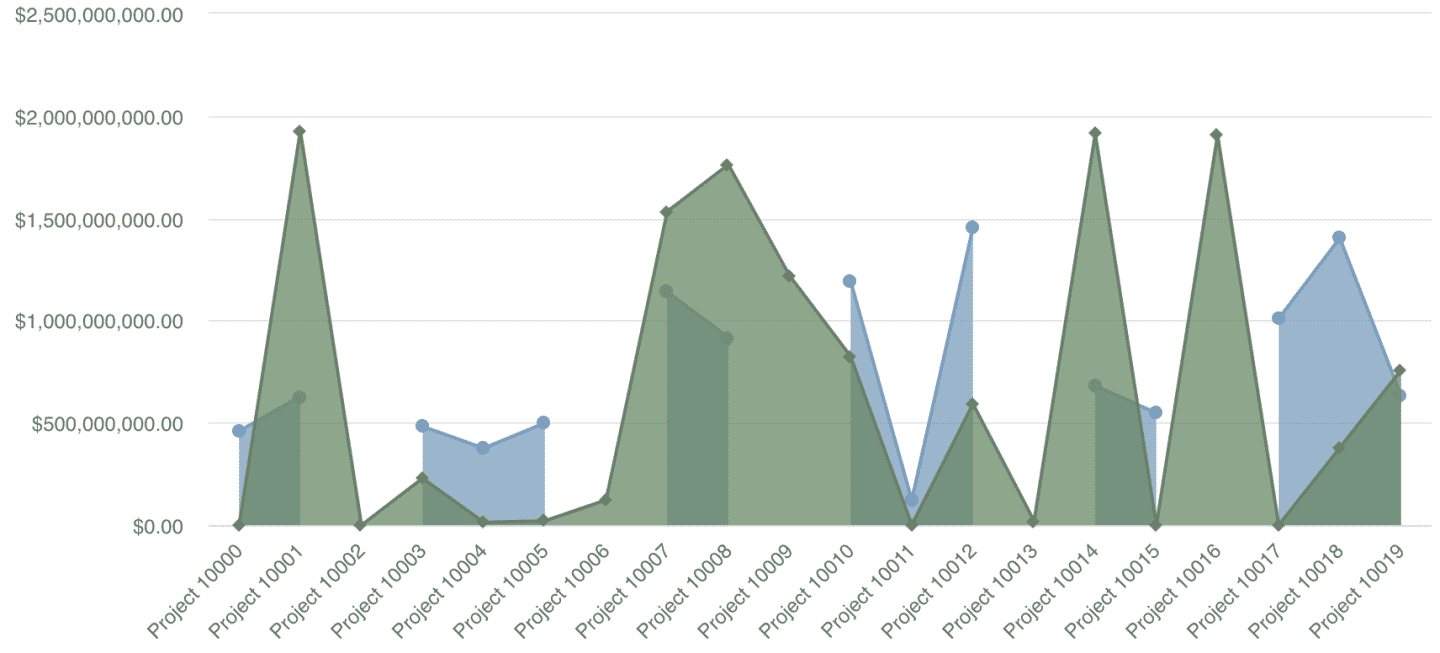
---|---|
Area: Basic Area: Stacked |
Area charts are similar to line charts - they simply have a color "fill" between the line and the axes. These reports are useful for displaying volume. Some people may find the area chart easier to read than a line chart. See example: Simple Project Financials Comparison |
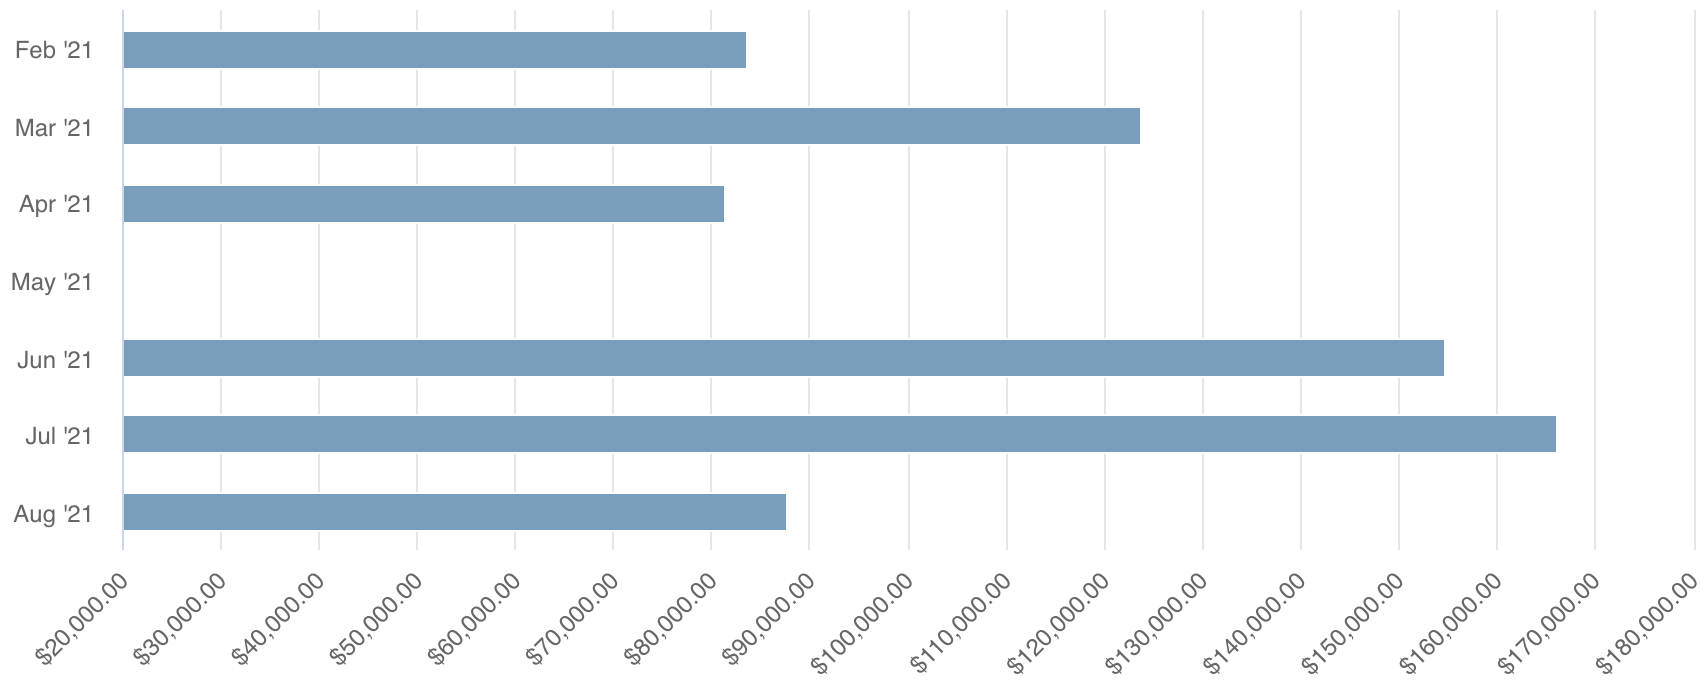
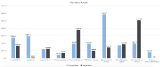
Bar: Basic Bar: Stacked |
Bar charts are similar to column charts and are used to compare one or more values across a property set or category. The bar chart type is useful when you have a large data set and need to support viewing on a small screen device, because the viewer can scroll through and more easily read the vertical axis labels. Stacked bar charts display the value end-to-end, rather than side-by-side, which can be useful if vertical chart real estate is also tight. See example: Allocated Hours by Project |
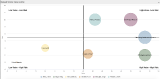
Bubble |
Bubble charts are great for comparing three or more dimensions of data. Each axis represents one data value with bubble size another. A field for color may also be specified to add yet another dimension. The varied size of bubbles is useful for quick visualization of the specific value per instance, such as cost per project (with a bubble representing each project). Note that users can hover over bubbles to view the details, including the bubble Size field value if not displayed. If you have large data sets such that there are simply too many bubbles, consider using a heatmap type instead. See example: Intake Request Risk vs. Value |
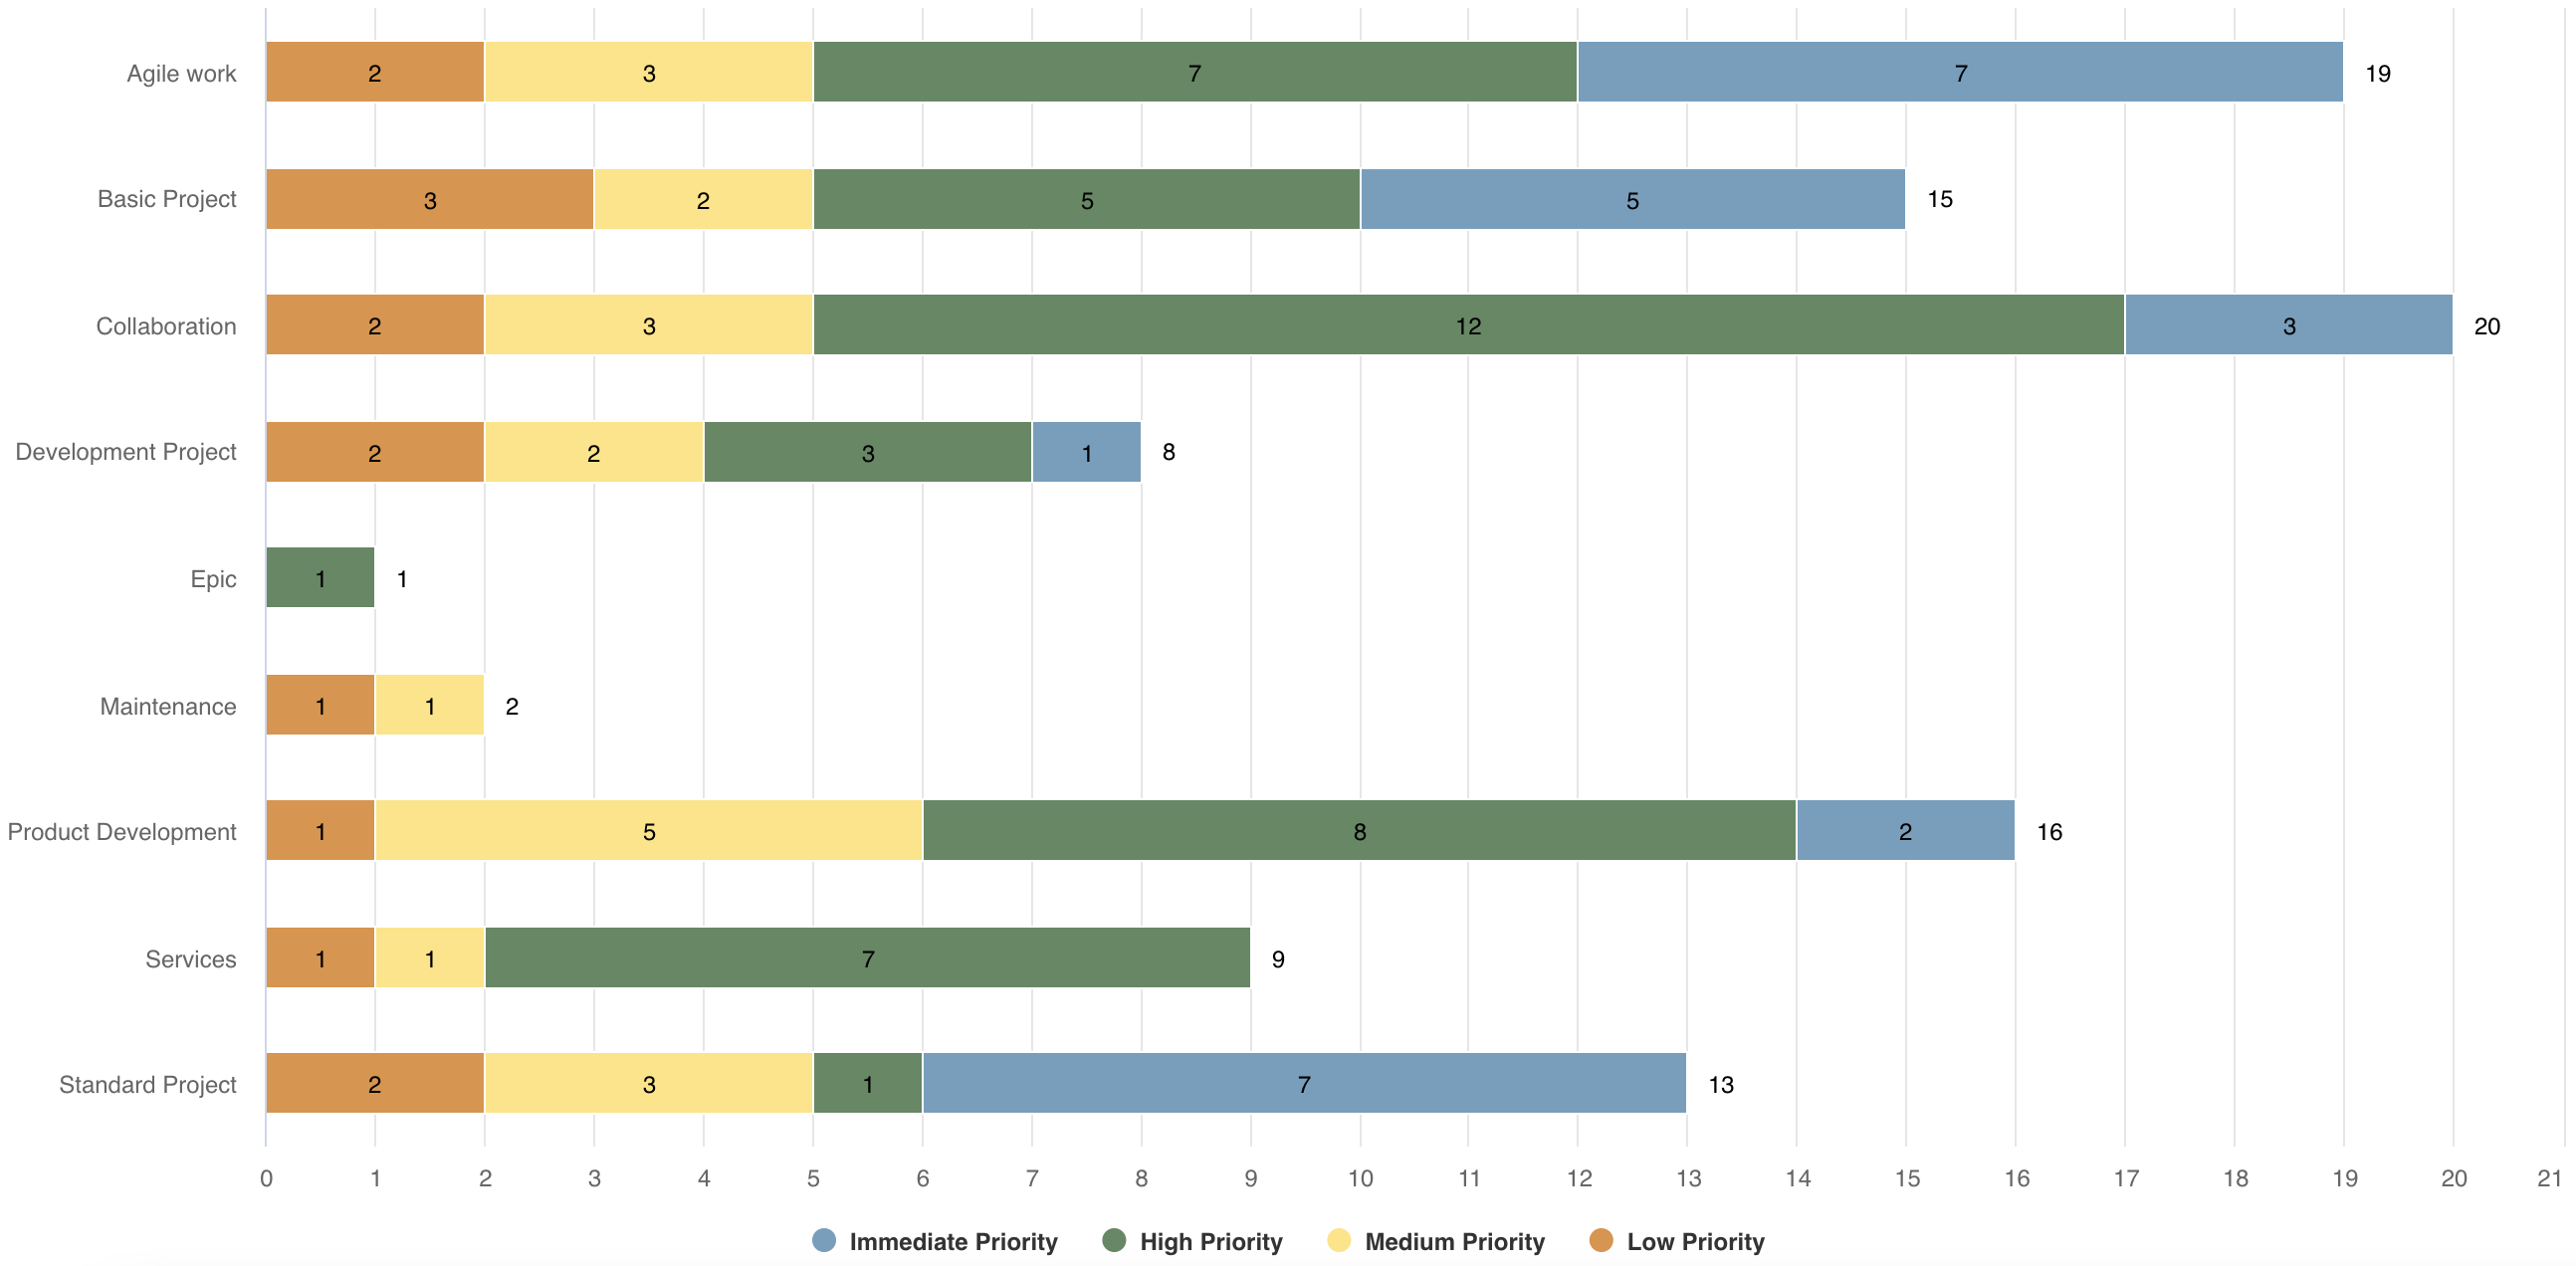
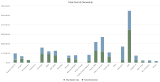
Column: Basic Column: Stacked
|
Column charts are basically the same as bar charts, with axes reversed. They are a good choice when wider screens are likely and there are numerous values to compare. For Column: Basic see example: Planned vs. Actuals For Column: Stacked see example: Projects by Category with Priority Stacks |
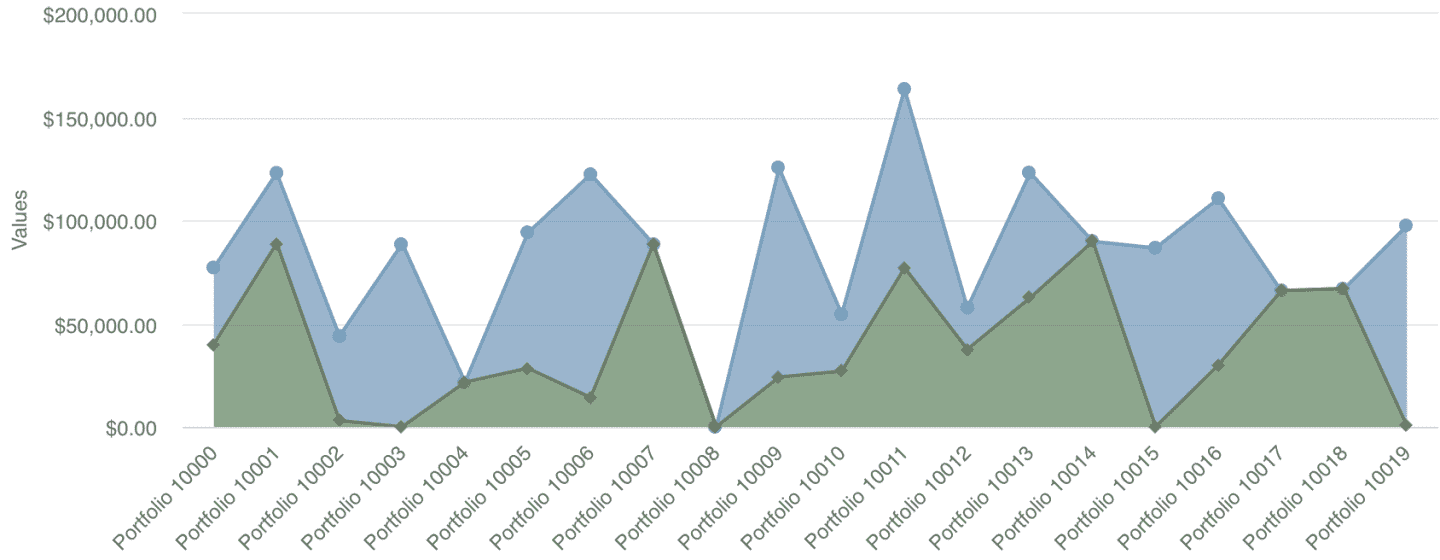
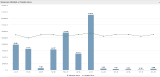
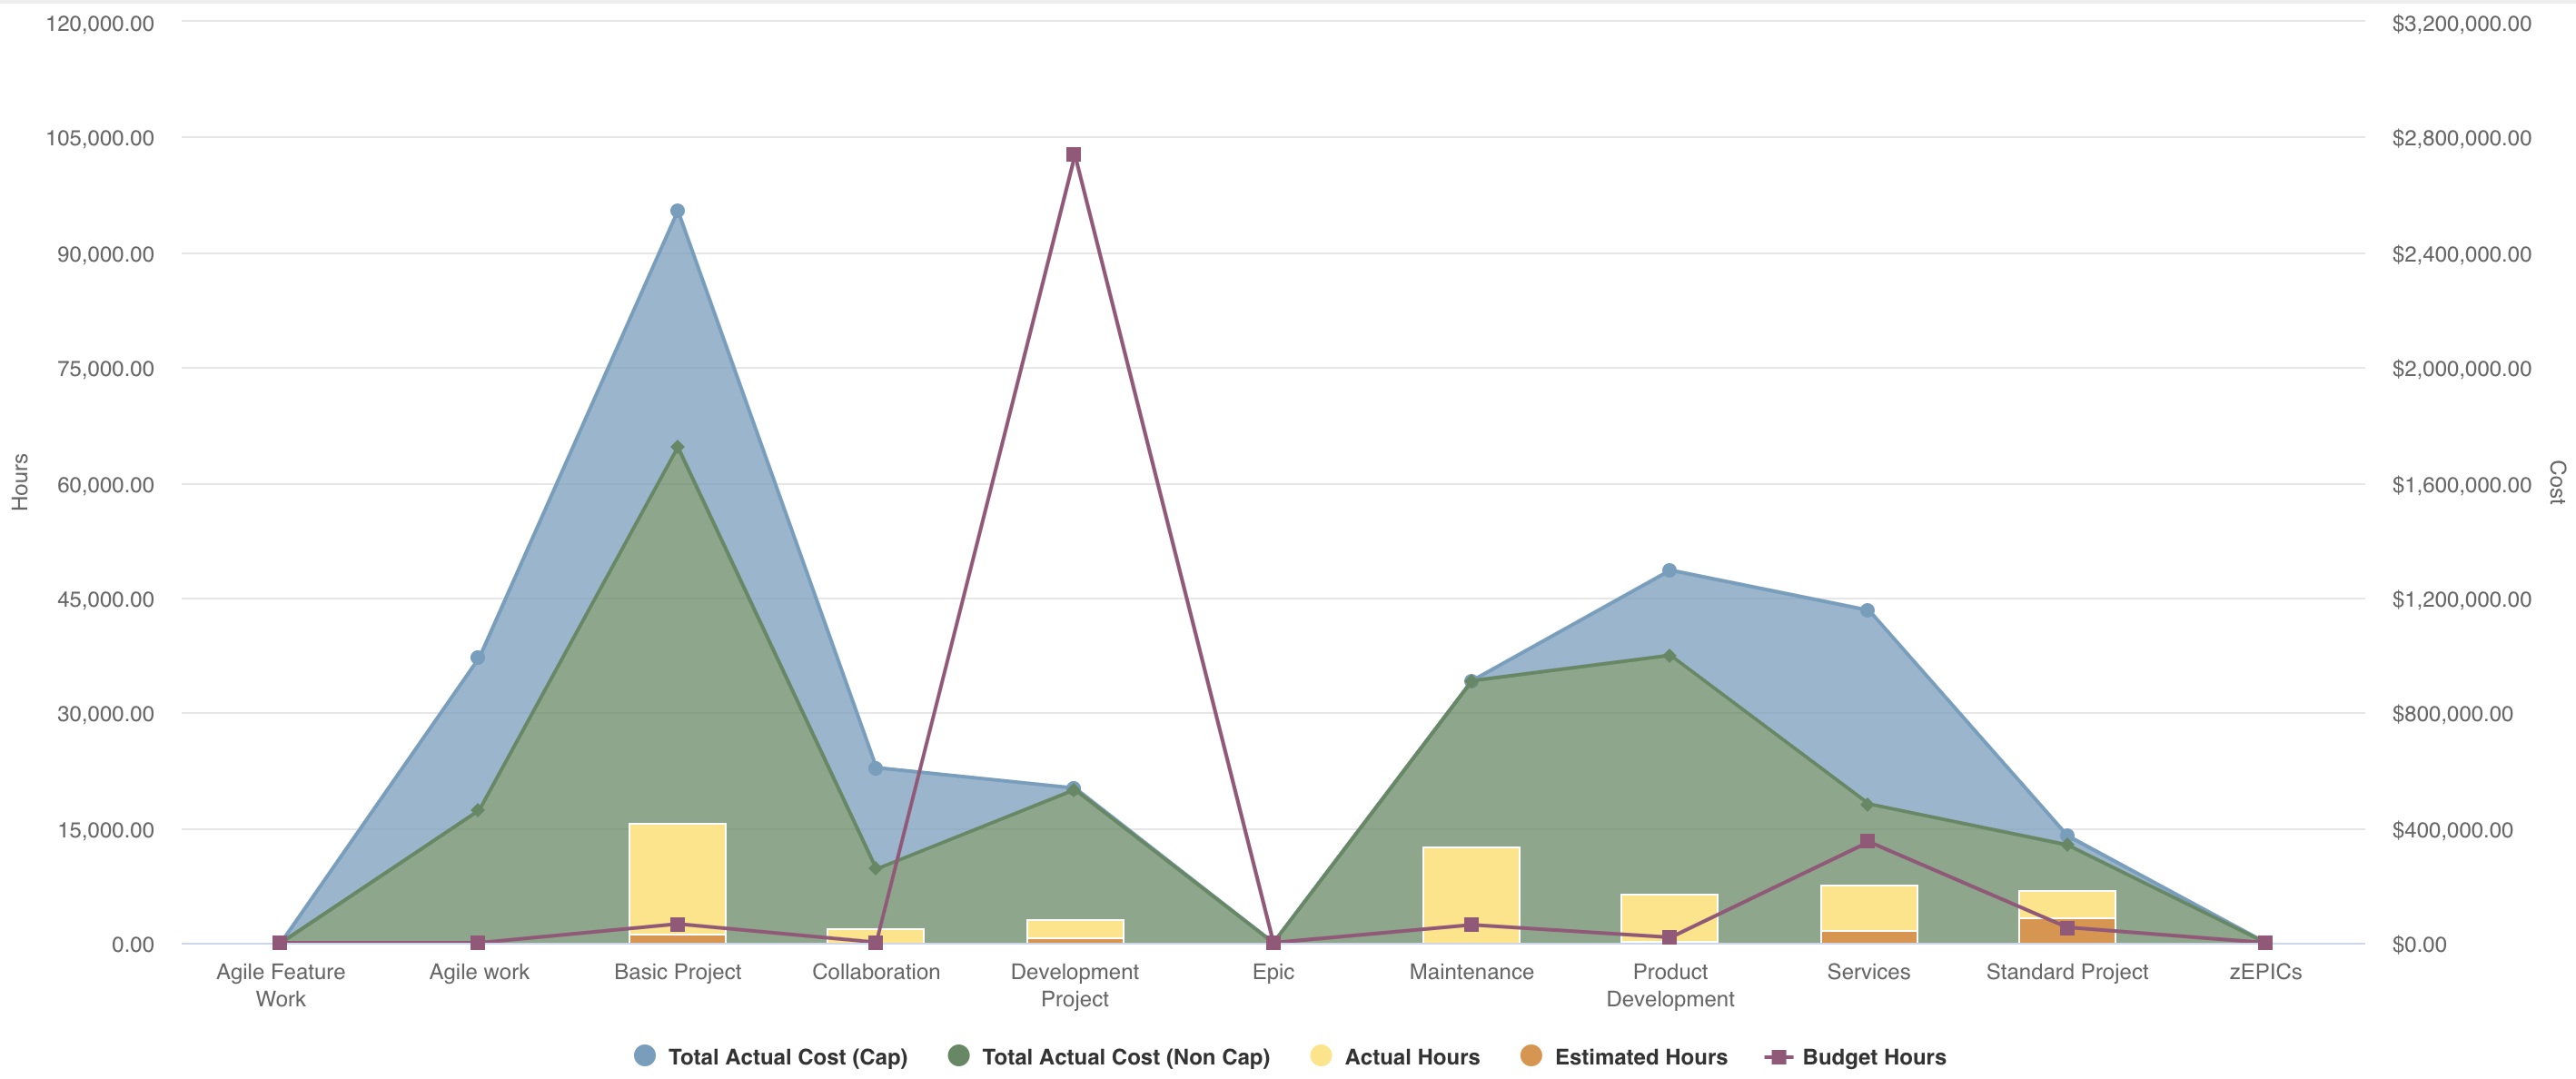
Combination: Area, Column, Line Combination: Stacked Area, Stacked Column, Line |
Combination charts allow you to overlay up to 3 report types on a single report. This is useful if you are comparing a lot of data and need to visually delineate the data, or, if you have data with different ranges of values that need to be presented together. Choose fields for areas, columns, and/or lines as appropriate. See example: Portfolio Budgets and Projects |
Crosstab |
Crosstabs allow you to display a table of date with row fields, column fields, and the fields for which you want to report the intersecting values. For example, you could display project Title as rows (left axis), project Category as columns (top axis), and Actual Hours and Estimated Hours as the intersecting values (values). Depending on the topic, you might also be able to display time periods as columns, such as choosing Month, Quarter, or Year as top axis fields when creating a Timesheet Entry topic report. The crosstab also allows you sub-total and total rows and columns, and aggregate to show average, minimum, maximum, or summed values. NOTE: For financial summary and financial entries reports, the List: Time Series works best (avoid the Crosstab). See example: Total Forecasts and Actuals |
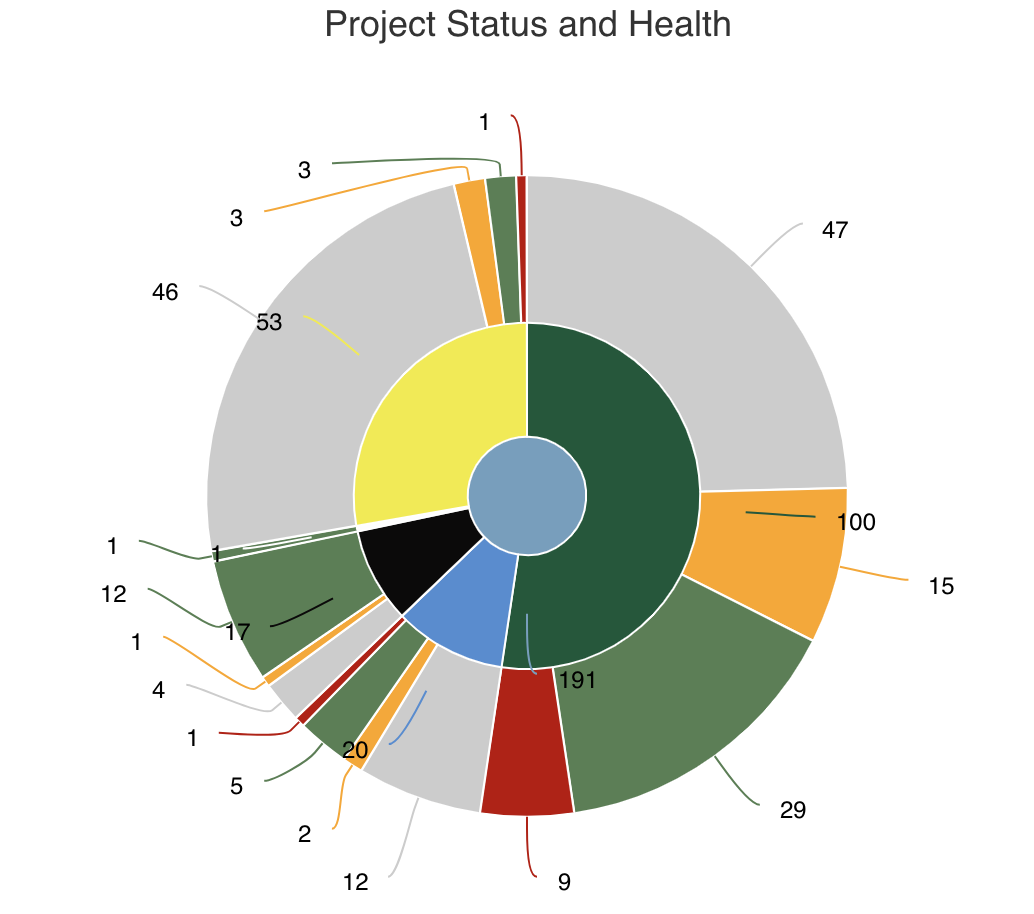
Donut |
Donut charts are basically pie charts with a hollow center. They allow you to display numeric totals and/or percentages broken out by a particular set of fields. Like bar and column charts, they allow you to compare one or more values across a property set or category. It is better to use a donut (or pie) chart when you have small data sets, else a bar or column chart might be easier to read. You can select a single field to group by or select multiple fields, where each field is another dimension or ring within the report. For example, you could show a donut that shows the count/percentage of projects broken out by Status. Or, a donut that shows count/percentage of projects broken out by Status and also by Priority, where each of these are rings. See example: Project Logs |
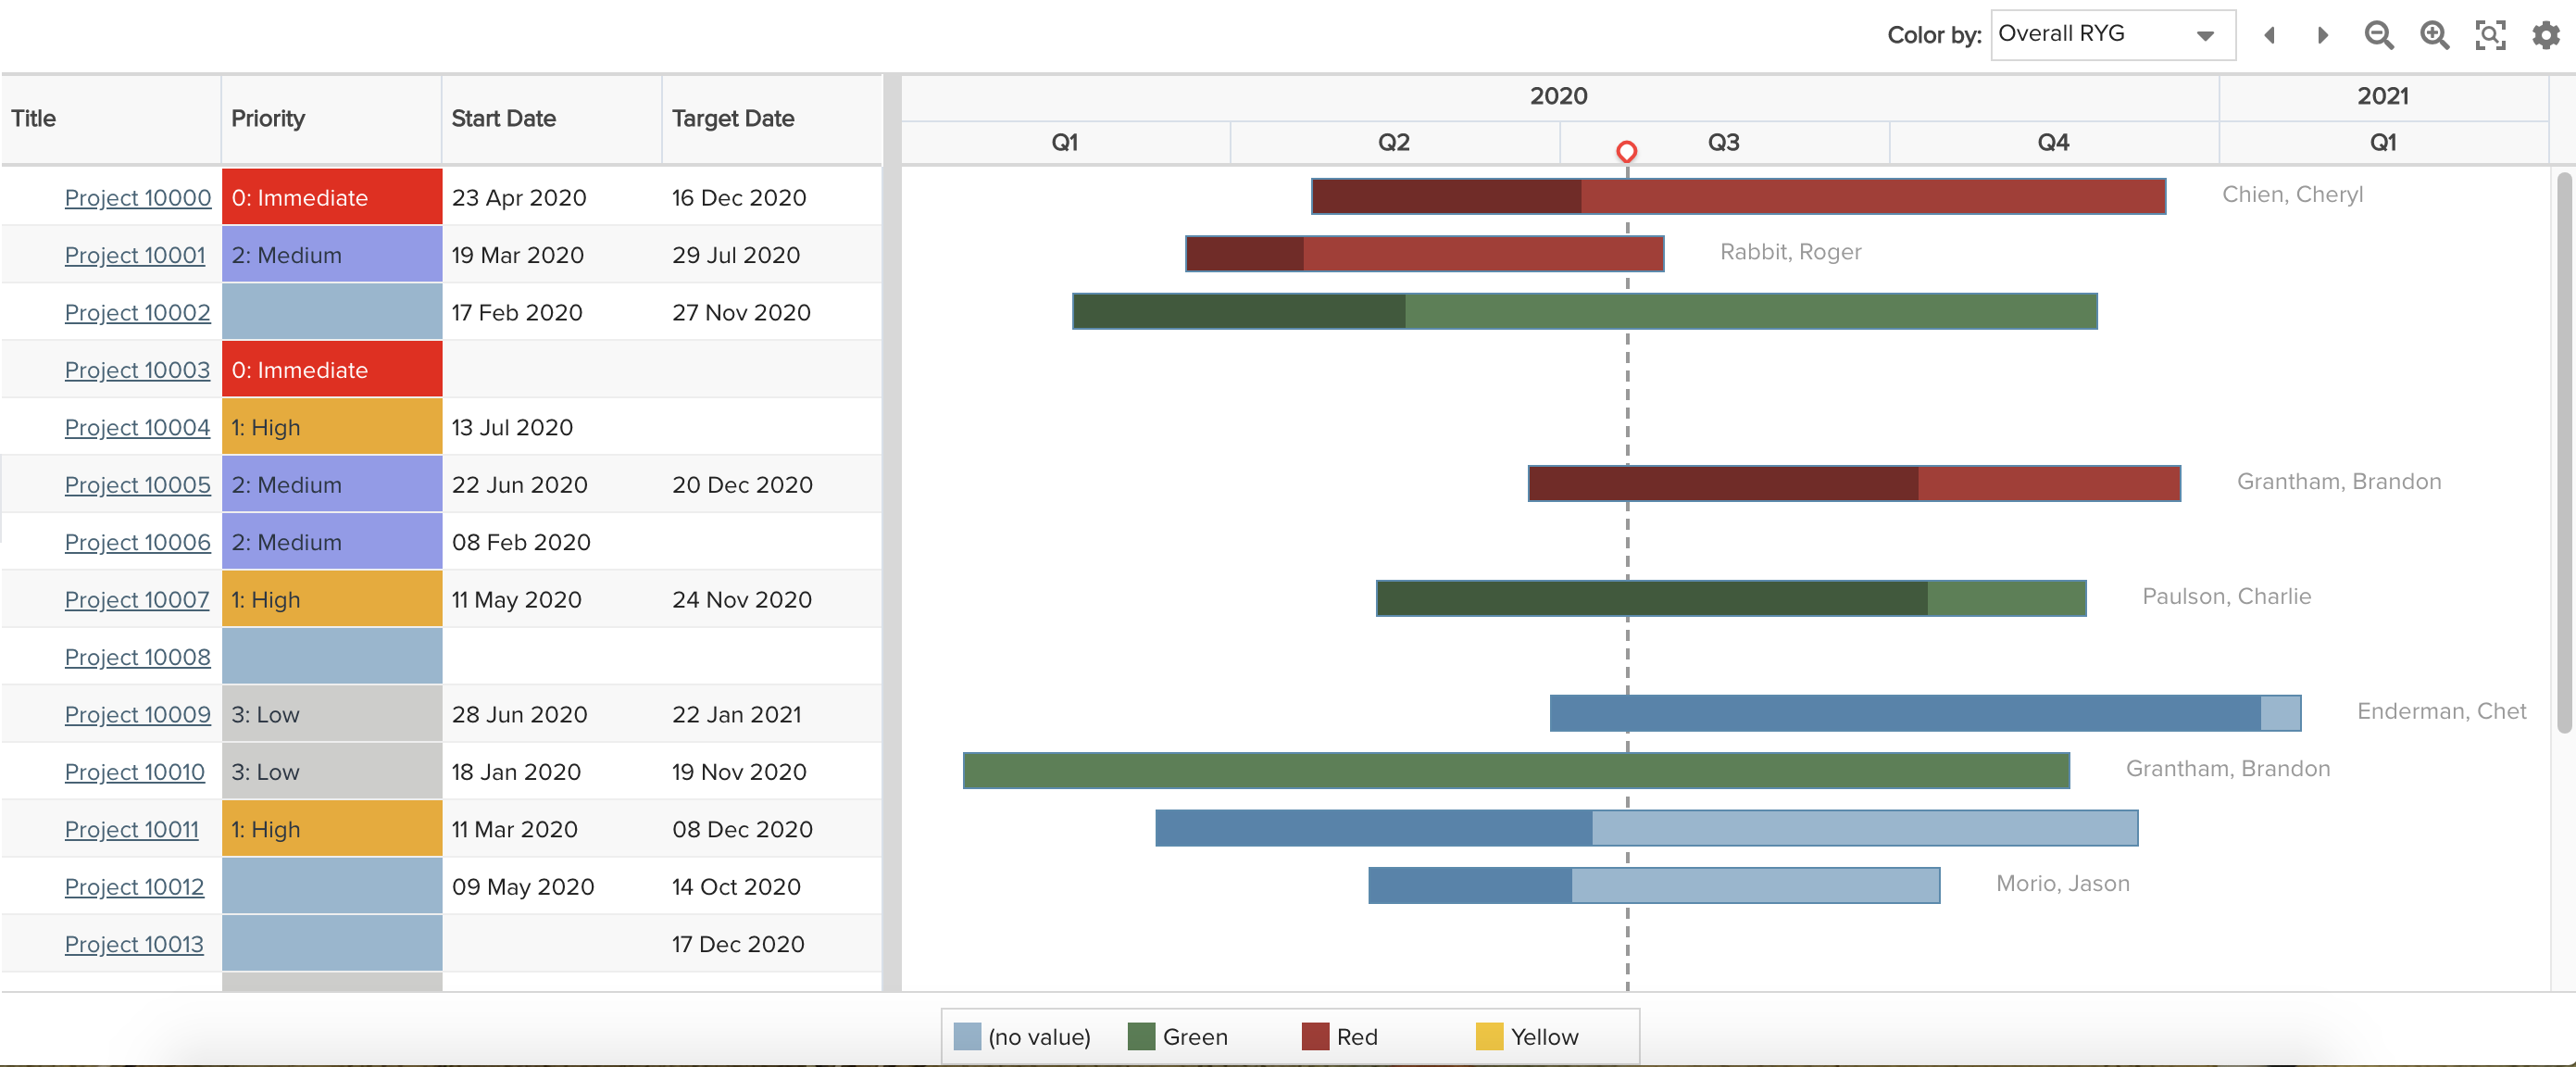
Gantt |
Gantt reports provide a visual summary of an entity's progress over time (usually a task), along with a configurable set of columns that provide related data about the report topic/entity. These charts are useful if you want to combine text and graphics on a single report. See example: Portfolio Roadmap |
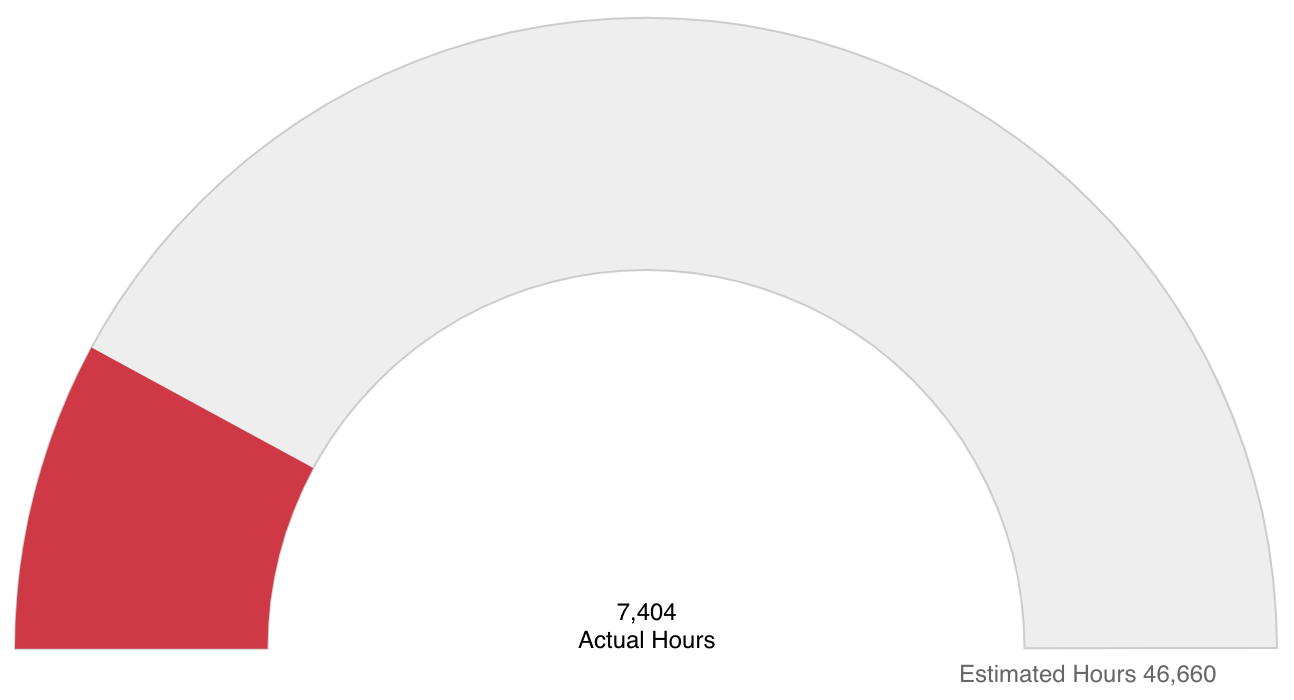
Gauge |
Gauge charts provide a quick and simple visualization of the progress of one data value against a target value, or, the percent progress of a single value. See examples: Project % Complete, Project Actuals vs. Estimated Hours |
Heatmap |
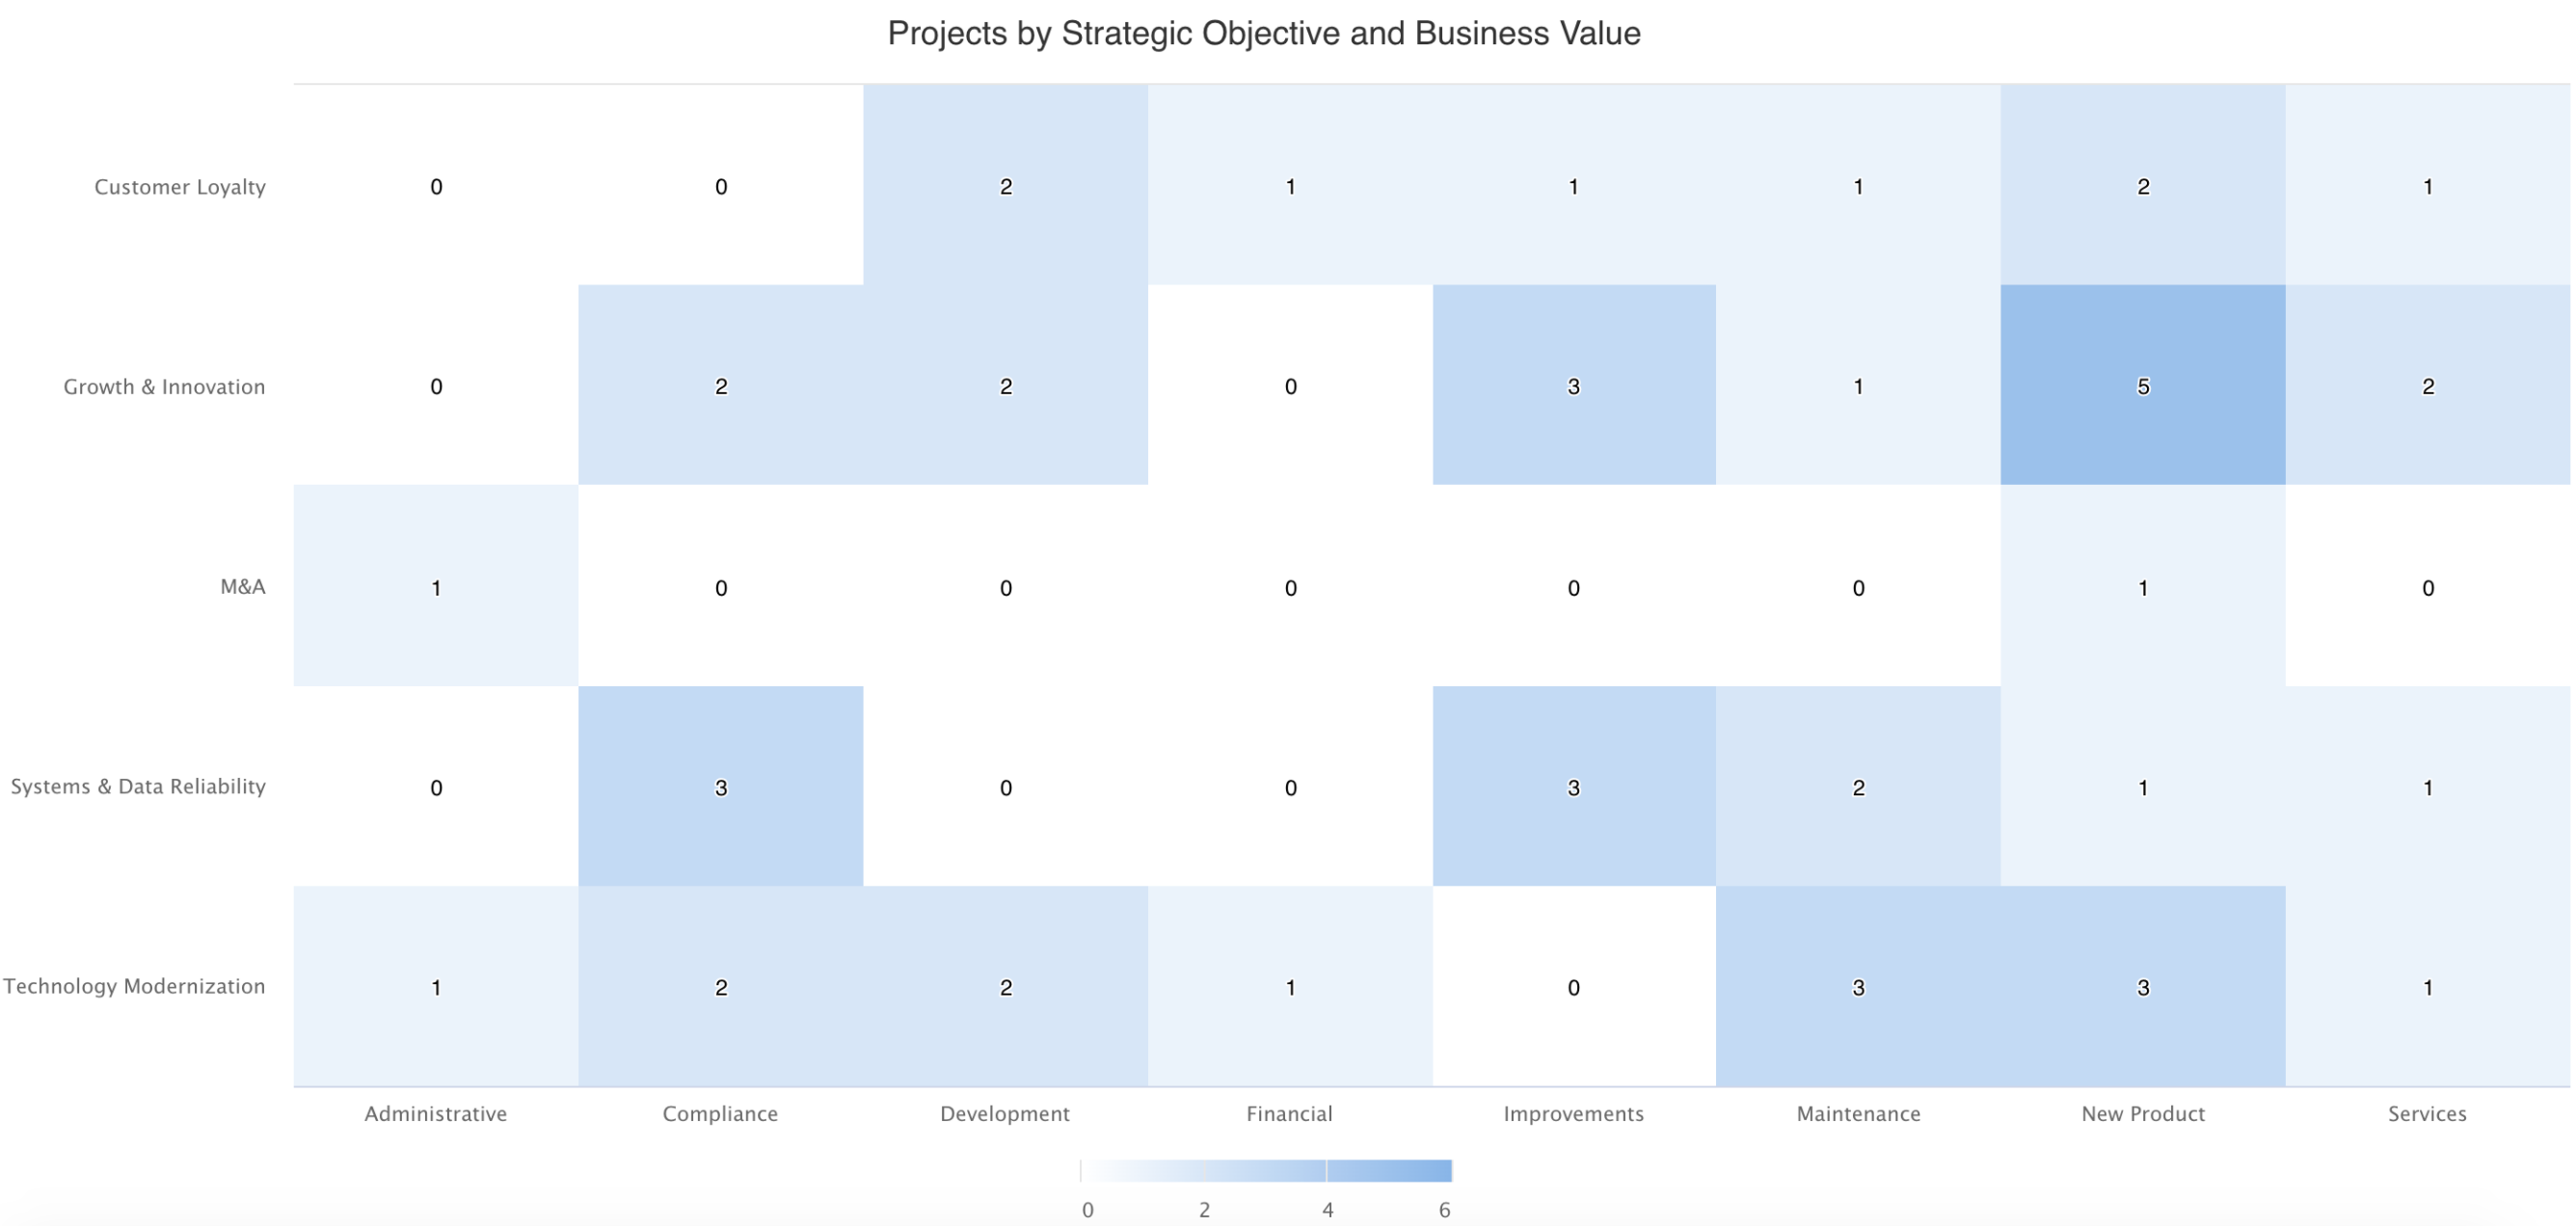
Heatmaps are great for comparing two properties of data and an intersecting value. They enable you to visualize hot spots as higher intersecting values appear with a darker color than lower values. Heatmaps show patterns or correlations and are particularly useful when you have large sets of data to visualize. See example: Projects by Type and Business Objective |
Line |
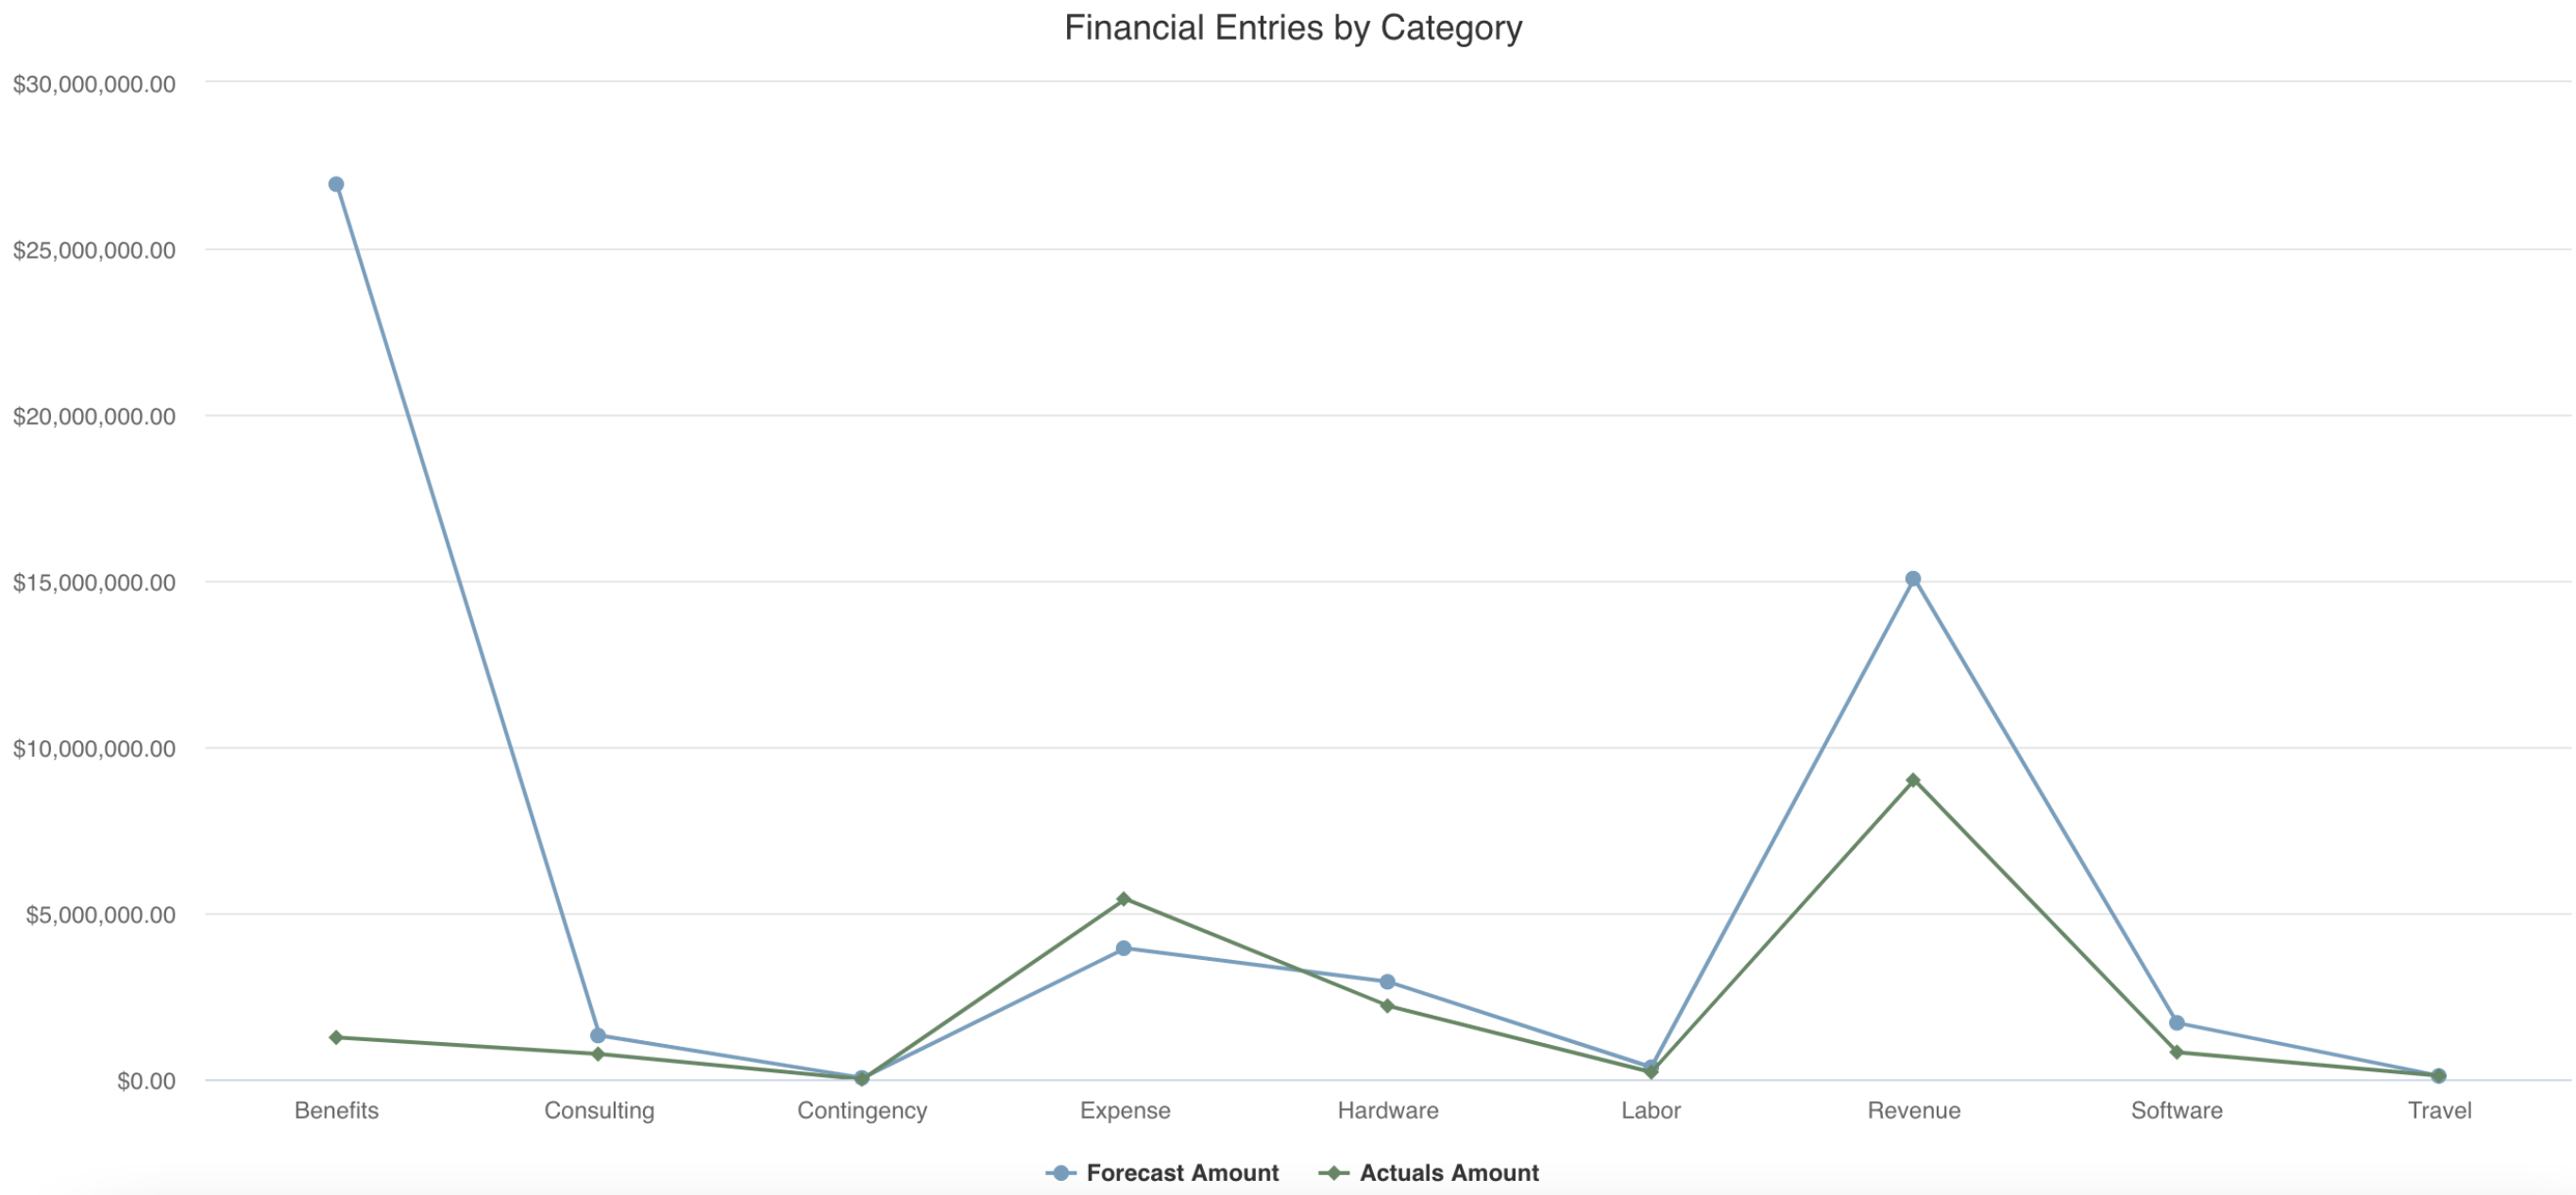
Line charts are often used to show trends or comparisons of data, often reflecting changes over time by plotting points on a line. Line charts may be easier to read than area or column charts when there are numerous left axis fields to be visualized. See example: Financial Entries by Category |
List: Basic |
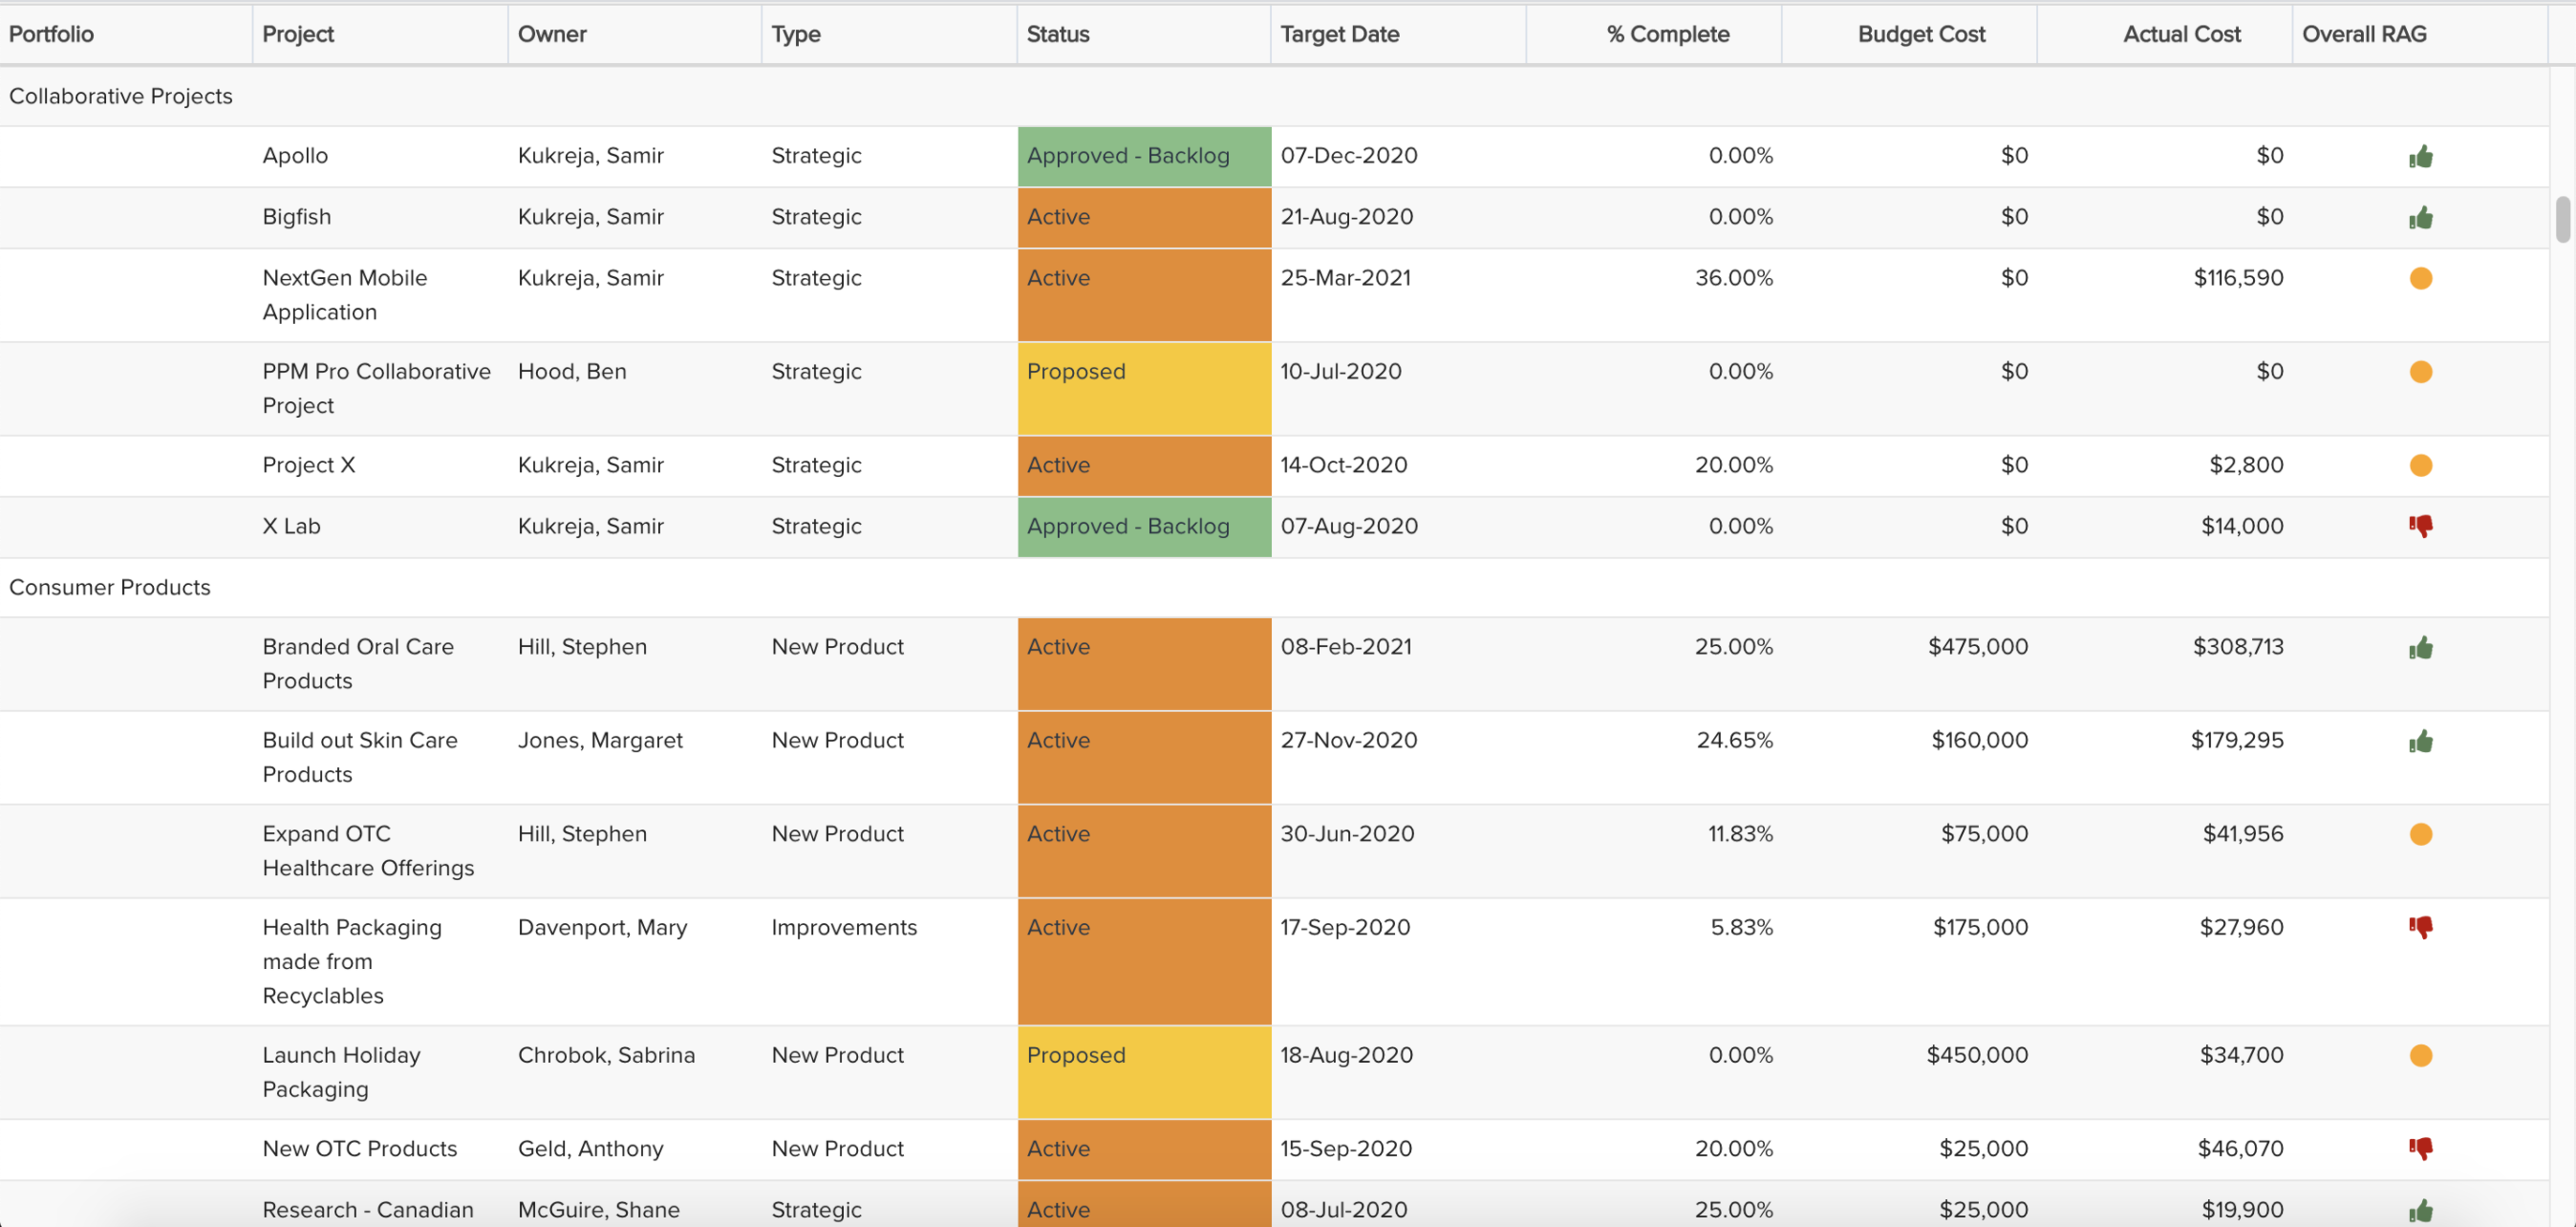
List: Basic reports are columns of data that can be sorted and grouped, and can include sub- and grand-totals. This type is good for data-intensive reports that would not be effective graphically. You can make a list report more visually appealing and readable by wrapping column titles (for lengthy field titles), specifying column widths, and if it will be used on a dashboard by choosing to auto-size the height of the report to avoid potential scrolling or unnecessary white space. You can also format certain column data and display lookup list values with their list colors and/or icons. See example: Portfolio Project Status |
List: Stacked |
List: Stacked reports are sets of the same data grouped together by entity instance. Like List: Basic, this is good for data-intensive reports that would not be effective graphically. You can make a stacked list report more visually appealing by carefully choosing the number of 'stacks' and specifying their label and value widths, and if it will be used on a dashboard by choosing to auto-size the height of the report to avoid potential scrolling or unnecessary white space. You can also format the label font and background colors. See example: Project Overview |
List: Time Series |
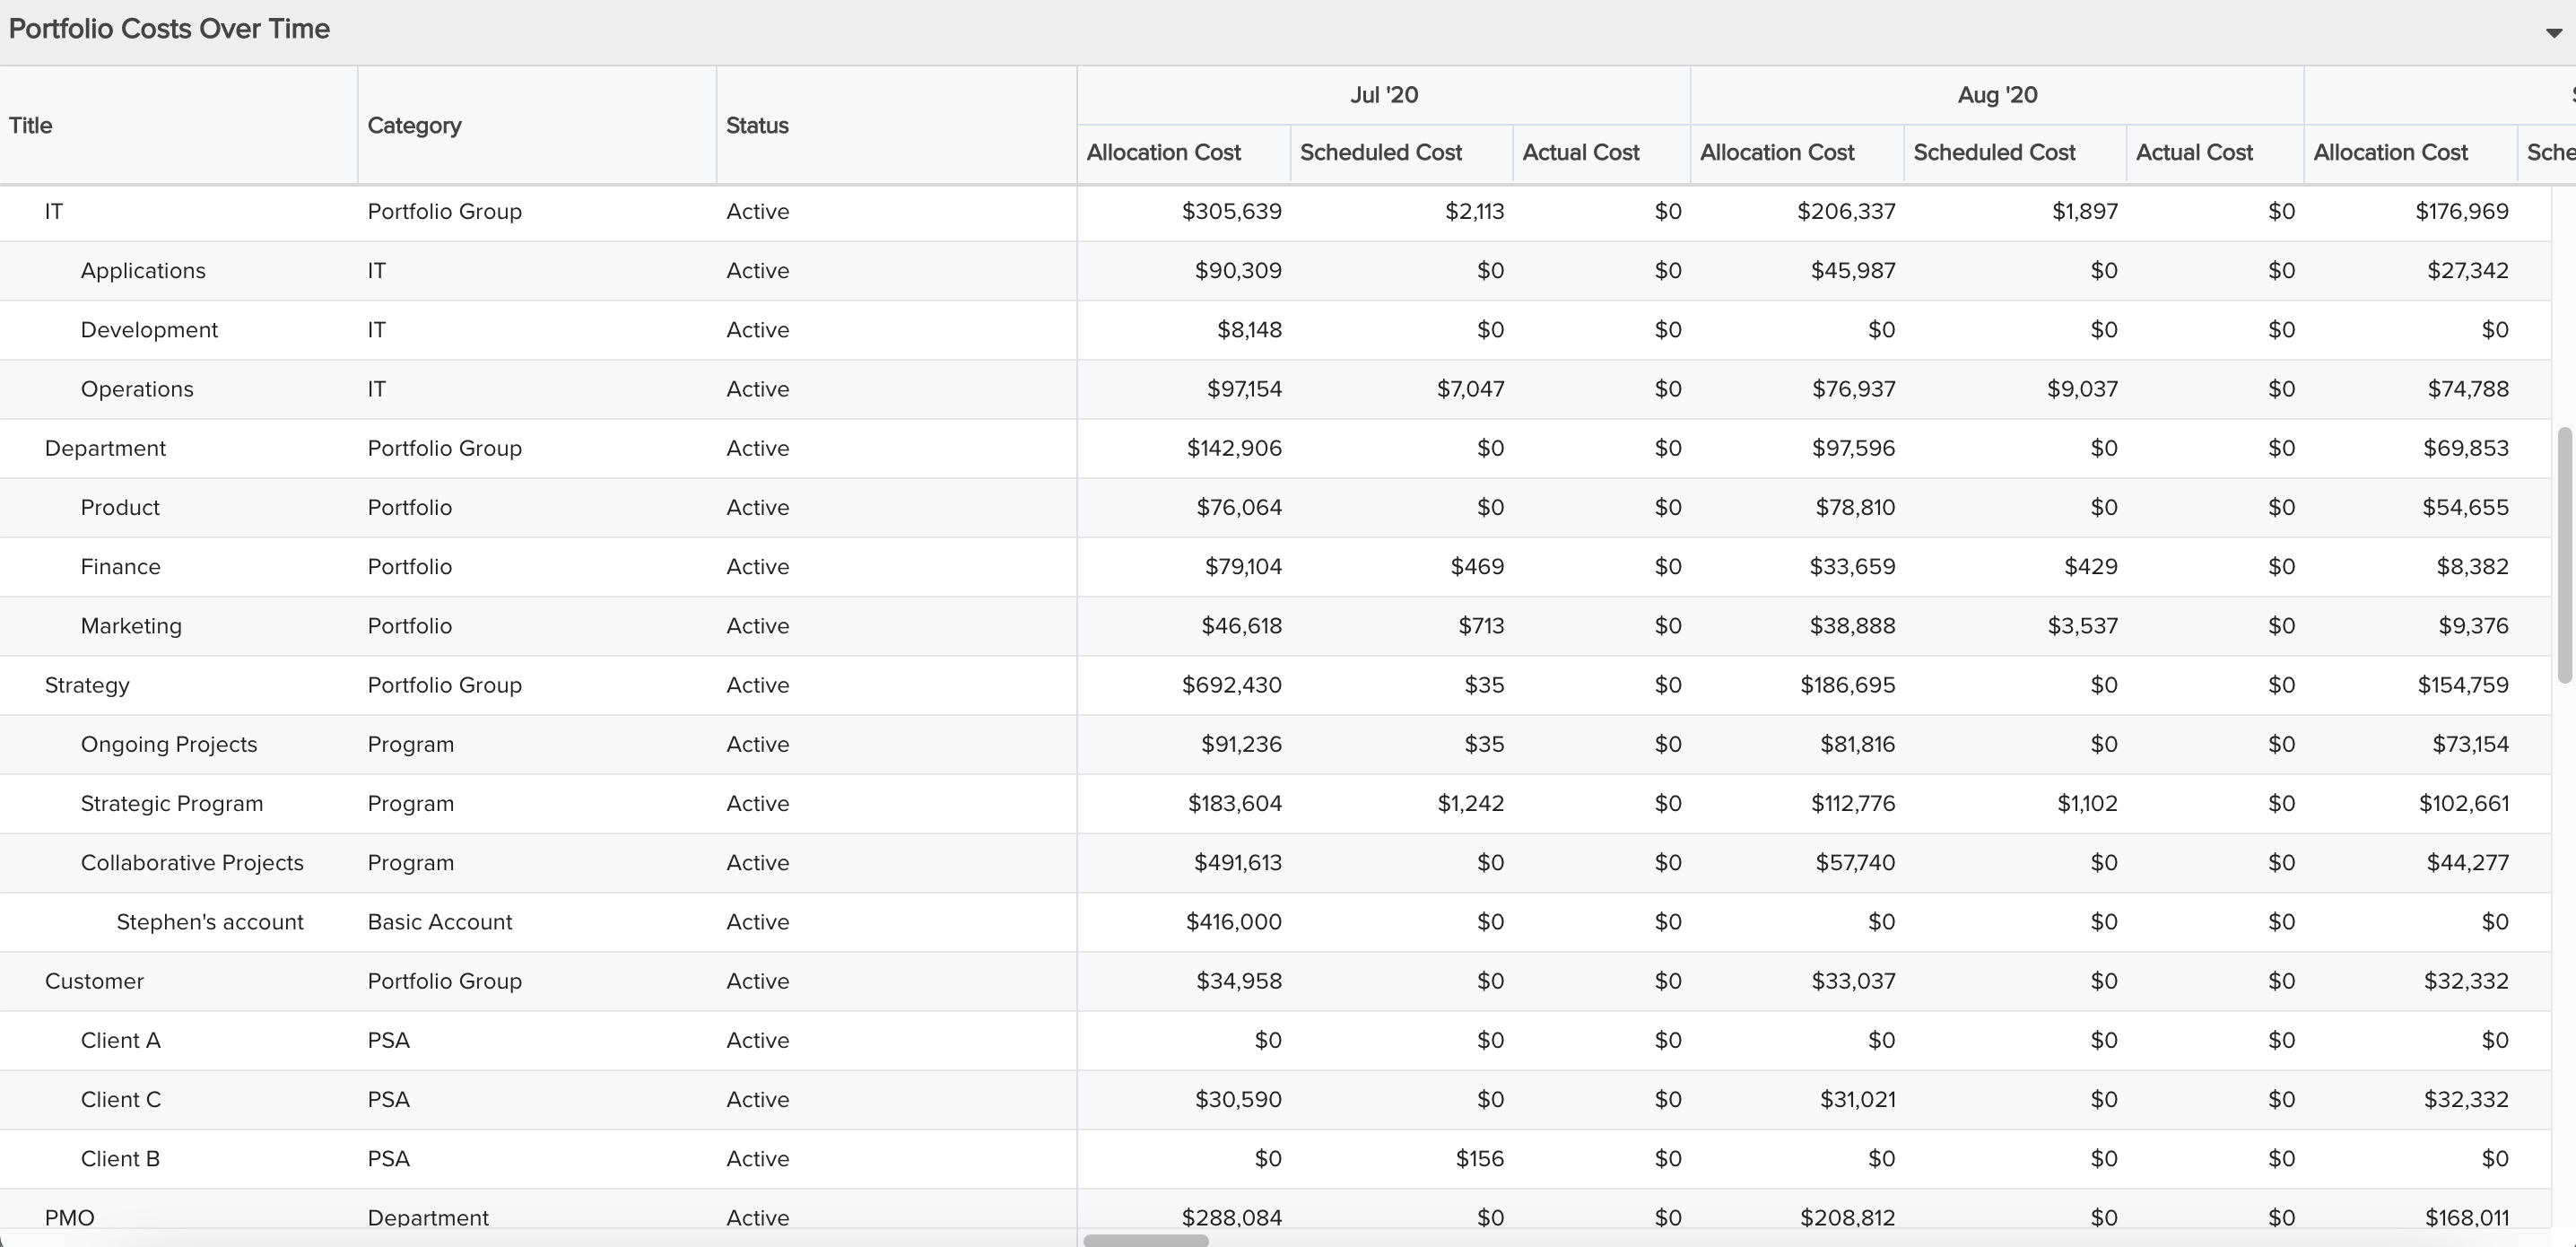
The List: Time Series report type is only available when the Time Series Specialty is selected. It is similar to a Gantt in that the left hand side of the report is a basic list, but the right hand portion displays time series field values (the available fields selected for the right hand values must be a '(Time Series)' field). The right hand side's time frequency and range is specified within the Time Series section of Variable Settings. This report type is particularly valuable if you have data-intensive reports for which you want to show values over a given time period, potentially broken up by properties such as capitalized versus non-capitalized or staffed versus non-staffed. See example: Portfolio Costs Over Time |
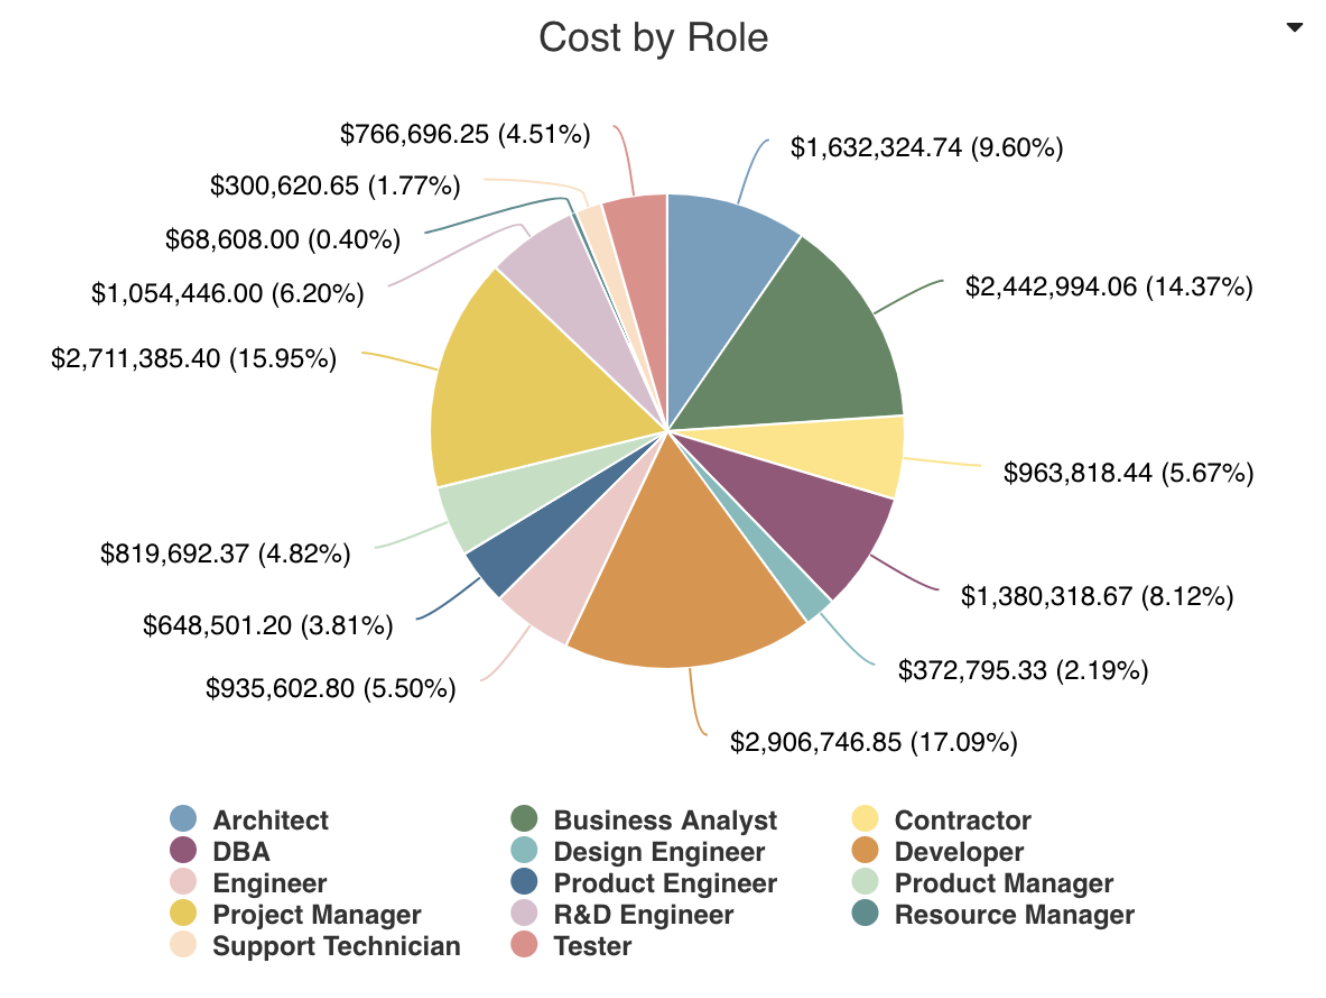
Pie: Basic Pie: Crosstab |
Pie charts are basically like donut charts with no hollow center. They allow you to display numeric totals and/or percentages broken out by a particular set of fields. Like bar and column charts, they allow you to compare one or more values across a property set or category. It is better to use a pie (or donut) chart when you have small data sets, else a bar or column chart might be easier to read. Pie: Basic only allows one field to be selected while Pie: Crosstab allows multiple fields to be selected, so that you can see other dimensions within the report. For example, you could display a basic pie that shows the count/percentage of projects broken out by Status. Or, display a crosstab pie that shows the count/percentage of projects broken out by Status and by Priority, with the center of the pie representing the overall total. See example: Allocated Cost by Role |
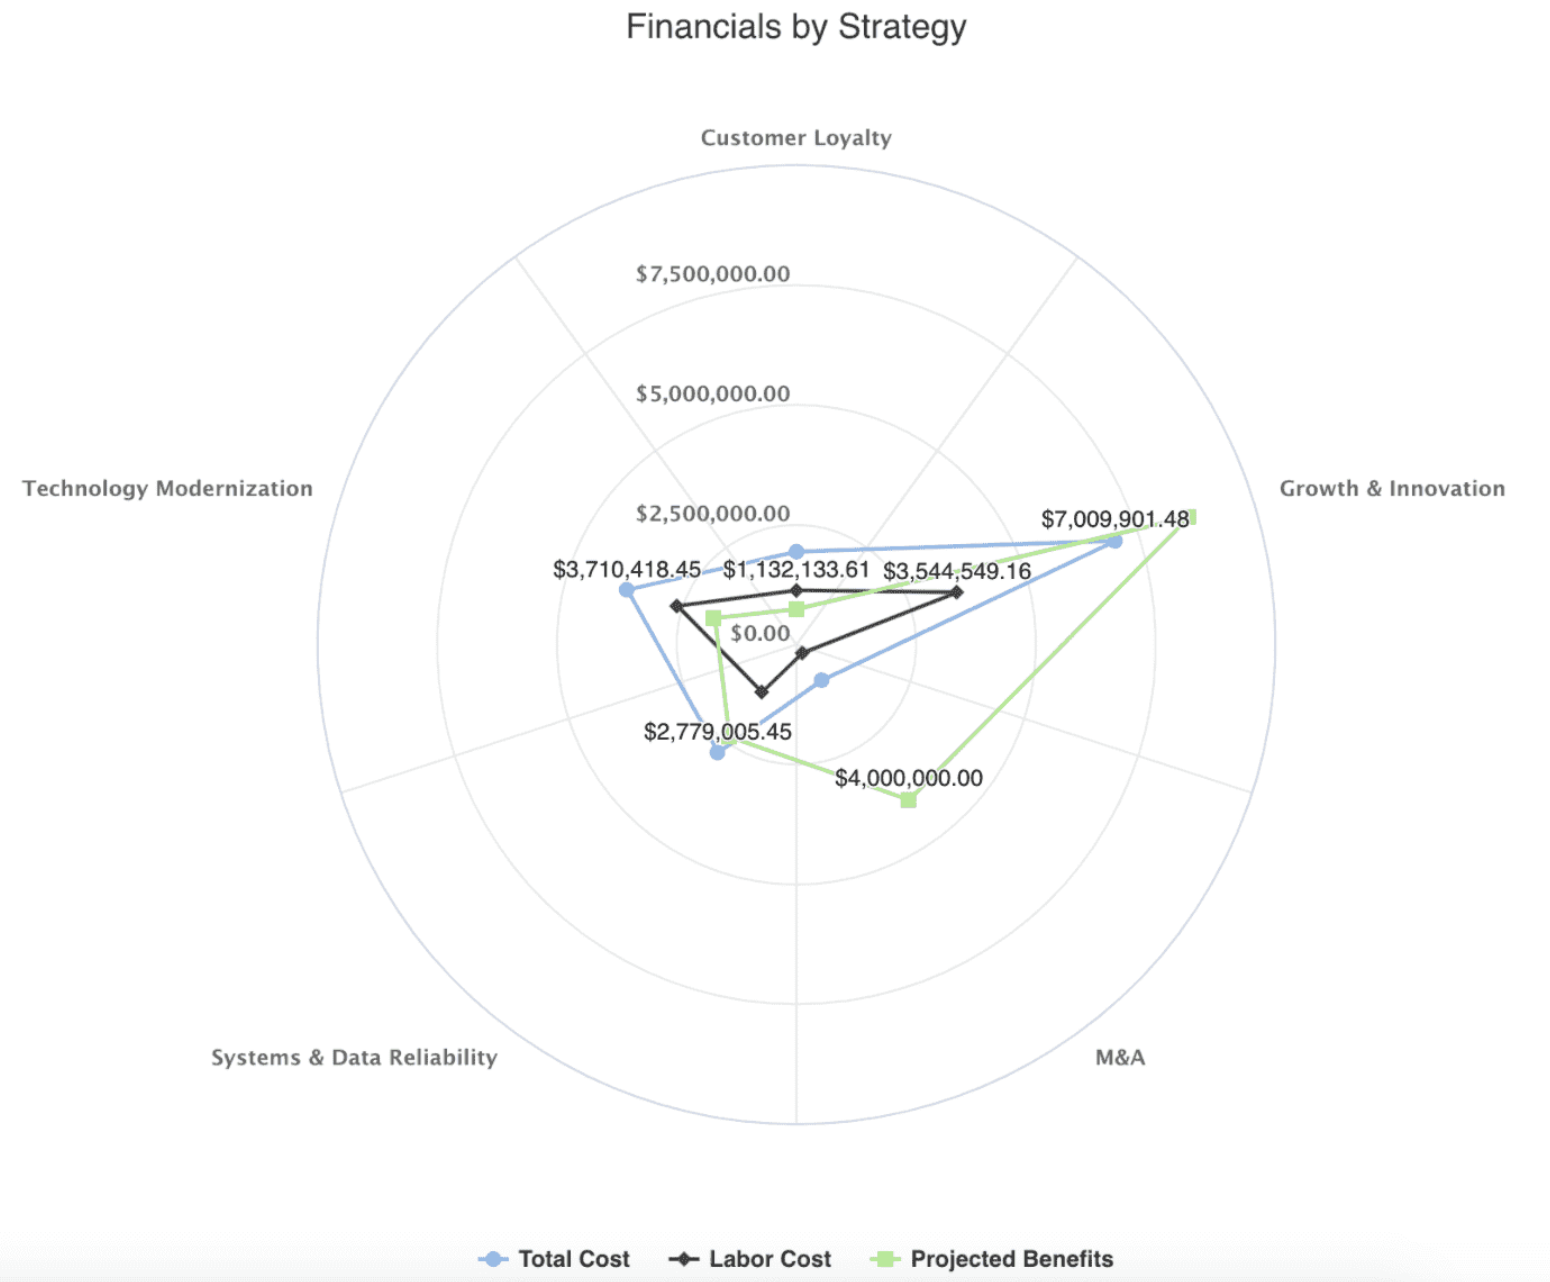
Spiderweb |
Spiderweb charts (sometimes called radar or polar charts) are great when you need to compare multivariate data sets. It is similar to a line chart but instead of a bottom axis, the 'Group By' field's values appear in a radial axis, providing an engaging alternative visualization that can also show patterns. See example: Project Financials by Business Objective
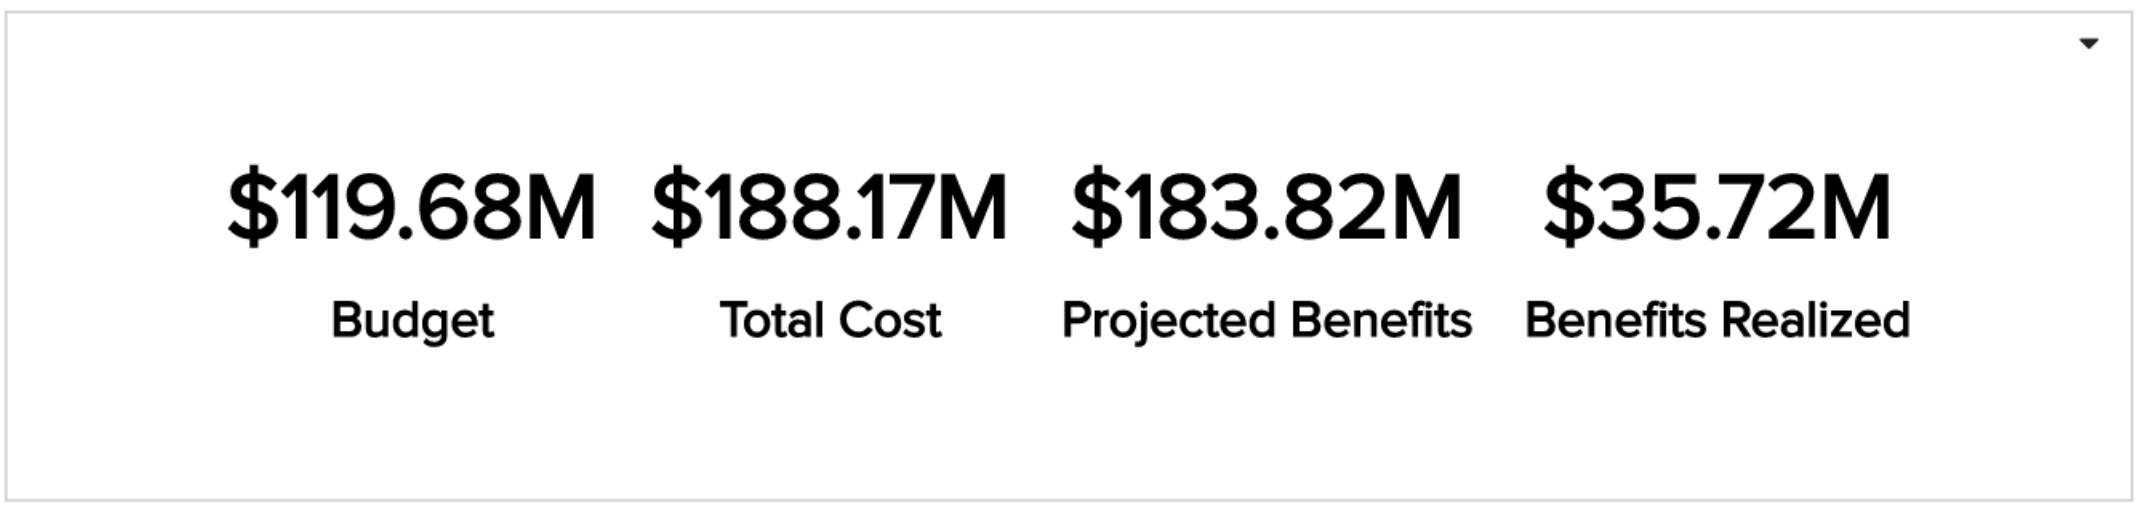
|
Tile |
A tile report shows a numeric aggregated value for an entity field. Its simplicity can be quite impactful. You can show a single field in a tile or multiple fields in a tile, changing the value or label colors to provide even more visual impact. See example: Tiles |