Planview Customer Success Center

Project Permissions Examples Cookbook

Below are examples of scenarios you might have in your environment. As these are "profile-based" permissions, it's a given that every solution involves using a profile. You create profiles on Admin/Permission Profiles. When you create a profile you always include at least one rule type. For each example, the Rule Type column indicates the type of rule to put in the profile. The Permissions column indicates the specific permissions to enable/disable.

Please note:

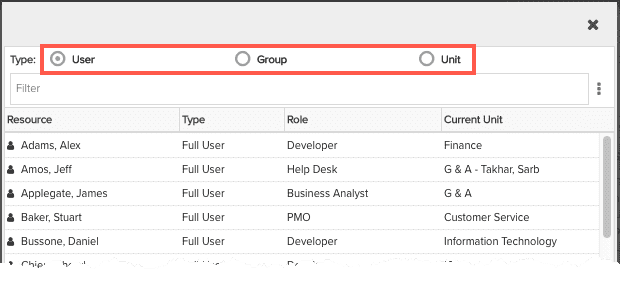
  • Any time we say "give users...." we mean "give users, or give groups, or give units..."

user_group_unit.png

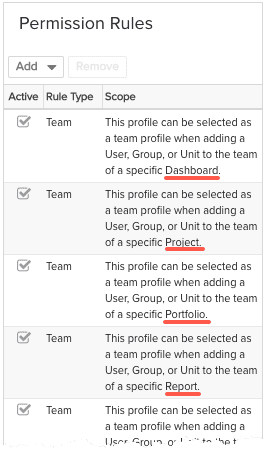
  • When you create Team profiles, you are always prompted to pick the entity the profile applies to. For these examples, the entity is always "Project". You can, however, put multiple team rules in one profile, so you can include permissions for other entities. For example, you might create a team profile called View All Entities that you can use for team members of any entity.

multi-entities.png

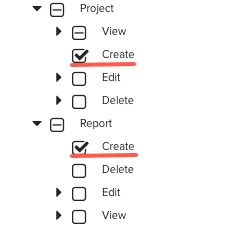
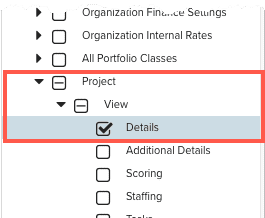
  • When describing permissions, we use the nomenclature Entity/Permission or Entity/Permission/Section. So Project/Delete means locate the Project branch of the hierarchy and click the Delete checkbox. Similarly, Project/View/Details means locate the Project branch of the hierarchy, expand the View permission branch, and then click the Details checkbox.

project_branch.png

Examples

  How Do I... Rule Type Permissions Notes
1 Give a project owner the ability to delete projects Owner Delete

Owners have implicit Edit/View rights to the Details section of entity owned by that user. You can grant the Delete permission to any owner by editing the existing Owner profile and checking the Delete project permission. If you do not have an Owner profile, you can create one. See Implied Permissions for Entity Owners.

  1. Create a profile with an Owner rule.
  2. Enable the Project/Delete permission in the Permission Hierarchy.
  3. Save the profile.
2 Give one or more users the ability to create projects Global Create

Create a Global profile, select the Create permission for the appropriate entity from the Permissions Hierarchy - remember you can include Create permission for multiple entities if you want -  and assign the profile to a user, group, or unit. 

create_entities.png

3 Give one user full edit permission on one project Team Various
  1. Create a profile with a Team rule and name the profile Full Edit.
  2. Pick the Project entity from the Entities list that appears when you Add the Team rule.
  3. In the Permissions Hierarchy, click Project/Edit (all the checkboxes should be enabled).
  4. Save the profile.
  5. Go to the Projects list and open the project you are giving the user permissions to.
  6. Go to the project's Team: Profile-Based Permissions page.
  7. Click Add.
  8. Select the User radio button, then select the user.
  9. Pick the Full Edit profile you created from the "With this permissions profile" droplist.
  10. Click Add.
4 Give one user access to all projects Global  At least View
  1. Create a profile with a Global rule.
  2. Click the User radio button and select the user.
  3. In the Permissions Hierarchy, locate the Project branch and select View. You can select Edit if you want the user to be able to edit all projects.
  4. Save the profile.
5 Give one user (or maybe a couple of users) total access to all entities

Global > User (for one user)

Global > Group (for more than one user)

Full Edit
  1. Create a profile with a Global rule.
  2. Assign the profile to a user, or several users, or a group or unit.
  3. In the Permissions Hierarchy, select the Entity/Edit checkbox for each entity to enable edit permissions for all (edit implies View permissions). For example, in the Project branch, select Edit, and in the Dashboard branch, select edit. The user will be able to fully edit projects and dashboards.
  4. Save the profile.
6

Add users to several project teams with View permissions

(or remove users from several project teams)

Team Various
  1. Create a profile with a Team rule called View Only.
  2. Pick the Project entity from the Entities list.
  3. In the Permissions Hierarchy, choose Project/View the permission. 
  4. Save the profile.
  5. Go to the Projects list, multi-select the projects you want to add the users to (use Shift-click or Ctrl-click), then choose Actions > Bulk Add Team Members
  6. Click the Users, or Groups, or Units radio button, and then select the users/groups/units/ to add to the projects.
  7. Select the team View Only profile to add with the selected resources in the "With this permissions profile" droplist.
7 Give groups of users permissions to one or more projects

Global

Various
  1. On Admin/Group, create a group called "Contractors" (or create a Unit).
  2. Create a profile with a Team rule called Contractor Profile.
  3. Configure the profile with the project permissions you want the contractors to have, for example, Project/View/Details and Project/Edit/Tasks.
  4. Save the profile.
  5. Go to the Projects list and select the projects that the Contractors group is working on. If multiple projects, use Bulk Add Team Members. Select the Contractor Profile when you add the members.
  6. Whenever you hire a new contractor, add the contractor to the Contractors group to automatically provision them. Same for removing contractors, simply remove the user(s) from group.
8

Give users permissions to projects that belong to the same department

or

Give users permissions to projects that belong to the same category

Team Various

For existing projects, you can filter your project list to show all projects that belong to one department/category and then use Actions >  Bulk Add Team Members to add the users along with the team profile. We recommend adding the users as a group or a unit, so each time you onboard a new user you can drop them in the group/unit and they will receive the appropriate permissions.

For new projects, you can use a template project.

  1. Create the template project. Be sure to use a project category that has a Department field, and that the user creating the template is on the Department team with Can Create Parent Relationship with Projects permission.
  2. Configure the department/category.
  3. Add the team members - preferably use a group or a unit so that new users can simply be dropped into the appropriate group/unit and automatically receive the correct permissions.
  4. Save the template.
  5. Create a new project from the template. Check the "Team Members" checkbox in the section where you indicate what elements to copy into your new project.

The team that you added to the template will be provisioned on each project you create from the template.

9

Give unit members permissions to specific projects

(Restrict Unit Access to Specific Projects)

Team

or

Association

Various
  • You can add Units as project team members if you want very granular control over each project (create a profile with a Team rule and apply it to a Unit). You can have a different profile for each project that you give the unit access to, or you can use the same one, or have a couple of different profiles - infinite possibilities.

or

  • Create a profile with an Association rule if your organization has very clear, overarching rules that can be applied to any projects that have the specified association with the Unit. 

See How Do I Grant Units Access to Specific Projects for detailed instructions.

10 View Org-level Reports Team or Global At least View

With profile-based project permissions and row-level security, users have access to all Org-level report sources and reports (for project targets) based on those sources. Users will see report data only for projects for which they have at least View permissions.

If you want a user to be able to report on all projects:

  1. Create a profile with a Global rule, select grant View permission to the user.

If you want a user to be able to report on only certain projects:

  1. Create a profile with a Team rule, configure View permissions at a minimum in the Permissions Hierarchy.
  2. Go to the Projects list page, select all the projects you want the user to be able to report on, choose Actions >  Bulk Add Users to Team.
  3. Select the Team profile you want to use from the "With this permissions profile" droplist.
  4. Click Add.
11 Create a project that has a parent department NA NA

Projects are no longer required to belong to a department. The Department field has been removed from the New Project Wizard. If you want to establish this relationship, you can do so manually.

To create a parent-child relationship between a the Finance department and a project:

  1. Use SSA to add the Department field to project Details.
  2. (Optional) Configure the Department field to "Show on New" and make Required. 
  3. For anyone who needs to create a project with this kind of relationship, place the user on the team of the Finance Department along with the "Can Create Parent Relationship to Projects" permission, or put the user in the Organization group (Org group members can access all departments). 
  4. Create the project. The user creating the project must be on the Finance team, as described in step 3. If you foresee situations where the project creator will not have the department team permission, then do not make the Department field required.
12 Grant permissions based on a Program/Department Team Various

Bird's-Eye View:

  • Create a project category that includes the Department field. The field may or may not be a required field. Also, you can decide whether you want the field to appear on the Create Project wizard, or if you want it to show on the project Details once the project is created.
  • Create a project template that uses the category and is configured for the department. For example, select Finance in the Department field.
  • Add the user/group/unit that corresponds to the department/projects to the team of the project template, along with the appropriate permission profile. We recommend using hierarchy units to place users on the project team, that way, when new users are added to the unit, they are automatically provisioned for the projects that unit is assigned to.
  • Create a project based on the appropriate template

For detailed instructions, see Example: Use a project template to grant permissions based on the project's parent department

13 Grant permissions based on project Category

Global

Owner


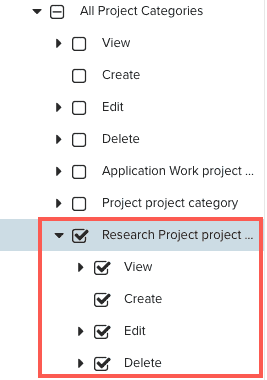
You can give users/groups/units permissions to projects of a specific category. For example, you can grant permission to create projects that use the Research Project category, or permission to view all projects that use the Maintenance Project category.

For example, to grant user Frank True permission to create, edit, and delete all projects using the Research Project category, do the following:

  1. Create a permission profile called Research Project permissions.
  2. Select Add > Global and then choose individual user Frank True.
  3. In the Permissions Hierarchy (shown below), choose Create, View, Edit, Delete permissions for the Research Project category, then click Save.

        clipboard_e564b4e05e694ecf0a034ee4e7a0fa73e.png