
Entering Time
If you haven't already, take a look at Working with Timesheets for an overview of the UI.
To enter time, you open a timesheet and create a timesheet entry; each row on the timesheet represents a timesheet entry. You can also enter time directly from a task. All of the entries for a date range comprise one timesheet. For example, on one timesheet you might log time for several different tasks and a day off - each time you "Add new" you are creating an entry. Depending on how your organization has configured timesheet approvals, one person might approve the entire timesheet, or project managers might approve entries for their projects.
Note that once you create a timesheet entry for a specific project/task (allocation) an allocation has an associated timesheet entry (either by way of a pinned timesheet, or even an entry with no hours), the allocated role cannot be changed.
Note that once an allocation has an associated timesheet entry (either by way of a pinned timesheet, or even an entry with no hours), the allocated role cannot be changed.
Creating a Timesheet Entry
1. Create a timesheet entry by double-clicking 'add new', choosing New > Entry, or pressing Alt-N. The 'add new' control will always appear beneath the last entry on a timesheet that already has entries. Note that when you create entries, the Category defaults to the value in previous entry. If it is the first entry on a timesheet, the Category defaults to "Project".

2. Once you have created the entry you can use the inline editor to fill out the entry. Note that you can use the keyboard to tab between fields, and the arrow keys to navigate the drop lists.

3. The fields are described below:
|
Field |
Description |
|---|---|
|
Category |
Select the type of time entry: Project, Portfolio, Administrative. Note that this droplist always contains Project and Administrative items, as well as any Portfolio or Application class that has the "Can track time" setting. So you might not see exactly what is documented here. |
|
Title |
Select the portfolio or project to which the time is being logged. |
|
Task/Type |
Select the task to log time to. |
|
Role |
This drop list that contains all roles associated with the task. If there is only one role, then that value is displayed. Otherwise, select the role to associate with this time entry. |
|
Billable? |
For tasks that are type Time & Materials or Not To Exceed, you have the option of indicating whether the hours are billable (Billable? = checked), or non-billable (Billable? = not checked). For all other tasks type, Billable? is not on the grid. If you don't see this field then your organization has chosen not to display it in timesheets. |
|
HTC |
Displays the estimated hours minus actual hours to-date for a role. Click here for the rules about when HTC auto-increments or decrements. Note that HTC is editable only if a resource has been scheduled to the task. If you don't see this field then your organization has chosen not to display it in timesheets. |
|
Is Capitalized? |
Reflects whether summary task is capitalized. If you don't see this field then your organization has chosen not to display it in timesheets. |
|
Displays the sum of the hours in the entry. This field is read only, unless your organization has enabled "bucket" entry, in which case the number you enter in the Total field will be distributed evenly across days displayed in the contours pane. (See Configuring Timesheet Settings) The values are rounded to the nearest 0.25 hours. If the hours cannot be divided evenly across all days, and there is a remainder of less than 0.25, then in some instances a cell may not have a value, or may have a lower value than the other cells. Note that depending on how you have configured the timesheet, there may be days displayed in the contour pane that are not included in the distribution of hours. For example, you may choose to display Saturday and Sunday in the timesheet, but do not want summed hours distributed to the weekend. In addition, your organization may want to simply enter weekly hours in a lump sum and does not want to view the daily entries. In this case, simply put one day on the contour pane, and then hide the pane. You can now just enter total hours in the Total field and they will not be distributed. If you don't see this field then your organization has chosen not to display it. |
4. Click Save when you are finished.
5. If you are displaying the Contours panel, you can then enter hours under the appropriate day(s), or use the Total field to enter a sum of the hours you work. Repeat for as many entries as you need.
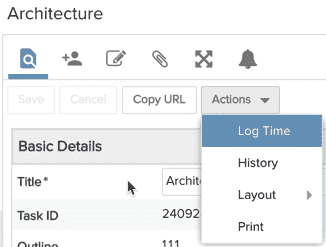
Entering Time Directly From a Task
Users can enter time directly to a task if they are scheduled to the task and the task meets your organization's filter rules. If the rules are met for a task, select the task and then choose Actions > Log Time from the task Details pane, as shown in the screenshot below:
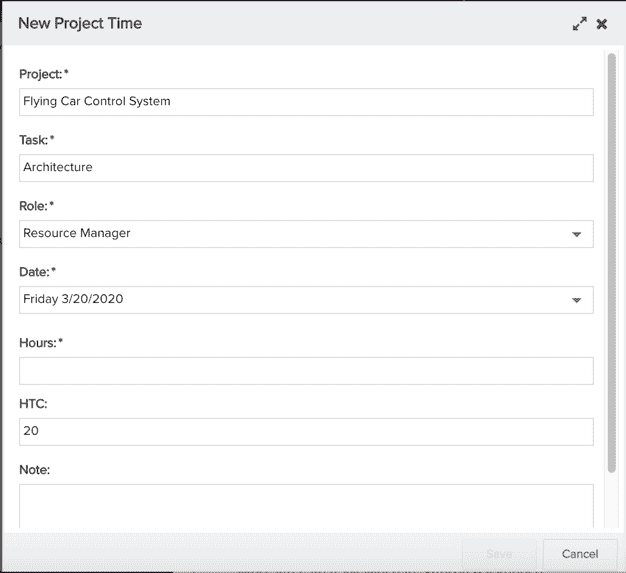
After selecting Log Time, the New Project Time dialog appears (shown below) and the user must enter the required fields, including total Hours for the selected day (which defaults to the current date).
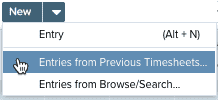
Copy Entries from Previous Timesheets
When you enter new project time, you can only charge time to one task at a time, in one project at a time, as described in Creating a Timesheet Entry above. Alternatively, you can use the Previous Timesheet Entries feature, to load entries from up to the previous 6 timesheets. This allows you to quickly populate your timesheet.
To populate a timesheet with existing entries
- Choose New > Previous Timesheet Entries...
- The Entries from Previous Timesheet dialog appears.
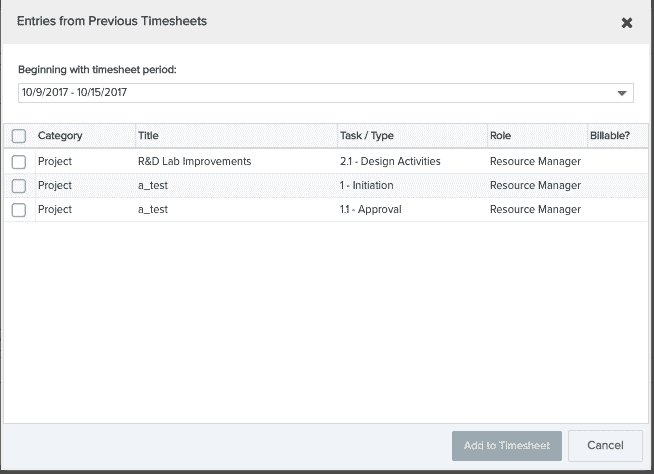
- Select the timesheet period to begin loading tasks from.
- Select the check boxes next to the entries you wish to copy.
- Click Add to Timesheet to load the tasks into your timesheet.
Note that the entries must adhere to your organization's timesheet rules. Timesheet rules are configured with filters by an Innotas Administrator. See Configuring Timesheet Rules and Settings for more information. Also note that once you have put a task on a timesheet, that task will no longer appear in the Entries from Previous Timesheets list, because you can only create one entry on a timesheet for a specific project/task combo.
Browse/Search Entries
In addition to loading all entries from a previous timesheet, you can also search for specific tasks to add. You can browse by Project, Portfolio, or Admin entries, and then single or multi-select to add to timesheet. Note that the dialog will only display tasks that satisfy your organization's timesheet rules.
Adding All Tasks (to which you've been scheduled) to a Timesheet
As an alternative to searching for specific tasks, you can load all tasks from all your projects into your timesheet.
1. Select My Projects from the Entries From: droplist. My Project lists projects where you are on the team and have tasks that satisfy your organization's timesheet rules.
2. Click the Add All Tasks from My Projects button that appears on the bottom of the dialog. Every qualifying task will be added to the Selected Entries.
Copying an Entry
You might have a need to duplicate an entry and just change it slightly from the original entry. For example, you have the same task but want it entered for billable and non-billable time. Because the Browse/Search and the Load Previous Entries modals only show entries that are NOT already on your timesheet, you will need to use the Add Entry (or New button) to create a new entry and enter the duplicate information and change a value to differentiate it from the original entry.