
Stepping into Centralized Project Management
Many project managers might think they are doing just fine with spreadsheets or basic project management software and fear that a centralized project portfolio management (PPM) solution will create more work for them. The truth is centralized project management has merits not just for executive management but for project managers also. While it may seem like a daunting initiative to get centralized project management implemented, in the long run it will pay off and actually improve everyday life. Below are several reasons why it is important and worthwhile.
- Ensuring business alignment - All too often we focus on completing the project or task without understanding why it is important to the business. By understanding how well-aligned the project work is to the business, project managers will naturally find themselves taking actions that will contribute more value over the course of execution – not just completing something that was handed or assigned to them. Centralized project management enables them to score, prioritize, organize work in portfolios, and employ dashboards to better understand how requested demand and approved projects align with business needs. While project managers will always be expected to deliver, supplementing successful delivery with quantitative and qualitative metrics to measure business alignment will increase their ability to make a bigger impact with their time and efforts and increase recognition and internal visibility upon delivery.
- Delivering on-time and on-budget projects - Project managers are typically measured by their ability to deliver projects on time and on budget. However, sometimes situations arise that are outside of their control – resource changes and strategy shifts. When changes occur, their ability to stay on-track can severely be hindered, not to mention their ability to justify why. Centralized project management provides support through reports and dashboards that leverage real-time data for clearly communicating to stakeholders. This high-level visibility across all projects helps stakeholders to remove obstacles and avoid introducing difficulties that can get in the way of successful project delivery.
- Accountability - Stakeholders hold project managers accountable for delivery of projects and initiatives – under all circumstances; the bottom line is that the project manager must honor commitments and the buck stops with them. While this may be an unavoidable fact of project management, the reality is that they do not have to carry all of the weight on their shoulders. With proper access to data through centralized project management, project managers can convey responsibilities and reduce the personal pressure or stress. Centralized project management enables project managers to hold their team members and stakeholders accountable for their commitments, including delivering tasks, meeting deadlines, or simply not pulling resources onto lower priority projects. Centralized project management will provide reports of their resources’ current allocation, facilitate creation of project milestones, and measure time actuals against project estimates. By consolidating this information into a single view, project managers can create a culture of accountability where everyone understands their roles, responsibilities and expectations, which increases the chance of project success.
- Preventing overworked resources - When projects are not centrally managed, resources are often asked to do or take on more work than they can handle, causing resources to be over-allocated and overworked, and hurting a project manager’s ability to deliver successful projects. Centralized project management helps project managers maintain the proper utilization of resources, ensuring they are always working on the highest priority work. By understanding true resource capacity and allocating resources appropriately to projects, project managers will see an increase of successful projects because over allocated and overworked resources are easily identified and quickly addressed.
- Visibility into accurate project forecasts and financials - Centralized project management provides the opportunity to upgrade from static data in spreadsheets to a holistic set of real-time capabilities that generates confidence in a project manager's committed forecasts. It also provides the ability to understand the portfolio of work the organization is investing in and how those investments are performing, both financially and time-wise. Centralized project management enables project managers to assess, absorb, and quickly react to changes in their environment, ensuring their forecasts can stay on track.
- Facilitation of standards, metrics, and governance - Centralized project management enables organizations to have a standard project decision making framework and process that is logical, robust and repeatable. This governance ensures that project managers have consistent project structures and processes, with true end-to-end visibility that empowers them with the knowledge that project performance is evaluated fairly.
- Cross-functional reporting and communication of key initiatives - Gartner research found that 80% of business executives believe that project managers should provide accurate status reports (the good, the bad, and the ugly), but only 33% felt that project managers are actually doing it well. Providing inaccurate or “fluffed” data causes further damage because warning signs of wasted efforts are covered up rather than communicated. Reporting is simply a gap in most organizations and this gap directly impacts the organization’s performance. Centralized project management provides several configurable reports and dashboards to facilitate communicating with all stakeholders – from team members, to management, and the line of business (LOB). It enables project managers to drive healthier conversations that foster better decision making.
The purpose of this topic is to provide an example set of steps for how you can progress along the centralized project management path to help achieve your company's objectives. If you have any questions about any of the following or other project management needs not addressed here, please contact Customer Care or Consulting Services. If you have another example or a helpful tip not portrayed below that you would be willing to share, please email productmanagement-ppmpro@planview.com and we will gladly add it!
The steps covered in this topic include:
Step 1: Design your initial project category
Step 2: Configure the project category and related information
Step 3: Create template(s) for new projects
Step 4: Grant permissions to relevant users
Step 5: Transfer existing external projects
Step 6: Audit, track, maintain, and evolve
Step 1: Design your initial project category
Start simple by focusing on a single type or category of project and designing it. What will bring your organization the most value or what type of project is most in use? Are you starting from scratch or do you have existing external projects that you need to model, for example from a project spreadsheet or MSP? Once you've designed and configured your first project category, subsequent ones will be much easier, especially if you can copy this first one as a jumping off point for the next one.
Initial Design Questions
The following questions relate to the most commonly used capabilities across our customers and should help you create your initial design.
- Given the initial project category you will create, who will be the likely project managers and people working on the projects of that category? Who are the stakeholders and executives ultimately and most keenly interested in those projects? Choose a few of each and invite them to participate in the project category design process, to contribute to and validate your design. Include them as appropriate to help answer the questions below and/or to confirm your design as it progresses.
- What project data must be captured (required) and what data is valuable but optional? To help ensure the best experience and fewest speed bumps for your project managers and their teams, you'll want to make sure you only show truly relevant and valuable fields on your project details; the simpler and less cluttered the forms, the happier the user and the more efficient the management. Decide what fields you want to include, for example, you can capture project charter fields such as business problem or opportunity, goals and objectives, critical success factors, and other details. In general, identify what data fields you want to show and capture as part of each project as well as how and when they should appear.
- Do you want to staff the projects of this category with roles or resources? If so, do you want to use top down project-level planning or bottom up task-level planning? And do you want to express demand in hours or headcount? Projects from this category could include role and resource staffing or not, it's up to you. If you do want to include the ability to staff roles and resources, decide what related defaults you want to set (or not) and whether or not users can change these settings when creating or editing projects of this category. See Staffing Considerations in the Stepping into Resource Management topic for more information, but in short:
- Decide if projects of this category should be project-level planning or task-level planning. Project-level planning is typically high-level planning; you may or may not know who will work on the project, but you are likely to know what kind of roles will need to be filled. Usually you would use project-level planning when you need to have role and resource allocations in place at the project level for further analysis and approval, when others in the organization will be doing staffing or staffing approvals, or when you need to represent demand before having detailed project task work breakdown structures. Task-level planning is typically low-level planning; you have your detailed task work breakdown structure and are building your demand off of this information. Usually you would choose task-level planning when you already have approval or don't need approval for resource allocations, have a detailed task plan, and simply want to schedule resources to those tasks.
- Decide if you want the project staffing demand expressed in either hours or headcount. You can represent all of your project resource work directly in hours, for example, a resource could be allocated to work 80 hours on a project. All project-level staffing data is stored in hours so there are no conversions. Or, you can represent allocations as a percentage of time a resource will be working by expressing in headcount. For example, a resource could be assigned to work half-time or 50% on a project when allocated as 0.5 headcount.
- Ensure that relevant roles have been configured and relevant resources have been added to the system (see Stepping into Resource Management topic's Ensure your People Resources are in the System).
- Do you want to include task management or scheduling? Tasks are executable actions that are assigned to resources and/or roles. You can configure different categories of tasks, each having a different set of fields and various sections, to meet your needs. For example, you can represent high level deliverables, detailed work items, and milestones. A project can be comprised of one or many tasks; whether the projects of this category will be waterfall, Agile, or a combination of these "wagile", they can be used to denote the work items needed to complete the project. Depending on the level of detail needed and what level of resource management your organization needs, you can also choose to include task scheduling, so that you can track resource scheduled hours, task hours to complete, or task and project percent complete (depending on the % complete method, discussed below). Tasks can also be used for cross-project dependencies (hard project dependencies). NOTE that if you are using Timesheets to track time and want to include projects from this category, then you will want to at least include a Tasks section so that you can minimally have a single time tracking task.
- Do you want to allow for predecessor projects? You can choose to allow your category's projects to have project predecessors (soft project dependencies), which is when a project is designated to finish before the current project starts; however, the successor project's start date will not be impacted by the predecessor project's end date. For example, if you have a predecessor project with an end date of 10/30 and that date slips out into November, the successor project with a start date of 11/1 will retain its start date and work can begin. These soft dependencies will be represented on the project Gantt chart by an arrow between the projects.
- How do you want to track project progress? Simple project progress can be tracked by monitoring the project start, target, and completion dates, as well as the same dates for tasks if the project is all or partially waterfall. Use the interactive Gantt chart capabilities in the user interface or reports to create a good visual status overview. If the projects of this category are fully or partially Agile, you can also track the individual task/work item completion statuses and number of completed tasks/work items. You can also optionally select to use one of five % complete methods that are automatically rolled up to higher level tasks and the project as a whole based on task data, some even without requiring manual entry: Timesheet Actuals, Number of Tasks Complete, Task Manual, Task Manual (Weighted), Task Manual (Duration). For all of these methods, as soon as a lowest level task has a complete date, its % complete value will be 100%. If you do include a % complete method, decide what related default method you want to set and whether or not users can change this method when creating or editing projects of this category.
- Do you want to track risks, problems, change orders, bugs, lessons learned or general issues? If so, then a Project Logs (or Issues, as sometimes these are labeled) section can be included with the project category to enable these kinds of tracking. You can configure different categories of project logs, each having a different set of fields and various sections, to meet your needs. Each project log can be assigned to a project team member (in the near future, to multiple team members as needed), to assist with resolution handling.
- Should users be allowed to add notes or status comments to the category's projects? You can provide the ability to capture threaded notes on the category's projects by including a Notes section. Status comments are very similar to notes and are provided if you would like to implement additional note streams. For example, you might want to use project notes for low-level details about the project, and use status comments to communicate high-level information to executives. Both notes and status comments can be reported on separately.
- Should users be allowed to add link or document attachments to the category's projects? You can allow team members to attach documents and links to the projects for this category, for example, to provide project reference information not already captured in project details, additional details, or project logs. The maximum size for any single file attachment is 100MB. If you would like to allow for attachments, you'll want to include the Attachments section on your project category.
- Do you want to allow team members to manage project alerts? Email message alerts inform users of changes that have been made by other users to the project. Many of these are automatically enabled, for example, to notify the project owner when someone else changes a project field. If you would like your project owners or team members to manage and create new alerts, you'll want to include the Alerts section on your project category.
- Do you want to allow projects of this category to be templates? You can configure any of the category's projects to be used as a template, which allows other users to use the template project as a jumping off point when creating new projects. When a project is created from a template, the tasks, task assignments, issues, allocations, team members, alerts and attachments from the template project can all be used as individual components of the new project. If you want to allow one or more of the category's projects to be used as templates, you'll want to ensure the Can Be Template field is included in your project details or settings (you can see more about Templates in Step 3: Create template(s) for new projects, below).
- Should project team members be allowed to view just their own projects, or others' projects as well? You may want to allow anyone to see projects of this category, select users plus project team members, just the project team members, or even just a very small set of select users. Of those users who have access to projects of this category, they can be granted access to all or a subset of the projects' content, sections and functions. These details will inform your project category permissions setup in Step 4: Grant permissions to relevant users, below.
- What information about projects of this category needs to be communicated to your project managers, stakeholders, and executives? What key project data needs to be tracked and visualized? What project information needs to be surfaced to help your organization make decisions and ensure successful delivery? You will want to identify what information is critical and most valuable for monitoring your project work, driving efficiencies, and keeping your organization work goals on track. This will allow you to create appropriate reports and dashboards for visualizing this information (Step 6: Audit, track, maintain, and evolve, below).
Advanced Design Questions
The following questions relate to more advanced capabilities. NOTE that if you do not know the answers to one or more of these questions or are not interested in the related capabilities, you can always consider them later as most can be addressed and configured in the future as needed. For example, if you're not sure yet if and how you want to measure project health, score your projects, or to what extent you want to track project financials, you can wait until you have projects in the system and add or adjust these options for your category at a later time.
- Do you want to allow for inclusion in portfolios from within the project? If you are also performing portfolio management (see Stepping into Portfolio Management for more information), for each project of this category you can include the Portfolios section if you want to allow permitted users to see which portfolios a project belongs to as well as allow them to add a project to one or more portfolios. If you do not include this section but are using portfolios, projects can still be added to portfolios from within the portfolio itself.
- Do you want explicit indicators of project health? The very simplest way to indicate project health is through having users manually edit health related fields. That is, you can create simple user-defined fields to subjectively capture health, for example have a list field called "Health" for which your project managers manually change its value as needed. Instead of or in addition to these, you can objectively and automatically measure project health by assigning a health profile. Based on performance calculations using thresholds that you configure, color-coded icons can be made visible that provide a complete picture of health, visible within the projects grid, project details, or reports. Indicators can be shown for project schedule health, budget to actual hours, budget to actual cost, budget to actual revenue, estimate to actual hours, estimate to actual cost, or estimates to actual revenue. If you are including tasks, they also can have similar indicators. The decision you make for how to indicate project health will inform the fields you create and health profile you use for your project category, as you likely will want to keep the way health is measured consistent across all of your category's projects. You will also want to consider how this information should be surfaced in your reports and dashboards.
- Do you want to track financial data, and if so, what kind? Labor costs, general expenses, and/or revenue? One time capital costs, recurring costs, or funding? Depending on your category's project financial needs, you can capture and report on financial totals and recurring amounts, capitalized vs. non-capitalized, and labor vs. non-labor. Tracking costs and revenue enables you to report on margin and profit. Decide if for this category's projects you would like to track:
- Costs and revenue associated with staffing allocations, based on role and resource internal rates and billable rates. If so you'll need to include staffing in the category (and ensure that your role and resource internal rates and/or billable rates have been set up).
- Costs and revenue associated with tasks and scheduled resources. For example, if you are using Timesheets to track time you can capture costs related to timesheet actuals. Or if your task is billable, revenue can be captured based on the task billing type, such as fixed bid. If so you'll need to ensure tasks and task schedules are included in the category, and for fixed bid billing type also the Fixed Bids section.
- Project-level financial entries. Each financial entry category allows for both forecasts and actuals, is either cost/expense/cash "outflow" or revenue/income/cash "inflow", and can have a different set of fields and various sections. If so, you'll need to include financial entries in the category (and ensure financial entries have been configured for your needs).
- You will also want to consider how this information should be surfaced in your reports and dashboards.
- Will the resulting projects need to be prioritized or scored in some way? If so, then identify how you want to capture the score, for example as a rank order or simple importance/priority field, calculated field based on other field values, or via a scoring model. Determine what options make sense if a simple importance/priority field. For calculated fields, determine what other fields will be used to derive its value and how they should be used in the calculation. If a scoring model, decide if an existing scoring model should be used or if a new scoring model needs to be created, and what its categories, weightings, and criteria should be. You will also want to consider how this information should be surfaced in your reports and dashboards.
- Do you want to allow projects of this category to be "confidential"? You can allow this category's project creators and permitted users to limit project access to authorized users by marking a project "confidential". Authorized users include: project owner, project team members, and members of the Admin standard group. Whether or not you want to allow this will inform the fields you'll include in your project details, most likely Settings.
- Do you want to allow the PMO or other select users to be be able to determine when certain fields become restricted or locked? PPM Pro supports a feature called "PMO Locking", which allows you to restrict the editing of a field (or fields) to users with the Edit > PMO Locked project permission (see Creating Permission Profiles). For example, imagine you want to configure permission profiles for a project to grant edit access to a variety of users. However, once budgets have been approved, you want to prevent all users except the project manager (or members of a group) from being able to edit any budget fields. You configure the appropriate budget fields, and when ready the project manager enables the PMO Locked property for the project. Those designated fields will be editable only by users with the PMO Locked project permission. This is called "locking" the field(s). Of course, project permissions control access as well, but the PMO Lock feature lets you control access temporarily, rather than asking the PPM Pro administrator to change access by way of a permission profile.
- Do you want the category's projects to be able to take baseline snapshots of project field values or staffing allocations? A baseline is a "snapshot" of your key project plan values, such as, status, start and target dates, duration, costs, and revenues. If these are appealing, you'll want to include the baseline section in your category. PPM Pro captures 2 types of baselines, project/task and staffing:
- Project/task baselines are useful for tracking project progress since they contain point-in-time data that you can compare against updated information as the project progresses over time. Another method for capturing snapshots of project (and portfolio) field data automatically on a weekly and monthly basis is via KPI trend fields (see Set up KPI Trend Fields below).
- Staffing baselines are useful for tracking demand and changes to it. You can compare a staffing baseline-to-current plan data right on the project Staffing screen (see Comparing Staffing Baselines to Current Resource Staffing for more information).
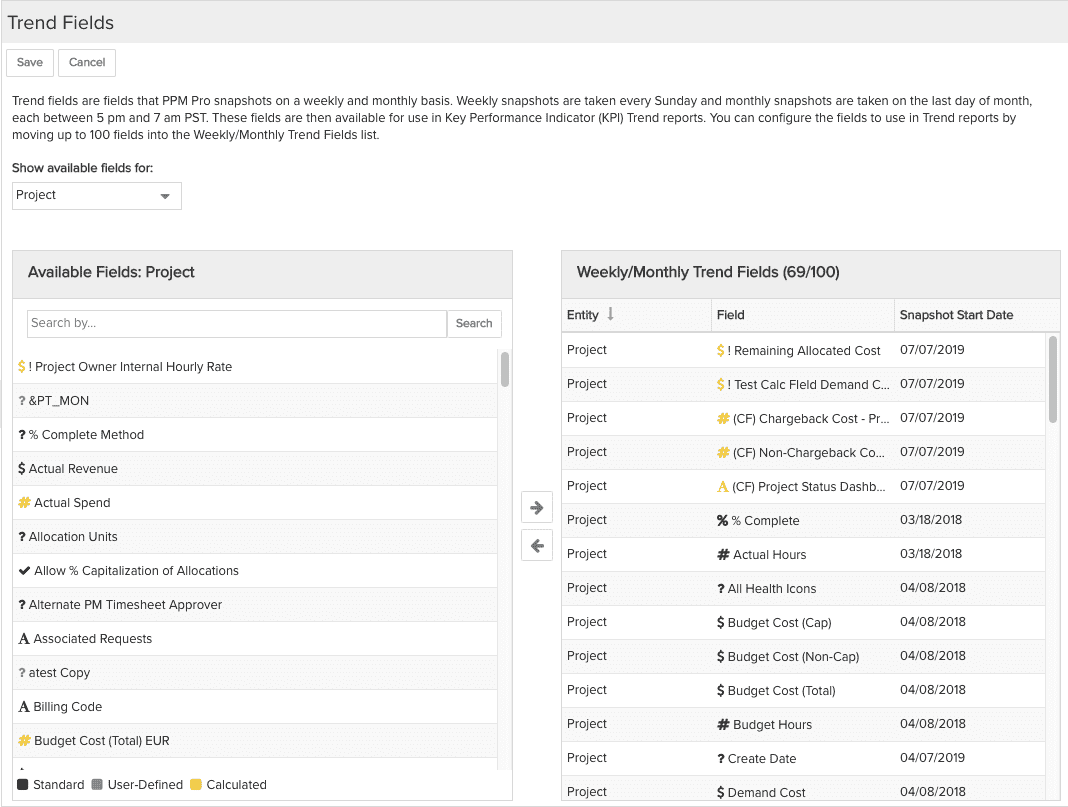
- Do you want to perform trend analysis on key performance indicators? PPM Pro's Key Performance Indicator (KPI) trend analysis feature allows you to capture periodic snapshots of any project field you identify in order to do reporting and trend analysis. Snapshots are taken weekly (between 5 pm Saturday and 7 am Sunday, in your default time zone) and monthly (between 5 pm the last day of the month and 7 am the first day of the next, in your default time zone). If you want to take advantage of this, you'll need to configure which trend fields you want captured. Once you are capturing snapshots, you can also create trend reports and add them to your project dashboards.
Step 2: Configure the project category and related information
Using the project category design you created in Step 1, configure your project category and its related information via self-service admin: Admin > Setup > All Entities > Projects.
- Within Available Fields
- Inventory the existing Standard fields to determine which match your list of project data fields
- Create new user-defined fields for the project data fields that weren't provided as Standard fields.
- Set up any field restrictions if there are fields you only want certain users to see.
- Again, start simple, you can always add more fields later as needed.
- Within Categories, set up the project category:
- Create a New Category, providing a meaningful Title for your project and optionally a Description. If you enter a Description, it will be shown to users in a tooltip if they hover over the category title when selecting it from the New project menu.
- Select a Health profile, if desired. If you do not see a health profile in the list or if you do not see a desired profile, you will need to create one.
- If you decided you want to take advantage of displaying some fields or field groupings in the Additional Details section (for example, so that this section and its fields can be hidden from certain users or because it makes sense to logically separate Details fields from Additional Details fields), and you would like to display a different name than "Additional Details", enter that name in the 'Additional details' display name field.
- Select what Sections to include for the project overall (Additional Details, Tasks, Staffing, Notes, Attachments, and so on).
- Select the Active checkbox to make the category available in the Admin Category dropdown when configuring Details, Additional Details, and Settings, and to the end user when creating an instance of the entity. Categories are active by default. Deselect the checkbox to hide the category (will not appear in the New Project options when the user creates an instance of the entity, or in the Categories droplist when configuring Details, Additional Details, and Settings).
- Within Details, design the overall Details form for the category:
- Note that there will be a set of default group headers and fields that will automatically appear within the Details field list. Fields indicated as "(mandatory)" must remain, but you can remove and rearrange all other fields and group headers as appropriate.
- Add group headers as needed and add the desired fields from the Available Fields list to the Details field list.
- For each Details field, configure its Variable Properties (on new project creation, and, on edit of an existing project instance): required, default value, if shown and if so if editable.
- Within Additional Details, if you have included the Additional Details in the category Sections to include, design the overall Additional Details form for the category:
- Add group headers as needed and add the desired fields from the Available Fields list to the Additional Details field list. Note that if you have changed the name of this section from 'Additional Details' to something else, that name will appear instead.
- For each Additional Details field, configure its Variable Properties (on new project creation, and, on edit of an existing project instance): required, default value, if shown and if so if editable.
- Within Settings, design the overall Settings form for the category:
- Note that there will be a set of default group headers and fields that will automatically appear within the Details field list. Fields indicated as "(mandatory)" must remain, but you can remove and rearrange all other fields and group headers as appropriate. See Designing the Project Settings page.
- Add group headers as needed and add the desired fields from the Available Fields list to the Details field list.
- For each Details field, configure its Variable Properties (on new project creation, and, on edit of an existing project instance): required, default value, if shown and if so if editable.
- Within Health Profiles, if you are going to use explicit and automatically calculated indicators of project health, ensure that there is a relevant profile setup or create a health profile according to your needs.
- Within Grid Columns, lay out the default columns and available columns that your users will see in their project grid.
- Ignore Health Profile Mappings. This was used to specify what health profile to use based on the value of the Project Type standard field and pre-dates current project category capabilities. It will be deprecated at some point in the future.
- Within Searchable Fields, select what fields you want to allow to be searchable within global search.
Your active project category can now be used by your organization! Follow the next steps as applicable and based on your needs to help derive the most value from the new project category. When you are ready, you can repeat many of the steps above (and below) as needed for additional project categories, even copying an existing category or its details when creating a new category.
Step 3: Create template(s) for new projects
If you know that you have similar content across a set of new projects, you can speed up project creation by creating one or more project templates. You can use a project template as the basis for creating a new project. For example, if new projects will often have the same set of initial tasks (with durations and dependencies), task assignments, and other project section content, it will help to create a single project containing these defaults and set its Can Be Template setting to Yes. Here are some considerations and information that will help you manage templates:
- You might want to ensure project templates have a consistent naming convention for easier management, by including a particular character or phrase consistently in their Titles. For example:
- '#Small Project', '#Agile Project', or '#Maintenance Project"
- 'Template - Small Project', 'Template - Agile Project', or 'Template - Maintenance Project'
- If you decide to use templates, please communicate their availability and how to use to your users who will be creating and maintaining projects (including the naming convention if you allow them to also create templates for their use).
- When a user selects to create a new project, they can select a template from the Use a Project template to supply default values for the new Project list. Templates appear in the list organized by their project category:

You can quickly find template projects within the projects grid by using the ad hoc filter on the Can Be Template field.

Note that there is no explicit Copy Project command, however you can achieve a project copy by creating a project from a template and then when you use that project template to create the new project, copy all the elements.
Finally, you can apply a project template to an existing project. See Creating Projects from a Template for more information.
Step 4: Grant permissions to relevant users
Once you are happy with your configured project category, you can grant access to it so that relevant users can begin creating and managing project instances of that category. Projects use the same profile-based permissions model as other entities, enabling you to grant explicit permissions to users, groups, and units to be able to create, view or edit projects and their sections (globally for all project categories, or specific project categories). These explicit permissions supplement the implicit project permissions a user will have by virtue of being a project owner. You can also grant users access via project Team permissions. When you are ready to begin allowing your users to access your project category, you will want to set up these permissions to meet your organization's needs.
Not sure how to help your users adopt using this new project category? Check out the Encouraging Adoption by Project Managers, Resource Managers, and Others topic.
Step 5: Transfer existing external projects
If you have external project data in another application, such as a Spreadsheet, MSP, or other tool, there are various ways that you can transfer existing project data and content into new projects of the category you created.
Task Spreadsheet Editor to Paste Tasks
If you have a project with tasks tracked in a spreadsheet tool such as Microsoft Excel or Google Sheets, you can copy and paste those tasks into an existing PPM Pro project's tasks using the Spreadsheet Editor function. The editor opens all of the project's existing tasks (maximum number allowed is 1000) in a spreadsheet-style editor:
- You can use familiar keyboard navigation gestures, such as using the tab/Shift-tab and arrow keys let you quickly traverse the grid, immediately start typing to edit, and use undo/redo and copy/paste (within the UI and with other spreadsheet tools).
- The editor batches validation, which speeds up the editing process by delaying validation until you hit the Save button. There may be some reconciliation handling for validation issues if there are concurrent people editing.
- Before you copy tasks from a spreadsheet and paste them into the PPM Pro project, ensure that the fields represented in the spreadsheet have matching columns in the same order in the PPM Pro tasks grid. That is, you will need to make sure the task categories and the task grid have the same fields (and field types).

MSP Import of Tasks and Task Schedules
You can import tasks and task schedules into an existing PPM Pro project from Microsoft Project (MSP) (latest 2 releases supported). Please see the Importing/exporting tasks topic for specific details on what happens upon import, particularly for dates and field mappings. You might want to take a look at Microsoft Project (MSP) and PPM Pro before you begin as well, to understand the differences between PPM Pro and MSP task handling.

Data Import for Various Project Content
PPM Pro has a Data Import capability based on spreadsheet import files, several of which can be used to ingest existing external project content. For each data import entity, you can generate an import file that will include all required and possible fields for the given entity, which you can copy or complete from your external projects and use for the data import (so you will need to make sure the relevant PPM Pro entity categories and details are configured before importing). Project content that can be imported includes:
- Projects - Allows you to import a new project(s), consisting of the project Details, Additional Details, and Settings field data.
- Team Members - Once you have an existing project(s), you can import the team members you want assigned to the project(s) (you'll need to know the project ID), including the relevant team member permission profile to use.
- Project Logs - If your project(s) will use project logs or issues/risks, you can import previously captured project logs/issues/risks you want included on that project(s) (you'll need to know the project ID).
- Task Roles - If your project(s) will include task management, you can import relevant task role information for the project(s) (you'll need to know the project task's ID). Task roles are types of resources, not the actual resources, needed to complete the task.
- Task Schedules - If your project(s) will include task management, you can import relevant task schedules for the project(s) (you'll need to know the project task's ID). Task schedules are also where you schedule resources so that they can track time and Hours to Complete for the task.
- Financial Entries - If your project(s) will include financial entries, you can import relevant financial entry forecasts (you'll need to know the project ID) and financial entry actuals (you'll need to know the project forecast's ID) for the project(s).
- Billing Rates - If your project(s) will include billing rates, you can import relevant billing rates for the project(s) (you'll need to know the project ID).
Web Services API Integration for Various Project Content
All of the project content possible to be ingested via data import can also be ingested via an integration using Web Services API. Setting up an integration can be especially valuable if it is a repeatable need. See Reducing Workload through Integrations for high level capabilities and approaches.
Step 6: Audit, track, maintain, and evolve
Once you have projects from your first project category actively being managed in your system, you can repeat the above steps to accommodate other types of projects. Oversee and highlight your successes, and continue to improve and evolve as your organization’s needs change, which will happen over time.
Set up KPI Trend Fields
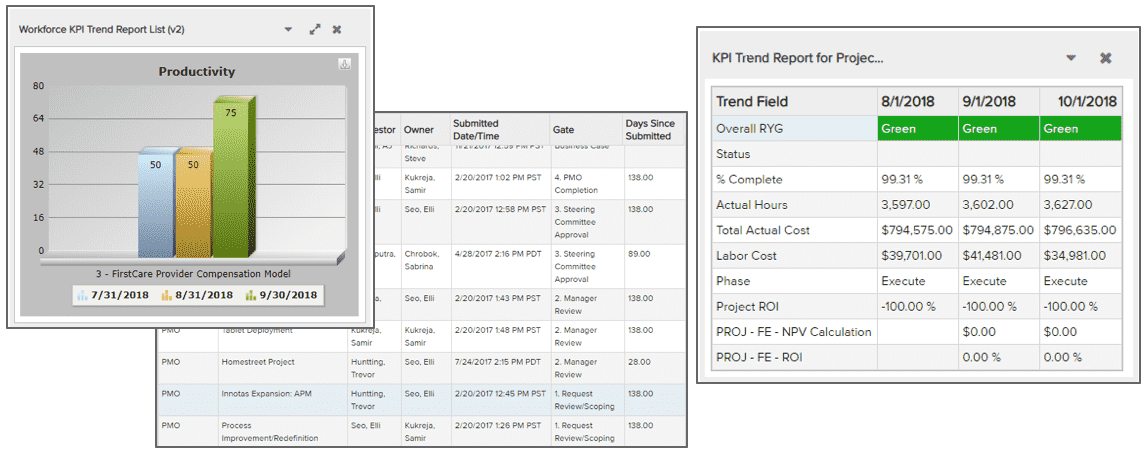
You can set up trend fields to capture weekly and monthly values of project key performance indicators (KPIs). This will enable you to analyze and report on trends to identify improvement opportunities across your projects.
Create Reports and Dashboards
Once you have your projects in the system, you can create reports and setup and publish various dashboards for project analysis and management.
Some example project analytics and reporting you might want to set up include:
- Individual project status reports and dashboards
- Overview of all projects by strategic objective
- Overview of simple project statistics such as total projects, projects by status, projects at risk, actual cost, budget cost, and project health
- Comparisons of costs and hours (such as budget vs. actual)
- Health indicators for scheduled budget to actual hours, budget to actual cost, and/or budget to actual revenue
- Project log and risk management reports
- Trend analysis for project KPIs
Adjust and Evolve Project Categories
PPM Pro make it easy for you to adjust project category contents over time, ensuring your project management is streamlined and users are happy. Some capabilities to keep in mind:
- If you receive feedback that certain sections or details fields are not needed in a category, you can always edit the category and remove them. If you find removing them was a mistake, you can always add them back later and the original data will be preserved.
- If you receive feedback that a project category is good for a particular set of users, but they would really like some additional sections or perhaps fewer details than another set of users, you can always copy the original category and edit it, granting permissions to each category per set of users.
- If a category becomes obsolete, you can edit the category and make it inactive. Existing projects that use the category will still be accessible in the system for management and reporting, but no new projects of this category can be created.
Consider Related Entity Management Opportunities
With centralized project management you have the opportunity to derive additional business value from the management of entities related to projects. Consider if the following may be of benefit to you and your organization:
- Portfolio Management - Use portfolios to map projects to your strategic organization goals and business objectives. This will allow you to roll up, analyze and report on alignment, helping to ensure your people are working on the right things. For example, you can evaluate various portfolio financial and performance metrics within and across your portfolios. See Stepping into Portfolio Management for more details.
- Resource Management - Understand and manage resource workload so that you can identify when there is more work than people to perform it. Resource management allows you to perform capacity and demand analysis, so you can identify when there aren't enough resources to fulfill your work needs. Use the resource workbench to see the workload and assigned staffing for your resources, so that you can manage resource assignments more effectively. The workbench provides a single place to view/edit/delete allocations across many (open) projects, allowing you to make allocation edits in bulk, rather than visiting the staffing page for each project allocation. Best of all, you can instantly see when your resources are over allocated so that you can reassign work to your under-allocated resources. Once you've addressed any over allocations, you can find demand for any resources that are still under allocated. See Stepping into Resource Management for more details.
- Work Intake/Requests Management - Manage your work intake by using requests to capture and keep track of all work intake. Automate the project intake flow so that the right approvers are notified at the right point in the process. Allow gate approvers to send a request back for more information or forward to the next step when all is well, or to reject the requests that are not aligned with your organization’s needs and goals. Communicate the volume, status and progress of requested work via dashboards. The requests functionality allows for advanced gate skipping and approver logic, with much more robust configuration options. See Stepping into Work Intake and Requests Management for more details.
- Time Management - Use time time tracking to inform your allocations, enabling you to highlight over/under worked people and how their time is spent. You can use time tracking to capture your resources' projects/tasks, portfolios, and administrative time, to show where and how much people are working. This helps you identify additional headcount needs and shift work when necessary. You can also use dynamic reports and filters to slice and dice time by strategic business objective, by division, by different project categories, by project vs. admin/"keeping the lights on" work, and many others. See Encouraging Adoption by Time Users and Timesheet Approvers for various time tracking benefits noted in ideas to promote compliance within your organization.