
Creating Projects from a Template
This video demonstrates how to create a project. Duration: 6.5 min.
This topic describes how to:
In addition, this topic includes a discussion of how the Schedule From date impacts project scheduling.
Overview
If you know that you have similar content across a set of new projects, you can speed project creation up by creating one or more project templates. You can use a project template as the basis for creating a new project. For example, if new projects will often have the same set of initial tasks (with durations and dependencies), task assignments, and other project section content, it will help to create a single project containing these defaults and set its Can Be Template setting to Yes
Note that when you create a project from a template, project permissions (aside from the permission to create a project) are ignored during the create process. This allows the project creator to select any of the elements available for copying from the template, regardless of the permissions granted to the project creator/owner. Once the project is created, permissions will be enforced. For example, let's say your owner profile includes the minimum permissions of View/Edit project Details. The project creator can include any project elements - tasks, team members, allocations, for example - to copy to the new project. Once the project is created, the owner will not be able to view/edit tasks in those elements - only project Details - as determined by the Owner profile.
Note: You must have View permission for the template project in order to create a project from the template, using any category for which you have create permissions. If you happen to pick a category other than the one used by the template, you might get unexpected results, such as missing meta-data (for example, you don't have the same fields in the destination category).
Creating a project from a template
Once a template is selected for creating a new project:
- All of the project template's Details, Additional Details, and Settings will be copied to the new project, EXCEPT for the Project Owner field, which will default to the current user. if using the API to create a project from a template, the Owner will default to the value of the Owner field in the template
- Project elements, such as staffing allocations, teams, tasks, forecasts, financial summaries, portfolio associations, and so on, can optionally be copied (but typically they are copied, otherwise why use a template).
- If you are populating tasks from the template project, note that the Start and Target dates will be read only; if you do not populate tasks from the template project, then the Start and Target dates will be editable. See Schedule From Date and Tasks Dates.
- If populating a project from a template that would push project dates past 20 years into the future from today() it will fail.
- Internal task dependencies are copied (tasks within the same project); cross-project dependencies are not copied.
- If portfolio associations are copied, by default they will copy at 100% to include. You can change the percentage, or you can select to use what the template project uses.
- The new project's category will default to the same category as the project template, but it can be changed.
- The user can choose which sections from the project template to copy, but note that if the project template category does not match the new project's category, not all sections may be copied.
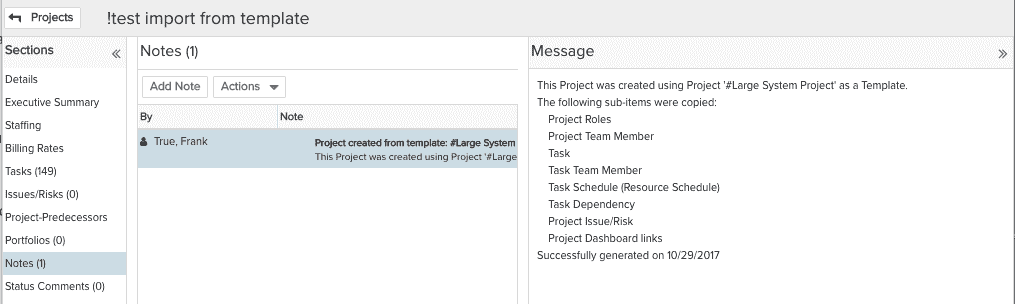
- The user can optionally save a note on the Project (if the Notes section is included per the new project's category configuration) regarding which template elements were copied.
To create a project and populate it from a template project
- Click the Projects tab.
You can also create project from any Department Basic Info page if you have the appropriate rights to create projects for that department.
- Click the New button to invoke the New Project Wizard.
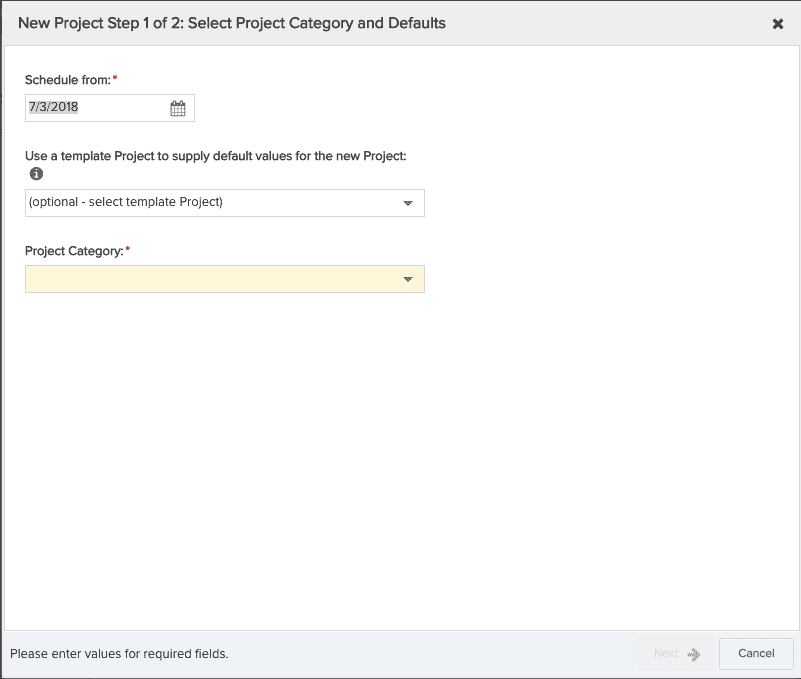
- In the new project wizard Step 1, select a category for the project - the default is the template's category. If your organization has one project category only defined, then you will not see this field on the wizard.
The Schedule From date defaults to the current date. Make adjustments as necessary. See Schedule From Date and Tasks Dates for more information.
- To populate the project's default values from a template project, select the template project. A list of project elements will appear. Note that this list will vary depending on the category you have chosen for the new project, and the category associated with the template project. For example, if the new project category does not include an Attachments tab, then Attachments will not be in the list.
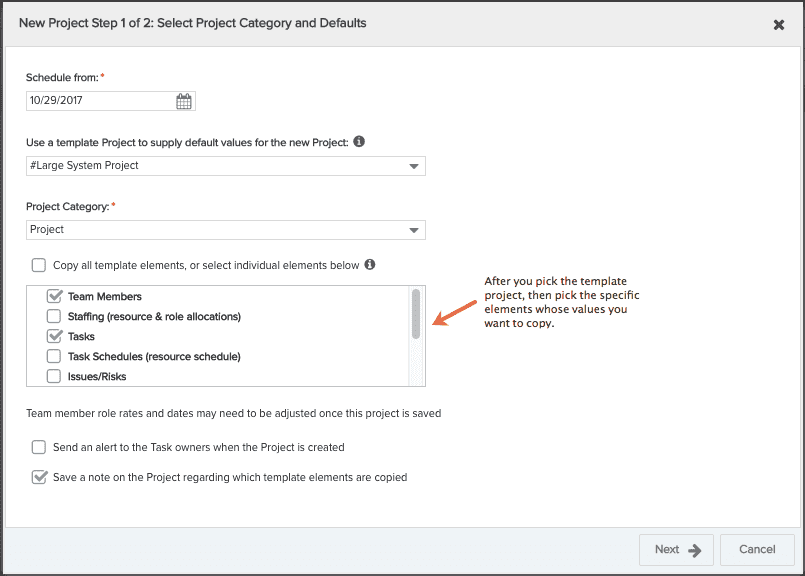
- Select the specific elements to copy - you can select individually or copy all elements.
-
Team Members - Copies the project team members of the template project to the newly created project's team.
-
Staffing (resources & role allocations) - Copies the staffing assignments from the template project to the newly created project. Note that to import allocations (staffing), you must also import project team members. The newly created allocation will use the start/target dates from the target project.
-
If you are using centralized staffing, proposed staffing requests in the template project will be copied to the target project Staffing screen as an unstaffed role with a status of "New" (the request for the proposed resource will not be copied to the target project, just the role).
-
-
Tasks - Copies the task from the template project to the newly created project. If you choose to populate tasks, you can configure the system to email an alert to each task owner upon task creation. Enable Send alert to owner on populate tasks to notify task owners of task creation. Note that time logged, hours and cost to the task will not be carried over.
-
Task Schedules (resource schedule) - Copies the task schedules from the template project to the newly created project. Note that to import task schedules, you must also import tasks, allocations (staffing) and team member. See discussion above about tasks dates relative to project Schedule From date.
-
Issues - Copies issues from the template project to the newly created project.
-
Attachments - Copies any attachments from the template project to the newly created project.
-
Dashboard Links - Copies any dashboard links from the template project to the newly created project.
-
Financial - Summary - Copies the financial summary in the template project to the new project. Manual entries and actuals are not copied. The Date Range and periods are copied. If you include tasks in the project template, then any values assigned to those tasks, such as task Budget, will feed into the new summary (but will be relevant only if your structure is set up to derive values from the task level budget).
-
Financial Entries - Forecasts - Copies any forecast entries (includes forecast amounts) in the template project to the new project (actuals are not copied). Finance Forecasts are offset by the difference between the template's Schedule From date and the target project's Schedule From date.
-
Portfolios - Copies any portfolio associations. When you check Portfolios an additional field appears below the list of elements (shown below) where you can specify the % to include for the portfolios. You can use a specific value (100% is the default), or use the value from the template project.

-
Project Calendar - Copies the template project calendar to the newly created project.
-
Alert Routes - Copies the alert routes from the template project to the newly created project.
- Click Next.
- Fill in at least the required fields.
- Click Save.
If you chose to save a note documenting the imported elements, you can find it in the Notes section of the new project.
You are now ready to edit your new Project.
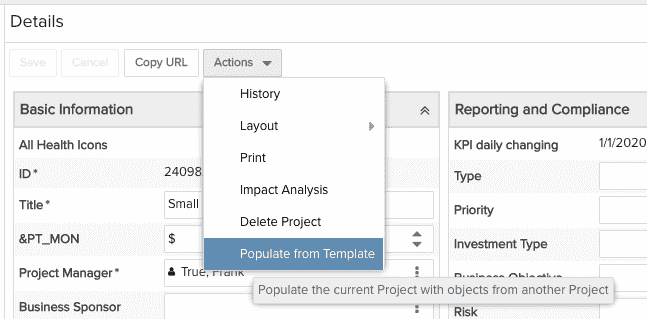
Populating an existing project from a template
Populating an existing project from a template automatically creates project elements based on the template elements, just like when creating a new project from a template.
Users with Edit permission on the project can populate an existing project from a template if the existing project does not contain any allocations, tasks, or financial summary (and provided a template has not already been applied). If these items exist in the target project, then the Actions > Populate from Template menu item will not be not be available in the project's Details section.
Note that if both the target project and the template project have any of the same team members on both projects, new team members are copied, but we do not remove team members or update existing team members/profiles. Also remember that if the Template Project category does not match the existing project's category, not all sections may be copied.
Schedule From date - all tasks, Staffing and Finance Forecasts are offset by the difference between the template's Schedule From date and the target project's Schedule From date. Please note that if populating a project from a template that would push project dates past 20 years into the future from today() the process will fail.
The financial summary dates will be copied from the template.
Note that when you populate an existing project from a template, permissions are enforced on the copy. For example, if you do not have permission to edit tasks, but check "Populate Tasks" in the template, no tasks will be created/populated in the target project.
Note: Existing projects already contain a set of metadata, such as Project Type, Status, and Owner. When populating an existing project from a template, this information will not be copied from the template.
To populate an existing project from a template project:
- Open the project and navigate to the Details section.
- Choose Actions > Populate from Template.
- Select the template project. You are presented with the list of template projects that are available for use.
- Select any or all of the following items to be populated/copied to the project: Project Team Members, Allocations, Tasks, Task Schedules, Attachments, and Project Calendars.
- Click Save.
Schedule From Date and Task Dates
When you create and populate a project from a template project, the project's Schedule From date defaults to today's date, regardless of what the date is set to in the template project. The duration of all tasks and all allocations is preserved, but the dates are shifted according to the new Schedule From date. The change in Schedule From date essentially works like shifting task dates while maintaining task duration. Please note that if a template project would offset project dates past 20 years into the future from today(), the process will fail.
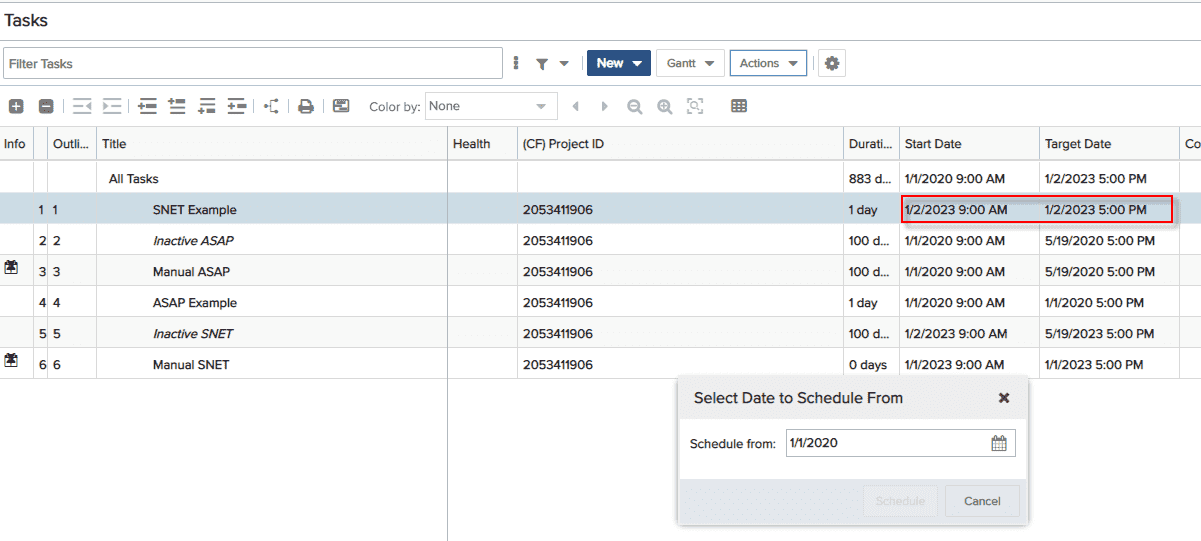
In addition, any tasks that have constraints will honor the date differences between the Schedule From date on the template and the new Schedule From date in the new project. For example, if a template has a Schedule From date of 1/1/2016 and a task has SNET constraint set to 1/1/2019, the difference between the Schedule From date and the task's SNET of 1/1/2019 is 3 years. When you create the new project from the template and enter a Schedule From date of 1/1/2020, the 3 year offset for that task gives a Start Date of 1/1/2023. Any allocations imported from the template will be re-contoured according to the offset between the template's Schedule From date and the new project's Schedule From date.
Note that for active tasks calendar events are considered, and could impact the Start and Target Date of the task (but duration will be preserved). For manually scheduled and inactive tasks, calendars are not considered (but the offset is).
Example: The following screenshots show a set of tasks/constraints that are copied from the template project into the new project that has a different Schedule From date. An example set of allocations is also included.
Project template with Schedule From date 1/1/2016:
.png?revision=2)
New project created from template, Schedule From date 1/1/2020:
Note the 3 year offset and the resulting 1/1/2023 Start Date due to the 3 year offset from the SNET task date. Also, the first task's Start Date is 1/2/2023 because 1/1/2023 is a Sunday, which is not a working day for this project's calendar.
.png?revision=2)
Example Allocations:
Template project with schedule From date of 1/1/2016
.png?revision=2)
Template project with schedule From date of 1/1/2020
.png?revision=2)