
Working with the Resource Staffing Screen
The resource Staffing screen is where resource managers fulfill staffing requests. In addition to fulfilling requests, a resource manager can modify, reject, or route a request to a different staffing manager. The resource Staffing screen is similar to the Project Staffing screen, but has additional features for analyzing capacity and fine-tuning allocations.
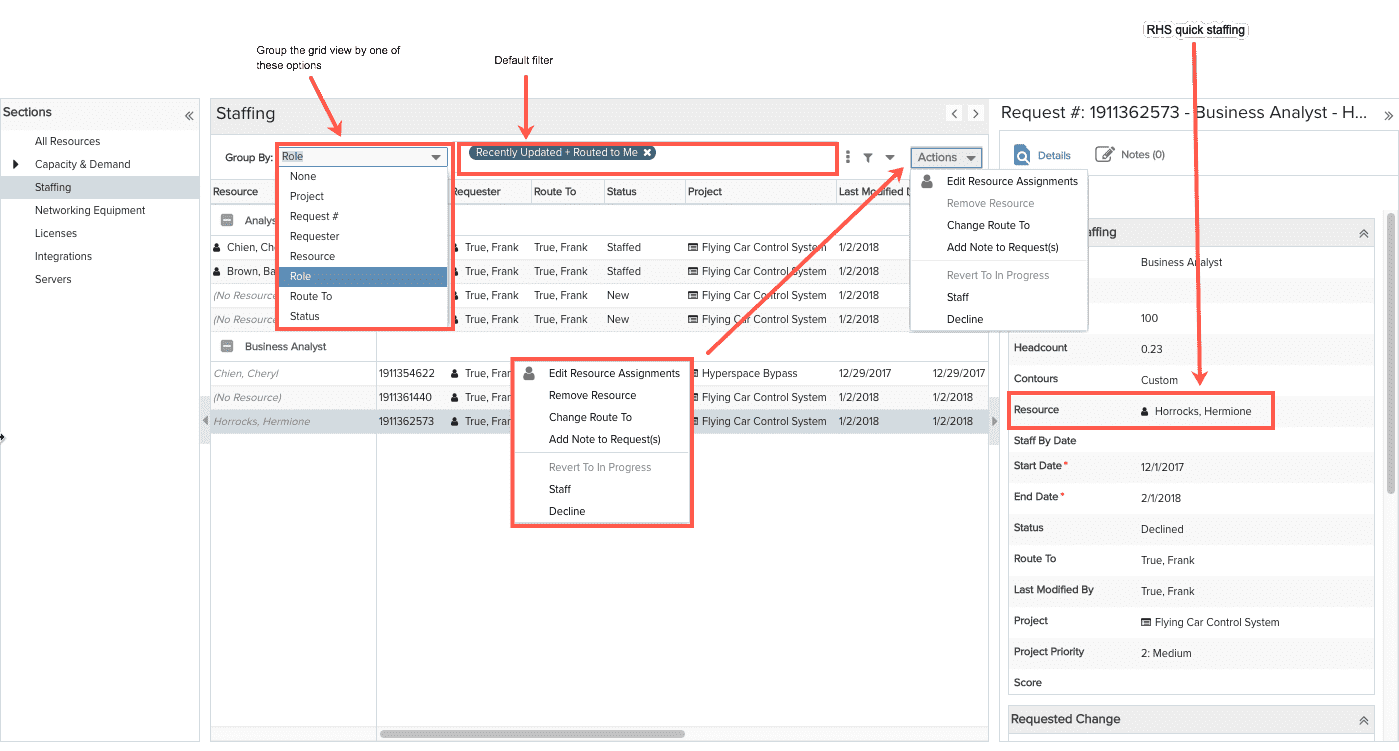
Below is a screenshot of the Resource Staffing screen, with the grid, the RHS, and a few salient features highlighted:
Headcount vs Hours: You can't see all the grid columns in the above screenshot, but when you use the system yourself you will see that both Headcount and Hours are included on the grid by default. Whether to use Headcount or Hours is a project-level setting. In the Resources/Staffing grid you will have allocations from a variety of projects so it's quite possible that some are planned in hours while others are in headcount. For this reason, both columns are shown, but only one column should have a value for any given row, corresponding to the current setting for that particular project.
Staffing Request Grid/Info Panel
The grid area contains the information about the staffing request, much like the grid area in the Project Staffing screen. To the right of the grid there is an Info panel (referred to as the "RHS"), where you can edit the Details for the selected request, and create threaded Notes for In Progress and Requested request. The grid can be sorted by any of the characteristics in the Group By droplist. By default, the grid is sorted by role.
In addition, when you first enter the Resource Staffing screen it is using a filter called "Recently Updated + Routed to Me" ("Recently Updated" means modified in the last 60 days). You can clear the ad-hoc filter, in which case you'll see all staffing requests routed to any resource staffing manager. Configure your own filters as best suits your needs.
You can fulfill a staffing request from the Staffing grid (Actions > Edit Resource Assignments), or fulfill a request directly in the Resource field in the Details tab on the RHS.
NOTE
Note that when fulfilling a request from the Edit Resource Assignments window, the resource's resource calendar events are considered (resource staffed to actual capacity). When staffing from the Resource field in the RHS, the demand is filled completely, which may result in an over-allocation.
Actions/Context Menu
The Actions menu and the right-click context menu contain operations for staffing requests.
|
Menu Option |
Description |
|---|---|
|
Edit Resource Assignments |
Invokes the Staff/Edit Resource dialog. You use this dialog to assign a resource to an unstaffed request, or to modify a proposed request. In addition, you use this dialog to analyze resource capacity. See Responding to Staffing Requests for more information. Note that you can also invoke the Staff/Edit Resource Assignments window by clicking the "hamburger" in the Resource droplist in the RHS, as shown below:
|
|
Remove Resource |
(Only applies to In Progress requests) Deletes the selected staffing request. |
| Change Route To | (Applies only to requests that are In Progress or Requested) Changes the resource |
| Add Note to Requests | (Applies only to requests that are In Progress or Requested) |
|
Revert to In Progress |
(Only used with Staffed requests) Changes the status of the request to In Progress, and makes the current resource proposed (italics). Returns the fulfilled capacity back to the resource's available capacity. |
|
Revert to Requested |
(Only applied to Declined requests) Changes the status of a Declined request to Requested. This is typically used if you made a mistake and declined a request that you didn't mean to. |
|
Staff |
Approves the staffing request, changing its status to Staffed. Applies to any In Progress or Requested request. |
|
Decline |
Changes the staffing request status to Declined and does not fulfill the demand. The product manager will see the Declined status and can resubmit as is or edit the request and resubmit, or ignore. |

Move Columns
You can move columns to any position by simply dragging the column header.
Lock columns
You can select one or more columns to remain "locked" to the left of the screen, preventing them from scrolling out of view. For each column you wish to lock, choose Lock from the column header menu.
Filtering Tasks
Use the "ad-hoc" filter just as you would on any on page. See Ad-Hoc Filters for more information.