
Creating a Lookup List
Users with administrative privileges can create and modify lookup lists.
In addition to the PPM Pro-provided lookup lists, you can create new lists to associate with user-defined fields on task, request, portfolio, asset, and project entities. Refer to the PPM Pro Administrator Documentation (Setting Up Entities) for information about associating a lookup list to a user-defined field in the appropriate entity.
You can add/update status list values, but you cannot create new status lists. While there is no limit to the number of list items per list, these lists are not designed for hundreds or thousands of records. They are intended to aid in further categorization of the data of a given entity. Item titles have an 80 character limit.
This topic covers:
- Creating lookup lists
- Ordering list values
- Setting a default value
- Displaying hover-help for list items
- Adjusting the Organization color palette
- Using colors and icons for list values
- List references (where lists are used)
- De-activating list values
- Deleting lists
- Printing lists and list values
Anatomy of the Lookup Lists Interface
You create lookup lists on Admin/Setup/Lookup Lists:
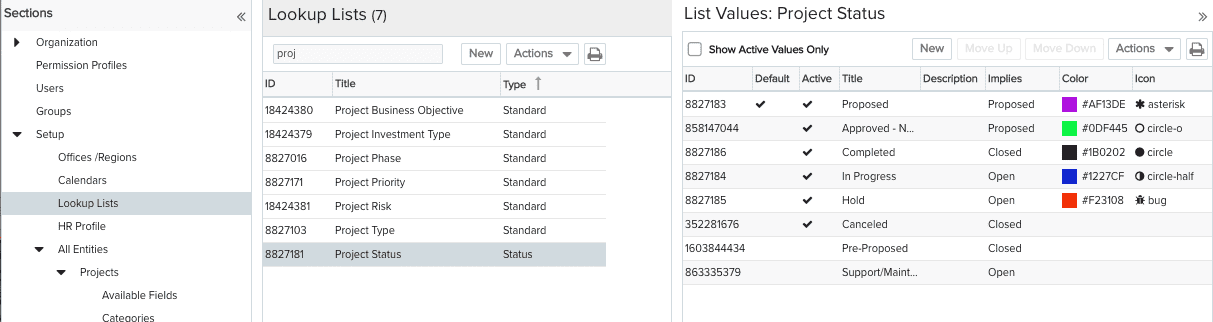
The Lookup Lists panel lists all status and lookups lists available to your organization. You can sort by Type: Standard (provided by PPM Pro), Implied Status (only one, provided by PPM Pro), and User Defined (any list created by you).
When you select a list in the Lookup Lists panel, its values and their properties are displayed in the List Values: listName panel.
Note that you can declutter the List Values pane by enabling Show Active Values Only, which hides deactivated values.
Creating a Lookup List
- Navigate to Admin/Setup/Lookup Lists.
- Click the New button.
- Enter a title for the list and click Save, or if you know you want to create create the first value right away for the newly created list, click Save and New Value.
The new list name will appear in the Lookup Lists grid, and the Type will automatically be User Defined.
- To configure list values, select the list and click the New button in the List Values panel. If you are creating a multi-select list, be sure your list values do not contain commas.
- (Optional) Specify a default value by enabling the Default checkbox.
- (Required) Enter a title for the value.
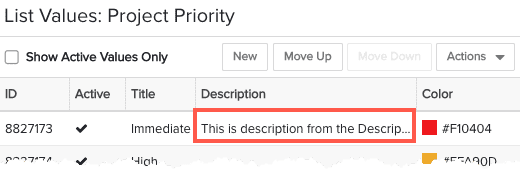
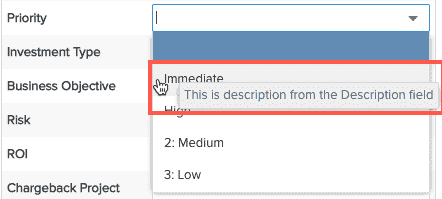
- (Optional) Enter a description for the value. This description will appear when the user hovers the mouse over the list item.
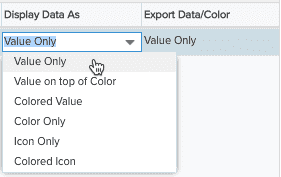
- (Optional) Select a color to associate with the value. When you configure a report that uses this list, you can specify if/how to apply the color.
- (Optional) Select an icon to associate with the value. When you configure a report that uses this list, you can specify if/how to use the icon.
- Click Save if you are done creating values, or click Save and New Value if you want to create another value right away.
- Repeat steps 4-10 for each additional value.
- Place the values in the order you want them to appear in the list. Drag the values, or select a value and click Move Up or Move Down.
Adding/Updating List Values
- Navigate to Admin/Setup/Lookup Lists.
- Locate and select the list you want to edit.
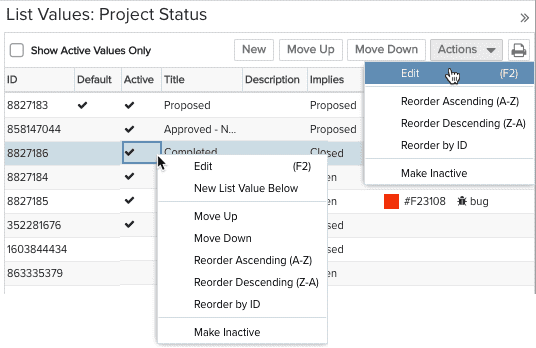
- You can edit the title by double-clicking it or choosing Actions >Edit.
- To modify existing values, double-click a value to invoke the inline editor, or select Actions > Edit. Select New to create a new value.
- Make your edits.
- Click Save.
Note: When editing status lists, note that it's usually a good idea to have a default value for a Status list. See Implied Status for information about the Implied Status field.
Ordering List Values
The order in which the values appear in the List Values panel determines the order of the values in the rendered list. You can drag values to reposition them, or select a value and click the Move Up or Move Down buttons to reposition (also available in right-click menu).
In addition, you can reorder the list of values by selecting one of the following from the Actions menu:
- Reorder Ascending (A-Z)
- Reorder Descending (Z-A)
- Reorder by ID
Specifying a Default Value
You can optionally select one of the list values to be the default. This is useful especially if you have a list configured as a required field. Simply edit a value and click the Default checkbox. This default value will be used unless you configure a different value in the entity's Details page. If you want to vary the default value by category, then configure the default value on the Details of each category.
Note: If you configure a default list value of "blank" on a category's Details, then the default value configured on Admin/Setup/Lookup Lists will be used because "blank" is interpreted as unpopulated.
Displaying Float-over Help for List Items
You can enter a description of any list item in the Description field. This text will display when the user hovers the mouse over the list item, as shown in the screenshots below (left screenshot is how to configure in Admin, right screenshot is how it appears to the end user):
Colors and Icons
You can assign a color and/or an icon to a list value. When you configure a report that uses the lookup list, you can choose the treatment to apply to the value by configuring the "Display Data As" and "Export Color/Icon" fields on the Field Selection screen in the report UI. Pie charts and Column charts automatically use any lookup list color assignment.
Examples of each treatment for a List report are shown below:
|
Report Definition Options
|
Example Output
|
|---|


How to Find Where Lists are in Use
You can get a list of every place a lookup or status list is in use by selecting the list and choosing Actions > View References.
Deactivate a List Value
You cannot delete a list value, but rather, you can mark it Inactive. Making a value inactive means it is no longer available in the lookup list. However, existing records using the value will be retained
- if the field is a single select list, you will not get a warning indicator and the item remains visible but cannot be picked when the user edits that field (item is no longer in the list)
- if the field is a multi-select list, you'll see a warning indicator and the hover text will indicate the value is no longer valid. See the screenshot below for an example.

You can save the field without any value (assuming it is not a required field) or pick from the current list.
To deactivate a list value, simply select a value and choose Actions > Make Inactive (or choose from the right-click menu, or double-click the row to enter edit mode and then enable the checkbox in the Active column.)
Note that you can "hide" inactive values (essentially "deleting" them) by enabling the Show Active Values Only checkbox at the top of the List Values panel.
Delete a List
You can delete user-defined lookup lists by selecting the list and choosing Actions > Delete. You cannot delete standard lookup or status lists.
Also note that you cannot delete a lookup list that is in use. To see if a list is in use, select it and choose Actions > View References. If you need to delete a lookup list that is in use, ask your PPM Pro administrator to reconfigure the field to point it to a valid list.
Printing lists and list values
You can print the All Lookup Lists grid, resulting in a list of the names of all lookup lists. The list details need to be printed one at a time, as described below.
Printing the Lookup List grid
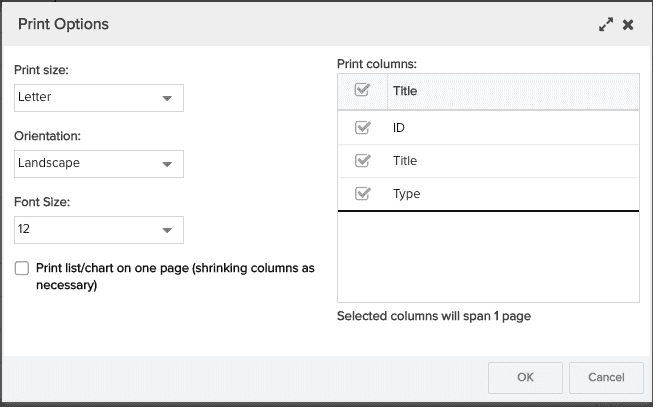
You can print the lookup list grid by click the printer icon  . In the Print Option dialog that displays (see below), adjust the print options, including which columns to include:
Printing List Details
- Select the list in grid whose details you want to print.
- In the Details panel, click the Print icon . A browser window displays the list values in a grid:
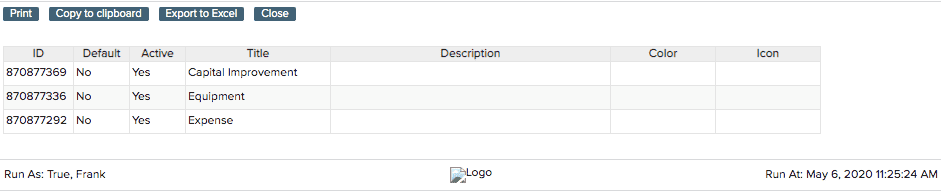
- You can choose from the following:
- Copy to clipboard
- Export to Excel
- Click Close to return to the Admin/Lookup List page.
- Repeat for each set of details you want to print.