
Creating a Timesheet Alert
Note: Must be a user with Administrative privileges to configure timesheet alerts.
Click here to see an example of a rendered timesheet alert. Follow the steps below to configure an alert.
1. Navigate to Admin/Organization/Timesheet Alerts.
2. Click New to display the New Timesheet Alert modal.

Note that this modal is also used to copy and edit alerts.
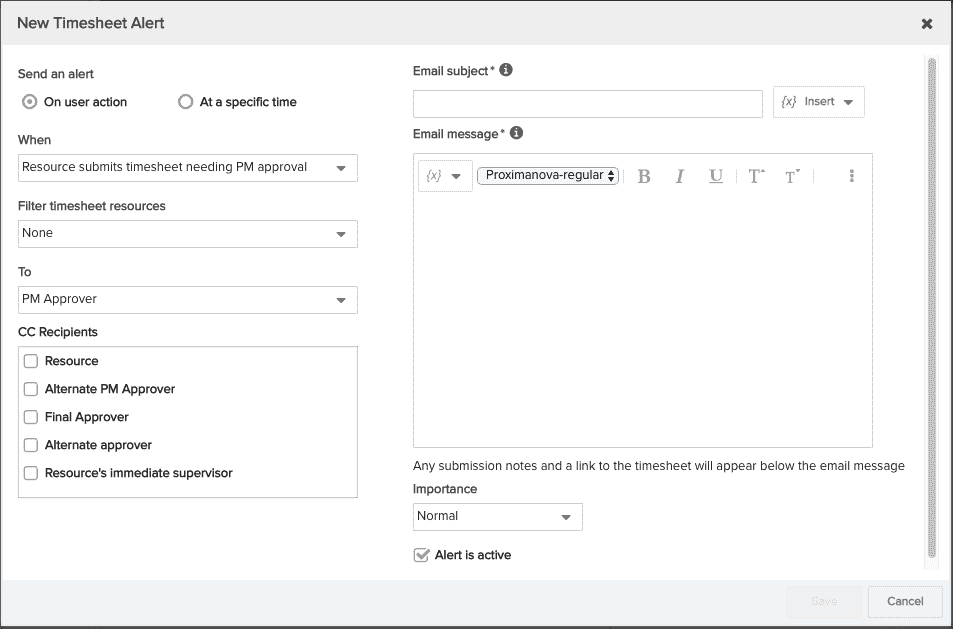
3. Choose what "triggers" the alert - either "On user action" or "At a specific time":
On user action - alert is sent to one recipient after user completes action (for example, alert sent to approver after resource submits a timesheet)
- The "user" in a user action-based alert is either the timesheet owner (resource) or the timesheet approver (person with authority to approve - Final/PM/Time Manager).
-
The "action" in a user action-based alert is submit or approve/reject. You pick the action in the next step.
At a specific time - Alert is sent to group of users who have timesheets in a certain state at a specific time (for example, send an alert at 1am to all users with overdue timesheets).
-
Time-based alerts "save up" timesheets that are in a specific state (an example state is 'overdue') until the specified time. Then, alerts are sent to the resource(s) or approver(s) who needs to act on a timesheet. Time-based alerts can recur daily, weekly, and monthly.
4. Select the user action/timesheet state from the When droplist.
5. (Optional) Select a filter from the Filter timesheet resources droplist to restrict the list of potential recipients.
You can reduce the pool of eligible alert recipients by choosing a timesheet resource filter. For example, you can choose to limit your recipient pool to full users only, or users with a "Developer" role.
6. Use the default To recipient, or select a different recipient.
Each alert has a default recipient. Use the default or pick another primary recipient.
7. (Optional) Select any CC (additional) alert recipients.
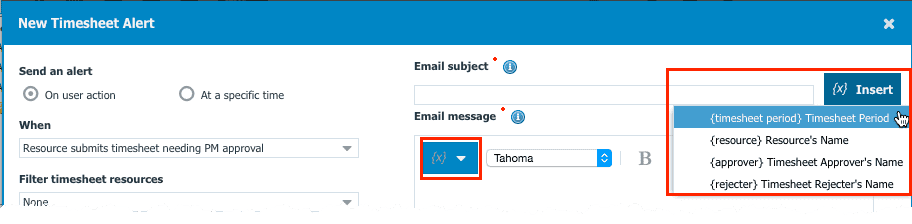
8. (Required) Write an Email subject and Email message.
Like any email notification, the message subject should succinctly describe the nature of the alert. The message body can provide additional information, if necessary.
PPM Pro provides a set of variables for use in both the subject and the message of user action-based alerts. You can type each variable in manually using this syntax: {timesheet period}. Alternatively, you can select the variable from the Insert Variable menu. There is a menu for the subject line to the right of the subject, and a menu for the message body to the left of the rich text toolbar.
Note that the message body automatically includes links to the Timesheet Approvals page (for timesheet approvers) and to individual timesheets that are ready or overdue for approval, and links to individual timesheets ready for submission (for resources).
Any submission/approval/rejection notes appear at the end of the message.
9. The "Alert is active" checkbox is enabled by default for new alerts. You can adjust this setting while you are creating the alert, or you can edit it later from the Actions menu in the Timesheet Alerts grid.
Active alerts will be sent whenever the alert criteria is met (user action or specific time/timesheet state). Inactive alerts are fully-configured but cannot be sent.
10. Click Save. You'll see the new alert in the Timesheet Alerts list.