
Working with Scenarios List page
The Optimization Scenarios List displays existing scenarios and allows you to edit, delete, and view them - provided you have the appropriate permissions - as well as create new scenarios.
Note: You can create, edit and delete scenarios if you are on one of the following teams: Organization Admin, Resource Admin, Capacity & Demand Admin.
This topic covers the following:
-
a description of the scenario list columns
-
how to use the Actions menu
-
customizing the list page by adding/rearranging columns
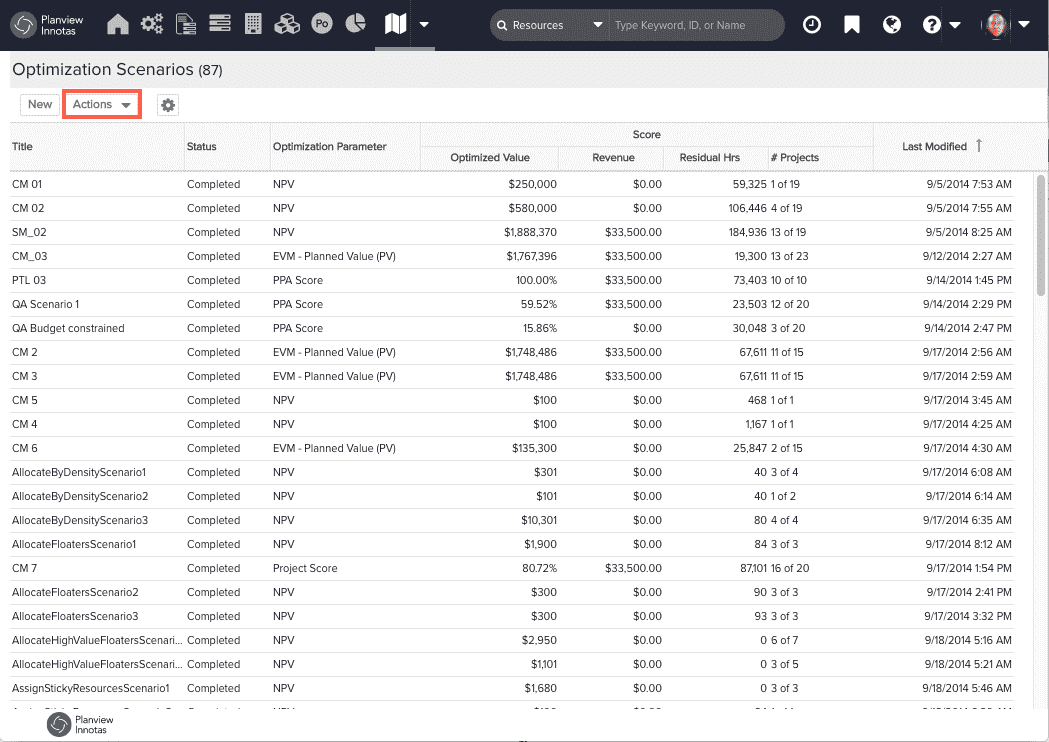
Anatomy of the Optimization Scenarios List page
Below is a screenshot of the Optimization Scenarios List page:
The Actions menu
The Actions menu at the top of the list holds all operations that you can perform on scenarios. You can also access this menu by right-clicking on a scenario.
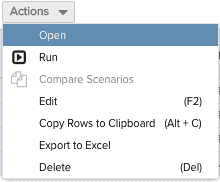 |
Open |
Opens the scenario output. |
|
Run |
Runs the scenario. |
|
|
Compare Scenarios |
This option in active once you select two scenarios. It runs the two scenarios and presents the output side by side. See Comparing Scenarios. |
|
|
Edit |
Opens the scenario for editing. See Creating a Scenario. |
|
| Copy Rows to Clipboard | Copy the selected rows to the clipboard. (Shift-click or Ctrl-click to select multiple rows.) | |
|
Delete |
Deletes the scenario. |
To open a scenario, double-click on a scenario, or select a scenario and choose Actions > Open or choose Open from the right-click menu..
Choose Edit to bring up the Create Scenario wizard, where you can make changes to the scenario parameters. Click Save to save changes and rerun the scenario. Use Save As to make a copy of the original scenario.
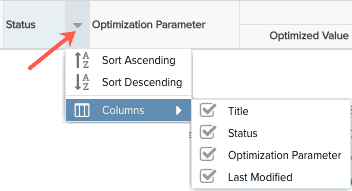
Customize the grid
You can determine the columns that appear in the PPA Scenarios grid using the column header menu. Hover the cursor over any column header to display the down arrow; click the arrow to display the menu. Add or remove columns by checking/unchecking the box next to the column name you want to add or remove.
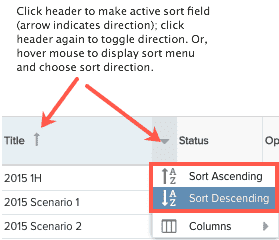
Sorting
To sort a list, simply click on a header. An arrow pointing up indicates ascending sorting; down indicates descending. Alternatively, hover your cursor over the header to display the sort menu. Choose the sort order.
 Move Columns
Move Columns
You can move columns to any position by simply dragging the column header.