
Stepping into Permissions Management
PPM Pro provides great flexibility in managing what users can see and act on what entities, but with great flexibility comes great complexity (and responsibility ;). It is easy to get lost in the weeds of permissions management, so the purpose of this topic is to clear cut a path for you and enable you to more easily manage your users' permissions and access given your company's needs. If you have any questions about any of the following or other permissions management needs not addressed here, please contact Customer Care or Consulting Services. If you have another example or a helpful tip not portrayed below that you would be willing to share, please email productmanagement-ppmpro@planview.com and we will gladly add it!
The steps covered in this topic include:
Step 1: Inventory your users' permission needs
Step 2: Ensure users have appropriate user types
Step 3: Add users to legacy entity teams
Step 4: Create/update groups and organization hierarchy for easier permissions granting
Step 5: Add users, groups, and/or units to standard groups
Step 6: Review and update your permission profiles
Step 7: Maintain and trouble-shoot permissions
Before You Begin
The key to getting your arms around permissions management is first understanding what permissions your various users need and then determining which of the various ways users can be granted access to an entity (project, resource, tasks, request, and so on) should be used. The KISS principle (keep it simple, silly) applies: grant permissions to users, groups, and units only as needed, to simplify long term management and because it is a lot easier to giveth than to taketh away.
The permissions a user has are additive across the 5 different ways in which they are granted permissions. Three of these ways, User Type, Standard Group Permissions, and Profile-based Permissions, are where you will primarily be living when it comes to permissions management. The fourth, Legacy Team Memberships, only applies if you are using Enterprises (Accounts), Divisions (Business Units), or Departments (Programs); most customers are no longer using these because the organization hierarchy is becoming a more powerful method for organizing and granting permissions in lieu of these legacy entities. The fifth way is through Implicit Permissions, which really are automatic and do not require your management, they are just good to be aware of (these are covered in Step 7).
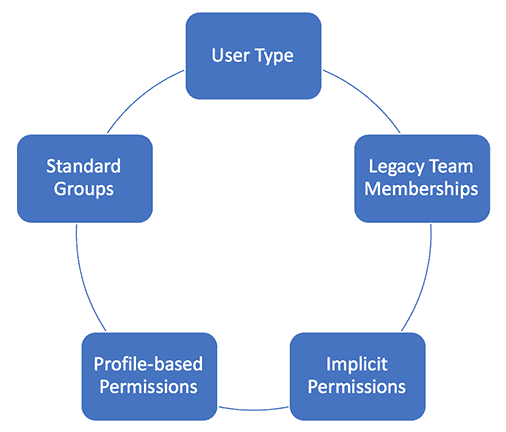
A user's permissions are the combination of all permissions granted in these ways
Step 1: Inventory your users' permission needs
Before you begin assigning or updating permissions, take a fresh inventory to determine what permissions are needed by what users. You'll particularly want to ensure you identify which users need the same permissions, because it is much easier to maintain your user permissions when you can manage them in sets of users, for example as groups or units of users. It is strongly recommended that you create an initial spreadsheet or chart of your sets of users to help organize their needed permissions so that you can reference it when managing permissions (here is a Sample Permissions Spreadsheet in case it helps). Some considerations that might help you as you inventory include:
- How much power does a user really need? Consider starting simple and assign bare minimum permissions to your users, as it is much easier to give more permissions in the future than to give them up front and need to take them away later.
- Do people with the same role, or other attribute, need the same permissions? If so, you could consider grouping these people when granting permissions (Step 4).
- Do people within the same organization unit and child units need the same permissions? If so, you could consider granting permissions to that unit as a whole (Step 4).
- Do unit managers need staffing permissions? Do non-unit managers or other users need staffing permissions? If so, you'll want to consider Unit Manager and/or Special Access rules for assigning specific profile-based staffing permissions (Step 6).
- What permissions will entity owners need, and do those permissions vary by entity, entity category/class (for projects/portfolios) or are they the same across all entities? This will help you determine any special permissions for owners across or for entity types, categories, and classes (Step 6).
- Are there different sets of permissions needed for entity team members, such as some team members being able to edit anything on the entity, others editing certain things, and still others mainly just having view access? Will different types of entity team members, like project or portfolio team members, need different permissions? This will help you determine if you need to create different profiles for different types of team members (Step 6).
- Do Administrators need access to more than the Admin view? If so you'll need to assign them relevant entity permissions (Step 6).
- Are there any users that need all permissions? Are there any users that only need a specific permission, such as view access? Identify the range of permissions needed (see all steps).
Step 2: Ensure users have appropriate user types
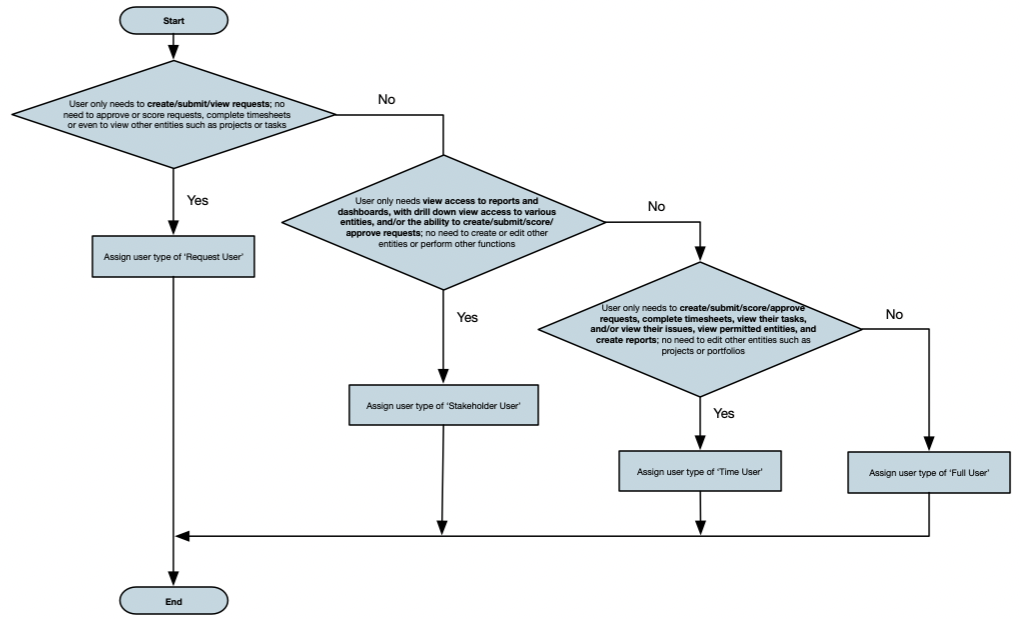
Resources must be users in order to access PPM Pro and to be granted permissions. When users are created, they are assigned a user type, which inherently gives them the ability to take advantage of certain permissions and not others. Think of the user type as a way of automatically constraining what permissions are possible. For example, a Request user type will allow a user to be granted permissions on requests, but not on any other entity (even if a Request user had a profile-based permission that gave all project view permissions, they still could not view projects because their user type limits them to only requests).
The four user types that apply to people who will be accessing the PPM Pro user interface are:
- Request User - The main reason for assigning a Request User is to only allow users to be able to create, submit, view, and/or score requests. Request users cannot be given access to any other entities, cannot be added to standard groups, and cannot have Administrator permissions.
- Stakeholder User - Stakeholder users can be granted profile-based permissions for creating, viewing, scoring, and/or approving requests. They can also drill down from a report or dashboard to view any entity in the system that they have been given permission to view through profile-based permissions. Stakeholder users cannot be given other types of access (such as edit) to any other entities, cannot be added to standard groups, and cannot have Administrator permissions.
- Time User - Time users automatically can enter timesheet data (once they have a Timesheet Activation Date on their user details), view tasks that they own and edit a subset of fields, view tasks they are scheduled to, and view and edit issues/project logs that they own. They also can be granted profile-based permissions for tasks, issues/project logs, and creating, viewing, scoring, and/or approving requests, for example to be able to edit their tasks and/or issues/project logs. And, they can view reports about their tracked time, if set up for and granted access to by another user. Time users normally cannot be given access to any other entities, cannot be added to standard groups, and cannot have Administrator permissions; however, there is an advanced option that can be turned on by Customer Care that will provide Time Users the ability to create reports and view any permitted entities, including by drilling down from a report or dashboard.
- Full User - Full users can be granted profile-based permissions for all entities and their functions. They also can be added to standard groups and can have Administrator permissions.
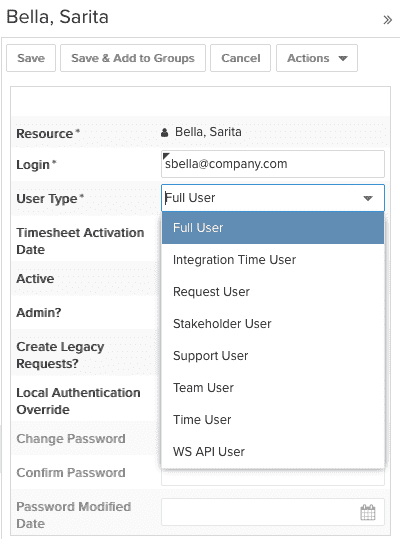
Because the different user types allow different types of access, you'll want to make sure your existing users and new users have the appropriate user type. When you create or edit a user, choose the user type based on the user's needs:
Note that if you are creating or editing a user and receive a message that you do not have enough licenses for the selected user type, please contact Customer Care or your Account Executive. User types are tied to license, which in some cases can be adjusted (for example, increasing the number of Request Users, as their licenses are effectively free) or potentially shuffled or added based on your needs.
Step 3: Add users to legacy entity teams
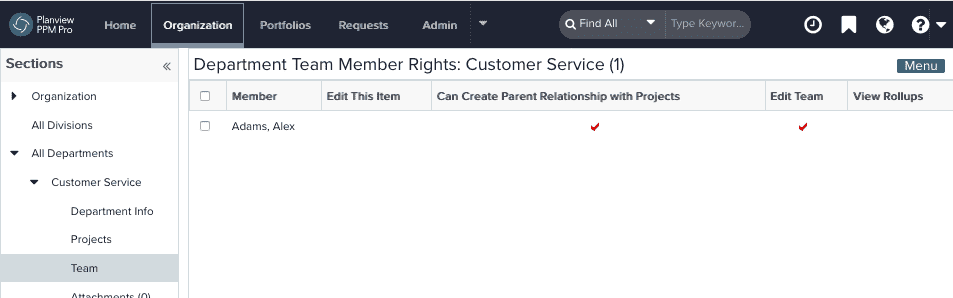
Hopefully you can skip this step to save you time and maintenance. There are still some legacy entities in PPM Pro that do not have the ability to have profile-based permissions: Enterprises (Accounts), Divisions (Business Units), and Departments (Programs). If you do not use these entities, excellent, do skip to Step 4! If you do use these entities, then a Full user may be granted permissions on them by being a member of the entity's team, with any of the following rights configured user-by-user:
- Edit this Item - Edit the entity's Basic Info/Details or delete the entity
- Create <child entity> - Create children of the entity, for example, if the user is a team member of a Division this permission gives them the ability to create Departments
- Edit entity team - Edit the entity team membership
- View Rollups - Allows user to view the entity's Rollups tab and "To Date" financial fields in Reports for the entity
- Can Create Parent Relationship with Projects (Departments only) - Populates the Department droplist with any department for which the user has this permission. In the past, projects were required to belong to a parent department; this is no longer a requirement. However, if you want to use a department in conjunction with a project, you need to have this property for each department you want access to.
For any of your users who need one or more of the above permissions on Enterprises/Accounts, Divisions/Business Units, and/or Departments/Programs, add them to the relevant entity's Team with appropriate permissions (see Creating Permissions-Based Entity Teams).
Step 4: Create/update groups and organization hierarchy for easier permissions granting
Once your user types are in good shape and before you begin granting other permissions, use the inventory you took in Step 1 to identify any common sets of users that you could potentially create groups for or make use of existing organization hierarchy units. You'll want to update existing groups and organization hierarchy memberships and/or create new ones, so that as possible you can apply the same permissions to these groups and units. Both groups and units can be assigned to standard groups (Step 5) and to profile-based permissions (Step 6). Taking advantage of groups and units can simplify your permissions management because you don't need to add (and continually update) user by user.
Groups
The two types of groups you can create are user-defined and filter-based. The primary difference between these two groups is how their members are identified. With user-defined groups, you explicitly add individual users, other groups, and/or units. This is a great group to create if you need to be able to ensure only certain people are part of the group. The downside is that you will need to manually maintain this group to ensure the correct people are in it. With filter-based groups, a resource filter determines who the members are. This is a great group to create if you want to ensure all users with a certain property are automatically included, meaning much less maintenance for you. The downside is that you need to make sure the resource filter you use pulls in only those users that you want in the group.
For example, if you know that certain roles (such as financial managers) will need the same permissions (such as viewing all financial information across the organization), you can create a filter-based group focused on that role and then add it to a standard group (such as Internal Cost Visibility). Or, if you have a set of project managers who need access to view all projects across an organization, you can create a filter-based on that role and assign the group a global rule in profile-based permissions (such as Full View Access). Another example of a filter-based group is based on a common property shared by a group of users, such as a particular set of skill categories or sharing the same timesheet approver.
Units
Unit membership hopefully is already organized in a meaningful way for your company. Oftentimes all members of a unit will need similar permissions, allowing you to add them to user-defined, filter-based, and/or standard groups as well as to a global rule in profile-based permissions. For example, if you know that all members of an organization hierarchy unit (such as Finance) and any child unit members should have the same permissions (such as financial data access), you can add that unit to a standard group (such as Billable Rates and Internal Cost) or global rule in profile-based permissions (such as Organization Finances - Full Edit).
Step 5: Add users, groups, and/or units to standard groups
The ability to access certain views and functions in PPM Pro have not yet been included in the profile-based permissions model. A Full user, other group, and unit may be granted permissions to these views and functions by being added as a member to certain standard groups (other user types will not appear for selection within the standard group's Add Team Member modal).

Based on your permissions inventory (Step 1), consider the following needs and add relevant Full users, groups, and/or units to standard groups as appropriate:
| User, Group, and/or Unit Permissions Need | Add to Standard Group | FYI |
|---|---|---|
| Access to Admin view and functions | Admin |
|
| View all bill rate, billable amount, profit and margin information, including in rollups and reports | Billable Rates |
|
| Access to the Capacity & Demand facility | Capacity and Demand |
|
| View all internal cost, profit and margin information, including in rollups and reports | Internal Cost |
|
|
Organization | |
| Publish and unpublish dashboards | Publishing | Users, groups, and units who need to publish dashboards should be granted separate profile-based permission to Create dashboards |
|
Resource | |
| Make corrections or additions to users' timesheets from Organization > Manage Time & Expense > Resource Time | Timesheet Manager | This is a very powerful capability and should not be granted lightly or to many users |
Note that there are a three other standard groups that convey permissions that you are unlikely to see, due to the feature being deprecated or in low usage. If you see these standard groups, please see About Groups for their permissions: Enterprise (Account), Fixed Bid Manager, or Expense Manager.
Step 6: Review and update your permission profiles
ICYMI, what is a Permission Profile?
Profile-based permissions can be applied to any user type and are used to grant granular permissions on various entities. An individual profile holds the permission(s), plus the scope for how to grant the permissions, who to grant the permissions to, and on what entities.
Profile = Permissions + rule + who + entity
- The "permissions", represented in the Permission Hierarchy tree, include create, view, edit, delete, and other entity-specific functions.
- The “rule”, represented in the Permission Rules, determines the scope of the permissions:
- Global - Grants selected permissions to ALL instances of an entity (all projects or all projects of a given category, for exampel) for the specified users, groups, and units.
- Team - Grants selected permissions on AN entity instance (a specific project, for example, rather than all projects) when a user, group, or unit is added to that entity instance's team (such as a project team) with the current profile.
- Owner - Grants selected permissions to entity owners. Note that entity owners get implicit rights to view and edit much or all of the details of the entity they own (such as view and edit project details), but you can use an owner profile to augment these permissions (such as Delete project or Edit all project sections). See Implied Permissions for Entity Owners for information about the implied rights for each entity owner.
- Unit Manager - Grants only selected resource permissions to organizational hierarchy unit managers on the resources in their units.
- Special Access - Grants selected resource permissions on a unit when a user, group, or other unit is added to the unit's Special Access list.
- Association - DO NOT USE: With the ability to now grant permissions on projects of specific categories, the Associations rule type is pretty much obsolete and we will be deprecating it. Please avoid using, and if this confuses you, please enter a support case to ask for assistance.
- The “who”, which is determined based on the Permission Rules or when adding to a team or special access list, specifies who is granted the permission - an individual user, a group, or a unit.
- The “entity”, also represented in the Permission Hierarchy tree, is any of the supported entities: projects, tasks, issues, portfolios, assets, reports, filters, dashboards, organization finance settings, organization internal rates, and requests.