
Stepping into Work Intake and Requests Management
Work intake and requests management enables you to take control of the work being done in your organization, ensuring alignment to your organizational goals and higher return on the investments you are making. By having a work intake process you can promote the capturing of great ideas, increased efficiency, elimination of duplicate efforts, cost savings, and the ultimate benefit of eradicating the waste of working on the wrong things. That is, when you have a sound request process, you avoid:
- Missing Out – people who have good ideas or want to request work may not know how to bring it to your organization's attention, which means you lose out on the next great idea.
- Wasted Time and Effort – people who should be evaluating requested work might not realize others are waiting for them. Multiple people might be evaluating the same work unnecessarily, either due to lack of awareness of others’ involvement or duplicate work requests. There also may be a lot of unnecessary back and forth while trying to determine if the work is worthwhile in an ad hoc manner.
- Inconsistent Evaluation – without apples-to-apples evaluation of proposed work, truly valuable work may go by the wayside while less valuable work receives approval. With no standard for what qualifies as good work, work that should never have been done in the first place progresses forward.
- Frustration – people become frustrated and lose faith if there is no way to monitor the progress of a submitted work idea or request. When this happens, they may choose to circumvent the minimal process in place or just go get it done elsewhere – bad news for the organization trying to establish process and consistency.
- Poor Visibility – without a way to track and highlight how much work is requested and processed, stakeholders and executives have no idea of the impact, positive or negative, to the organization. It is also difficult to adjust resources and predict imminent and future work resource needs without knowing what is already in the funnel.
- Treating Everything Like a Project – Gartner states that “When PPM leaders treat all requests and work as projects, the impact is felt through reduced benefit realization, low project performance and overstretching of key resources such as project managers”. A work intake process can route requested work to the appropriate effort level, whether action item, task, project, or a combination of these.
Still not sure about the value of work intake and requests management? Please see the Parkview Health: Prioritizing Project Investments with Strategic Work Intake customer webinar, where Parkview Health highlights the value of work intake and provided great advice for kicking off work intake at an organization.
The purpose of this topic is to provide an example set of steps for how you can progress along the work intake and requests management path to help achieve your company's objectives. If you have any questions about any of the following or other work intake needs not addressed here, please contact Customer Care or Consulting Services. If you have another example or a helpful tip not portrayed below that you would be willing to share, please email productmanagement-ppmpro@planview.com and we will gladly add it!
The steps covered in this topic include:
Step 1: Design your initial work intake process
Step 2: Ensure associated entities have request associations
Step 4: Grant permissions to relevant users
Step 5: Audit, track, and improve your work intake and requests management process
Step 1: Design your initial work intake process
Background on request capabilities
It might help to understand key PPM Pro request capabilities before you begin designing your work intake process, as they may inspire and help determine the best process approach. Below are summaries of those key capabilities.
- Categories and permissions - You can have more than one category or "type" of request. Each category can have different guidelines, details, types of associated entities (project, task, project log), and gates (or no gates) with varying approver and gate flow logic. Further, permissions can be granted per request category, so that you can grant different users and organizational areas access to one, some, or all request categories. This allows you to have various request forms and processes so you can streamline and design based on your target requester's knowledge and needs.
- None to many associated entities (resulting work) - Requests act kind of like a carrier pigeon for information that is captured and used to make decisions during the workflow process. Usually that information, in the form of details, notes, and attachments, is copied into one or a combination of associated projects, tasks, and project logs, which basically become the resulting work. For example, if you know that a request will always result in a project or is a change request for a project, then that request category need only include project associations. Or, if the requested work could be at any level, you can have a request category that includes project, task, and project log associations. This flexibility helps your requesters, who do not need to know up front what entity might result from the request. It also enables you to split up the requested work as appropriate, for example, to associate the requested work to a new task on an existing project, to two new projects, to three different project logs, and so on. Keep in mind that a request category does not have to have associated entities or resulting work; it can just be used as a way to capture information.
- Gates and workflow - A request does not have to be part of a workflow, it can simply be a form for capturing information that can then be copied (or not) to existing or new projects, tasks, and project logs. Alternatively you can configure a request category to have 1 to n gates. The gate workflow allows requesters to submit their work requests and each gate approver to provide information and approve the request to go to the next gate, until it ultimately exits the workflow as fully approved. This assumes the work meets your organization needs and should in fact be done. Approvers also have the option to:
- send a request back to any prior gate for more information
- place a request on hold, for situations where the requester needs to provide additional information or if the request simply needs to be removed from the evaluation process for the time being (and can be placed back in progress when the time is right)
- reject the request if it should not be done at all
Requests, including rejected requests, can also be copied, tweaked, and submitted. Another beautiful capability of gates is that request fields can be configured per gate to be required or not, have a default value or not, be shown or not, and if shown to be editable or read-only. This enables you to simplify what gate approvers will see on the request form, showing only relevant fields to help de-clutter the request form and to better emphasize key fields for that gate.
- Gate approvers logic - The request gate approver logic allows multiple and varying numbers of approvers at each gate, and can use requester and request field properties as part of that logic. By setting up approvers logic rather than simply listing out all possible approvers, you can make sure that only relevant approvers receive notifications and can take action on the request; you don't want to spam all possible approvers if only a subset are truly needed. For example:
- at an Initial Review gate you can simply have the approver be a single person who is the requester's unit manager
- at a Detailed Review gate, when (a) the requester has a role of Developer or they are a member of the IT unit, then you can require any one person to approve who is a member of the IT Directors group, else (b) when the requester's unit is Finance, then all people must approve who are members of the Financial Directors group, else (c) any two people from the PMO group must approve
- at a Final Review gate, you can specify that (a) the ePMO unit manager must approve if the request's "ePMO review needed" checkbox is selected, and the DCU unit manager must approve if "DCU review needed" checkbox is selected, and the QA unit manager must approve if the "QA review needed" checkbox is selected, else (b) any 2 people from the Request Process Managers group must approve if none of these checkboxes are selected.
The approver logic is very flexible and enables you to configure the relevant number of approvers and who should be in the pool of approvers based on your organization needs.
- Notifications, including nag-o-grams - Automatic email notifications can be configured and automatically sent to:
- a requester when someone else submits the request on their behalf. For example, if Bob submits a request and lists Sue as the requester, then an email can be sent to Sue informing her that Bob submitted a request on her behalf, including a link to that request if Sue is a user.
- gate approvers when a request enters a gate, based on gate approvers logic. For example, in the Gate approvers logic capability Final Review gate example above, if the ePMO and QA review checkboxes were selected, then the ePMO and QA unit managers would both receive an email notification upon the request entering this gate and would need to approve before the request can transition to the next gate. But if these checkboxes were not selected, then the ePMO and QA unit managers would not receive an email and would not need to approve.
- pending gate approvers who have not yet approved when a request has been sitting at a gate for a period of time. For example, a reminder notification (aka nag-o-gram) can be configured and sent only to relevant gate approvers who have not yet approved, recurring daily, weekly, or monthly. This helps prevent the request from getting hung up at a gate unnecessarily.
- Gate skipping logic - Request gate logic allows you to skip gates based on request field properties. For example, you can create gate logic to check if a request field for "Estimated effort (hours)" contains a value less than 100, and if so, skip directly to the last gate rather than going through unnecessary gates such as financials or security. This enables you to streamline the workflow so your requests can move through the process as swiftly as appropriate.
- Prioritization and scoring - There are various ways to help you compare and prioritize the work requests coming in. For example, you can:
- use a simple rank ordering request field or even a simple list request field to indicate the importance or priority of doing the work. This field's value can be used when comparing work requests.
- use a request calculated field that is derived based on the values of other fields (such as the Lean Weighted Shortest Job First or WSJF measure). This field's value can also be used to compare requests
- use a scoring model. Both of the single fields listed above are useful if completed by consensus or a single individual. If you would like to have a group of individuals each provide their own scores based on a set of weighted criteria, and then combine those scores into a total score, then you can configure and use a scoring model on the request category. Using a scoring model allows you to compare requests by looking at the total scores as well as the criteria set score values. For example, some customers like to use scoring models that have criteria for Risks and for Rewards, analyzing the total scores as well as the Risk versus Rewards scores of the requested work.
Creating a work intake process design
Rather than drinking from the firehose and trying to do all work intake requests at once, start simple by focusing on a single type of request and designing its work intake process. What will bring your organization the most value without miring you in too much complexity? Perhaps a simple project request, general work request, or even a project change request? Once you've designed and configured your first request work intake process, subsequent ones will be much easier, especially if you can copy this first one as a jumping off point for the next one. The following questions should help you create your design. NOTE that if you do not know the answers to all of these questions, you can always consider them later, as most can be addressed and configured in the future as needed. For example, if you're not sure yet if and how you want to score your requests or how you want to communicate work progress in dashboards, you can wait until you have requests in the system and add these later.
- Given the initial request type you will create, who will be involved throughout the request process? Who will be the likely requesters, and if there are gates, the likely experts involved at each gate? Who are the stakeholders and executives ultimately and most keenly interested in work demand? Who should be allowed to edit or take action on a request? Choose a few of each and invite them to participate in the workflow design process, to contribute to and validate your design. Include them as relevant to help answer the questions below and/or to confirm your design as it progresses.
- Will this request involve gates and workflow? If not, you can skip to question 5 below. If so, create a flowchart of the workflow process (hand drawn or otherwise). Capture the overall flow by representing each gate, including:
- If the request will always need to go through the same sequential set of gates or if you can skip a gate based on certain request field values and what those values are. This latter information will determine your gate skipping logic.
- Who are the experts needed at a gate to provide information and/or make decisions about the requested work and whether or not it should continue in the workflow process. Be sure to identify what information about the requester and the request field data might be needed to determine who the experts are, as these experts will be your approvers and help form your gate approvers logic.
- If the request workflow has gates, do you want to allow approvers to send the request back to any prior gate? Sometimes approvers at a later gate may deem that additional information or clarification is needed from a prior gate's approvers before they can take action on a request. Decide if it makes sense to allow an approver to send a request back to any prior gate, as this is an option you can configure as part of the request category.
- If the request workflow has gates, what types of automatic notifications do you want to occur and what do you want them to say? Each automatic notification that is sent to a PPM Pro user will include a link to open the relevant request. You can configure the email subject and message for each notification. Decide whether or not you want the following automatic notifications to occur, and if so, what the content of each should be:
- a notification to requesters when someone else submits a request on their behalf
- per gate, gate entry notifications to the gate approvers (identified by your gate approvers logic)
- per gate, reminder notifications to gate approvers who haven't yet approved, including the frequency of those reminders; for example you can configure a reminder to be sent daily, or every 2 days, or weekly on Wednesdays and Fridays, or on the first of the month, or on the second Monday of the month, or every two months, and so on
- Should users be allowed to add notes or attachments? If so, capture when you want to allow notes or attachments to be added. If no gates, should notes or attachments be allowed to be added when the request is being created and/or after it has been saved? If there are gates, should notes or attachments be allowed on new/before submission and at which gates? This will inform when to show your request category's notes and attachments sections.
- Will the request be used just to capture information or will it result in project, task, and/or project log work? If the former, you will not need to include any entity associations within your request. If the latter, identify what type of work might result, keeping in mind that you can include just one or a combination of projects, tasks, and project logs. You can also allow for any project, task, or project log category to be associated or a subset. For example, you might not want to allow associating to certain specialized project categories, so identify which entity categories you want to enable. Next, identify at what point in the workflow you want to allow the creation of these associated entities. If no gates, should the associated entities be allowed to be added or created when the request is being created and/or after it has been saved? If there are gates, should associations be allowed on new/before submission and at which gates? This will inform when to show your request category's associated entities.
- Will the requests need to be prioritized or scored in some way? If so, then identify how you want to capture the score, for example as a rank order or simple importance/priority field, calculated field based on other field values, or via a scoring model. Determine what options make sense if a simple importance/priority field. For calculated fields, determine what other fields will be used to derive its value and how they should be used in the calculation. If a scoring model, decide if an existing project scoring model should be used or if a new scoring model needs to be created, and what its categories, weightings, and criteria should be. Once you've determined how to capture the score, determine when you want to show these fields or the scoring model section; similar to the above, on new, on edit, or at which gates.
- Do you want to allow users to track the activities on the request, such as when notes or attachments are added, and in the case of gates, when an approver takes an action? If so, capture when you want to show the Activity Log section; similar to the above, on new, on edit, or at which gates.
- What request data must be captured (required) and what data is valuable but optional? What data can be hidden at various gates or perhaps hidden or view only for certain users? To help ensure the fastest processing and fewest speedbumps for your requesters and approvers, you'll want to make sure you only show truly relevant and valuable fields on your request form; the simpler and less cluttered the form, the happier the user and the faster the workflow. You will be able to hide or show fields on new versus edit, and if you are using gates, per gate. You can also indicate if a field is required, editable, or has a default value on new, edit, and per gate. Further, you can make certain fields visible to or editable by only certain users by applying field restrictions. For example, you may want to limit who has visibility to certain financial fields. In general, identify what data fields you want to include on the request form as well as how and when they should appear.
- For the request data you will capture, and if the request will result in one or more work entities, what request data needs to be copied to that work? Identify the request fields that you'll want to allow to be copied to associated work entities. This will inform the field mappings when configuring the request details.
- Should requesters be allowed to view just their own requests, or others' requests as well? If you are using gates, are there any users who will be request process managers such that even if they are not a gate approver, they can take action on a request? You may want to allow requesters to see others' requests, for example, so that they can avoid entering a request that someone else has already entered. You may also want to identify users who can help move a request along in the process (without having to be a gate approver), for example, to address situations where a request is hung at a gate because a required gate approver is on vacation or no longer at the company. Such users can be given explicit permission to view, edit, or take action on their own or others' requests, and will inform your request permissions setup.
- Given all the answers to the questions above, is there an initial set of instructions or information about the request or workflow process that will help the requester in deciding to create the request? If so, capture this information, including any links to external online data that would be helpful. This will inform the request guidelines that you can optionally include as part of your request category. For example, some customers like to include instructions on what type of asks are appropriate for the request category, what are the steps and process for evaluation, links to forms that should be completed and attached or that provide additional information, what the requester can expect in the way of notifications or the outcome of the request process, or who to contact if there are questions about the request process.
- What information about requests and the request process needs to be communicated to your request process managers, stakeholders, and executives? Do you need to show the volume of work demand in your organization? What about which requests have been approved or rejected, or are on hold, or have been in process for a very long time? What work intake information needs to be surfaced to help your organization make decisions and ensure the right work is getting done? You will want to identify what information is critical and most valuable for monitoring the work intake process, driving efficiencies, and keeping your organization work goals on track. This will allow you to create appropriate reports and dashboards for visualizing this information.
Once you have your initial work intake design completed, the hard work is done! Setting up the request is quite straightforward. PPM Pro requests can be configured by an admin using the next steps and self-service admin: Admin > Setup > All Entities > Requests. Please see the Planview PPM Pro Requests Revamp end-to-end demo webinar recording for a comprehensive walkthrough of the user experience and configuration of requests, which covers much of the configuration described below.
Step 2: Ensure associated entities have request associations
If your request will have associations to projects, tasks, or project logs, you will need to go into each of these entities and edit the categories you want to allow to be associated to requests. This will enable you to:
- Control which entity categories can be associated to your requests. For example, if your tasks have 3 categories "Deliverable", "Enhancement", and "Milestone", but you only want to allow requests to be associated to "Deliverable" and "Enhancement" and not to "Milestone", then you would edit the "Deliverable" and "Enhancement" task categories to ensure the "Request Associations" section is selected. This will ensure requests can only associate to (and copy request data to mapped fields for) these two task categories.
- Access associated requests from within individual entities. Once the "Request Association" section is configured for an entity category, whenever a user with permission to view its associations is looking at an individual entity, they will be able to see all of the associated requests for that entity. For example, if a project "Data Mining" is of a category associated to requests, when looking at the Data Mining project Associations section, there will be a panel for the Associated Requests for the project.
To enable these associations, visit each entity in self-service admin Categories section and follow the steps below for each entity. For example, for projects go to Admin > Setup > All Entities > Projects > Categories and:
- For each category that you want to allow to be associated to a request, edit by double-clicking it or select it and choose Actions > Edit.
- Within the resulting Edit Category window, select the Request Associations checkbox within the Sections to include list.
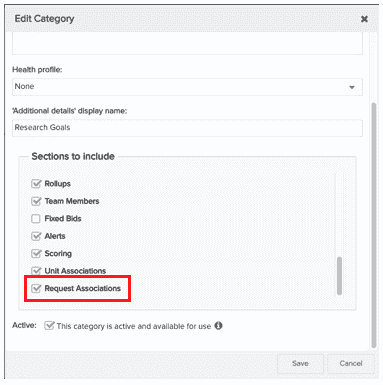
- Once you Save, the entity Categories grid should show a checkmark in the Request Associations column for that entity category.
Step 3: Configure the request
Using the work intake process design you created in Step 1, configure your request via self-service admin: Admin > Setup > All Entities > Requests.
- Within Available Fields
- Inventory the existing Standard fields to determine which match your list of request data fields.
- Create new user-defined fields for the request data fields that weren't provided as Standard fields.
- Set up any field restrictions if there are fields you only want certain users to see, for example, if you want to hide certain fields throughout the workflow process from requesters or other users.
- Again, start simple, you can always add more fields later as needed.
- Within Categories, set up the request category's details
- Create a New Category, providing a meaningful Title for your request and optionally a Description. If you enter a Description, it will be shown to users in a tooltip if they hover over the category title when selecting it from the New request menu.
- Select what Sections to include for the request overall (Notes, Attachments, Project Associations, Task Associations, Project Log Associations, Scoring, Activity Log). Also select which of these sections you want to Show on New when a requester first creates the request. For example, if you want to allow requesters to add attachments or notes when creating a request, select to show those sections on new.
- If the request will include the Scoring section, pick a Scoring profile (you can reuse scoring profiles you have already set up, or create a new scoring profile and set up its components). The Scoring section will not appear in the request if you do not pick a Scoring profile.
- If the request will include rich text guidelines as a first step when creating a request, select the Show Request guidelines on new checkbox and use the resulting rich text field to provide your instructions, including links and formatting as appropriate
- If the request will include gates, and if you would like to notify a requester when someone else submits a request on their behalf, select the Send notification to requester upon submission checkbox and configure the email subject and message. Also, if you would like to allow a request to be sent back to any prior gate during the workflow process, select the Allow the request to be sent back to any gate checkbox.
- Select the Active checkbox to make the category available in the Admin Category dropdown when configuring Details or Cards, and to the end user when creating an instance of the entity. Categories are active by default. Deselect the checkbox to hide the category (will not appear in the New Request options when the user creates an instance of the entity, or in the Categories droplist when configuring Details or Cards).
- Within Categories, if the request will have gates, then within the bottom Gates panel for the request select to create a New gate, and for each gate configure
- A meaningful Title for the gate and optionally a Description.
- Select which of the category's Sections should appear at that gate. At some gates you may not need all sections to appear, particularly gates that appear early in the workflow.
- On the Gate Approver tab configure the gate approvers logic. Per your earlier work intake process design, approvers can vary based on who the requester is and what are the current field values of the request. Also, please see Gate Approval Examples for illustrations of how to build gate approver criteria.
- If you want to automatically notify gate approvers when the request enters this gate, then on the Notifications tab select the Upon entering this gate, send email notification to all pending gate approvers checkbox and configure the email subject and message. Again, only approvers determined by the gate approvers logic will receive these notifications.
- If you want to automatically send a periodic reminder notification to gate approvers who have not yet taken action on the request at the gate, then on the Notifications tab select the Send reminder email to approvers who have not yet approved checkbox. You can configure the frequency of recurrence as well as the email subject and message.
- Within Categories, after you have added all your gates, configure the gate flow if you want to reorder the sequential gate flow (for the gates currently shown in the Gates grid) or include gate skipping logic
- Select to Edit Sequential Gate Logic.
- If you want to keep a sequential gate flow but reorder the gates, simply select the relevant gate and then the Move Up or Move Down buttons.
- If you want to use gate skipping logic, select the Gate skipping option button and configure the gate skipping logic. Per your earlier work intake process design, gates can be skipped based on the current field values of the request. NOTE: Before you do this, you will want to ensure that the sequential order of gates is correct - order is important because when choosing the Next Gate, you can only choose gates later in the sequence (this prevents creation of circular logic). Also, please see gate skipping examples for illustrations of how to build gate skipping criteria.
- Within Details, design the overall request form for the category
- Add group headers as needed and add the desired fields from the Available Fields list to the Details field list. NOTE: Make sure that you include any request fields whose values that the gate approvers logic and/or gate skipping logic configured earlier may rely on.
- For each Details field, configure its Variable Properties (on new and for each gate if the category has gates): required, default value, if shown and if so if editable.
- For each Details field that can be mapped and if the category has one or more associated entities, configure the field's mappings. Note that if you do not see a Mappings tab for a selected Details field, then it cannot be mapped. If you can see the Mappings tab but do not see a needed associated entity category, revisit Step 2: Ensure associated entities have request associations.
- Within Grid Columns, layout the default columns and available columns that your users will see in their request grid when using the List View.
- Within Cards, select what and how fields should appear on the card for that request category (cards appear as configured when the user selects the Card View as opposed to the List View). Note that Available fields are derived from the selected Details fields; if you do not see a field you want to show up on a card, go to Details and make sure the field is shown there for the category.
- Within Searchable Fields, select what fields you want to allow to be searchable within global search.
Step 4: Grant permissions to relevant users and begin work intake
Requests use the same profile-based permissions model as other entities, enabling you to grant global permissions to users, groups, and units that should be able to create, view or take action on requests (specific request categories or all request categories), to supplement the implicit request permissions a user will have by virtue of being a requester, submitter, or gate approver. You can set up these permissions to meet your organization's needs when your request configuration is completed and you are ready to start work intake.
Note that you can start small and run a test set of requests through the system by granting permissions to a small set of users, requesters, approvers, and stakeholders who were involved in your work intake design process or who are interested and willing to help you refine the process. Grant permissions to that subset of requesters and make sure the possible approvers are aware that they will begin receiving notifications. As you receive feedback on the process, tweak and improve and gradually enlarge your user base as appropriate. By the way, if you are worried about adoption of this process, please see the Parkview Health: Prioritizing Project Investments with Strategic Work Intake customer webinar, which provided great advice for kicking off work intake at an organization. There is also the Encouraging Adoption by Project Managers, Resource Managers, and Others topic for other customer ideas on encouraging adoption.
Step 5: Audit, track, and improve your work intake and requests management process
Once you have your first request category and are satisfied with its work intake process you can repeat the above steps to accommodate other types of work demand. Continuously trying to improve all of your processes is the key to sustainable success when it comes to work intake. Oversee and highlight your successes, and improve and evolve as your organization’s needs change, which will happen over time. As one of our customers adamantly recommends, “keep score” – it’s imperative that you evaluate how the work intake (and resulting work) performed both operationally and financially, and that all stakeholders are aware of it so that you can improve as an organization and meet your strategic goals.
Current request reporting is fairly basic, but it does allow you to report on associated entities which can be very helpful. There are several standard fields that help you manage and report on a request, specifically computed fields that show elapsed time. In addition, if you configured the request to include the activity log section, you can view all the high-level actions that have been taken on a request, giving visibility into how the request progressed through gates, including each approver's time of approval. Advanced reporting capabilities, particularly to support more gate and workflow analysis, will be added in a future release once the new reporting feature is completed (currently targeted within the first half of 2020). However, here are some ideas that are possible today:
- Analyze the number and velocity of requests flowing through the work intake process. Look into redundant or work requests that made it too far in the process before being stopped/that never should have made it in. Then, adjust the process to prevent and identify such unwanted work intake items as early in the process as possible.
- Segment and report on work requests by score, department, strategic initiative, and other important factors. This will allow you to make comparisons and analyze impacts.
- Document lessons learned and identify actions to address them. Modify and evolve the intake process as your organization experience evolves. Keep a history and avoid repeating mistakes.
- Summarize results and regularly publish meaningful information to stakeholders and executives via dashboards. This demonstrates the outcomes and value of work intake. ‘Keep score’ and make sure your stakeholders are aware of the scoreboard. Did the scores and prioritization result in the the right work making it through? Did this work meet their strategic goals? If not, find out why and course-correct your work intake process.
