Configuring Gate Flow
Overview
Gated requests are requests that have one or more "checkpoints" (referred to as "gates") that the request must pass through to achieve final approval. Each gate can require a different set of information that a request is required to obtain before it can be approved at the gate. Typically, all gates must approve a request for it to reach "final" approval; by default an approval at one gate results in movement to the next gate. This is referred to as "sequential" gate flow, and is the default behavior of the approval system.
While sequential gate flow satisfies many use cases, some organizations require a request to take a non-sequential path toward approval based on characteristics of the request, such as who the requester is, the budget amount, or a date. You can use gate-skipping logic to direct the flow of a request. For example, your business process might not require approval at some gates if the request was submitted by a member of the PMO, or if a request is for internal consumption as opposed to external. Similarly, if a request has a simple work effort, the request might require fewer gates than a request with a large work effort. Note that gate flow can only advance (go forward) automatically - it cannot go backward.
Keep in mind that the big benefit of using gate skipping is that you can accommodate multiple scenarios with one request category, rather than having to create a separate request category for each variation. For example, instead of creating a category for "strategic" project requests and one for "tactical" project requests, you can use information from the request itself to determine whether it needs the strategic (more rigorous, more gates) or tactical (less rigorous, fewer gates) approval path.
You configure gate-skipping logic similar to how you configure request approval: create a "gate flow filter" comprised of blocks of criteria that are evaluated in order - the system executes the first directive that resolves to true.
Topics covered:
- How to Configure Sequential Gate Flow
- How to Configure Gate Skipping
- Switching from Sequential to Gate Skipping Flow
- Switching from Gate Skipping to Sequential Gate Flow
- Deleting Gates Included in Gate Skipping
- Adding Gates to a Gate Skipping Flow
- Using Variables in Gate Skipping Criteria
See also Gate Skipping Examples.
How to Configure Sequential Gate Flow
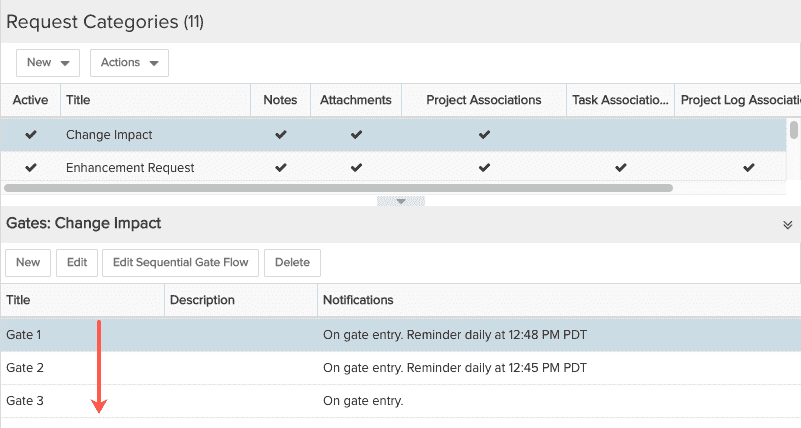
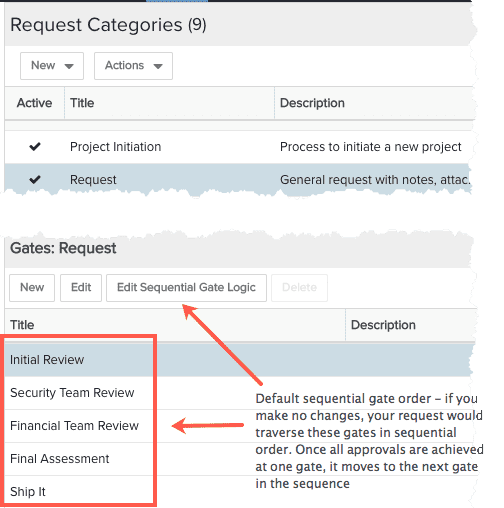
The default gate flow is sequential - that is, requests flow linearly in the order of the gates shown in the Gates panel of the Admin/Setup/All Entities/Requests/Categories page. In the screenshot below the Change Impact category is currently using sequential gate flow, meaning that after a Change Impact request is submitted it goes to Gate 1 - Gate 2 - Gate 3 (provided the approval criteria are met at each gate).
You can change the sequence by clicking the Edit Sequential Gate Logic button and rearranging gates using the Move Up and Move Down buttons.
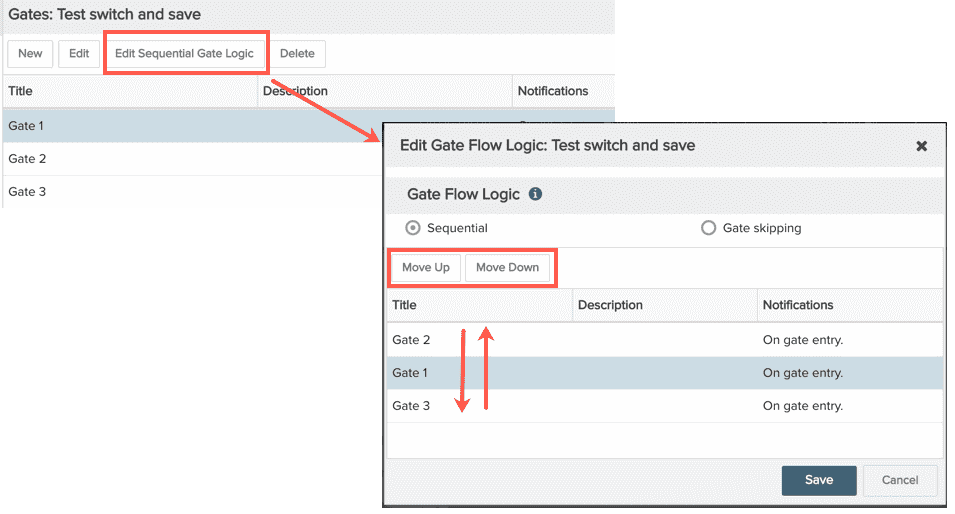
Note that even if you plan to use gate skipping, you'll want to pay attention to the gate sequence - order is important because when choosing the Next Gate, you can only choose gates later in the sequence (this prevents creation of circular logic). If you need to change the order after you've switched to gate skipping, you can switch back to sequential gates, but you will lose your gate skipping configuration.
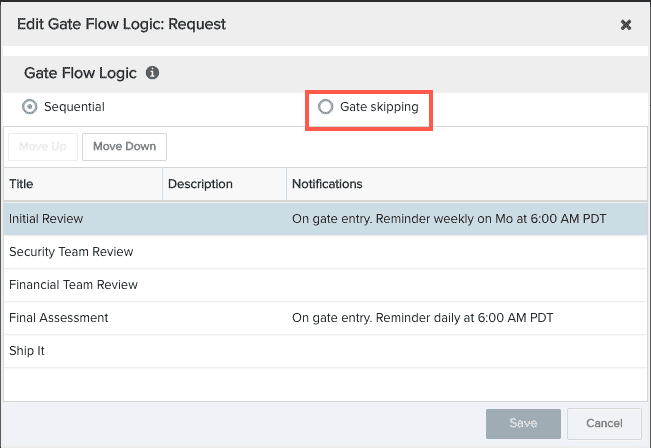
Switching from Sequential Gates to Gate Skipping
If you decide you want to implement gate skipping, simply click the Edit Sequential Gate Logic button. In the Edit Gate Flow Logic modal that appears, click the Gate skipping radio button. Note that even if you plan to use gate skipping, you'll want to pay attention to the gate sequence because order is important because you can only direct a request to land on a Next Gate that is later in the sequence. This prevents creation of circular logic. Note that you actually can switch back to sequential gates after you configure gate skipping, but you will lose your gate skipping configuration.
How to Configure Gate Skipping
You can configure a request's movements through gates based on a combination of the current gate and information from the request's contents. Based on the criteria, you can direct the request to a gate that is not "next" (but is in the future) as defined by the sequential flow. This is referred to as "gate-skipping". For example, if a request was submitted by a member of the PMO, you might waive the Initial Review gate and send the request directly to the Business Case gate.
Just like with sequential gate flow, you'll modify the flow on the Admin/Setup/All Entities/Requests/Categories page. From there, you'll see a button labeled Edit Sequential Gate Logic, because by default the flow is sequential in order of the list of gates (see screenshot above). Once you configure gate skipping, then the label of this button will be Edit Gate Skipping Logic.
What is a Gate Flow Filter?
You configure gate flow similar to how you configure request approval: create a "gate flow filter" comprised of blocks of criteria that are evaluated in order - the system executes the first directive that resolves to true. You can think of a filter as a business rule that guides the behavior of the request flow.
Build gate skipping filters to determine which gate(s) a request flows through until it becomes fully approved. Similar to gate approval, a set of variables is provided that are based on request fields and allow you to derive your gate list from specific, real-time request data. See Using Variables in Gate Skipping Criteria.
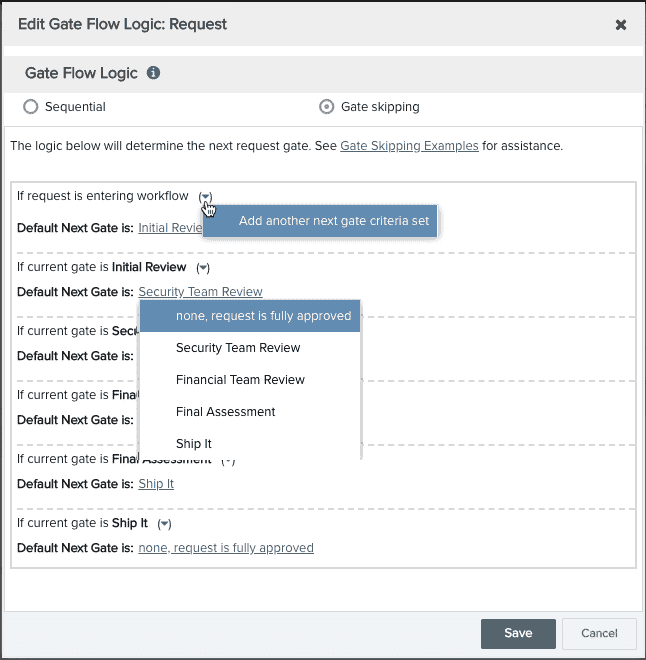
In the screen shots below, you can see how the default set of gates is represented when you move into gate skipping. The sequential gate order in screens 1 and 2 is the same as the initial gate skipping order in screen 3. Screen 4 shows the Next Gate list, which is how you pick the next gate.
1) Default |
2) Click Gate Skipping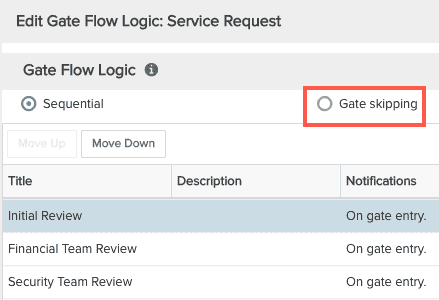 |
3) Default gate order presented as default gate skipping logic, includes step for entering the workflow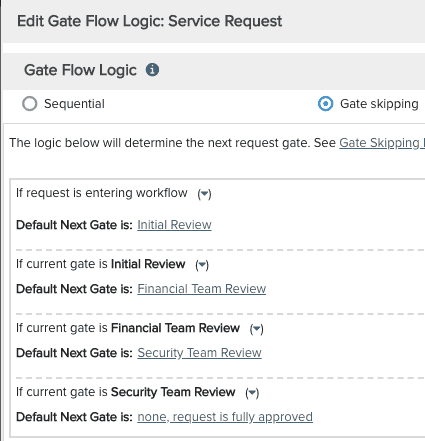 |
4) Can adjust the Default Next Gate; each gate will always have a Default Next Gate that is the next gate in the sequence |
Once you have the default configuration, you can edit the logic to include one or more criteria sets, which themselves are comprised of filter elements (statements) that describe the next landing spot for the request.
The following is an example of a gate flow filter that shows all the filter elements:
Filter Elements
| Element | Description |
|---|---|
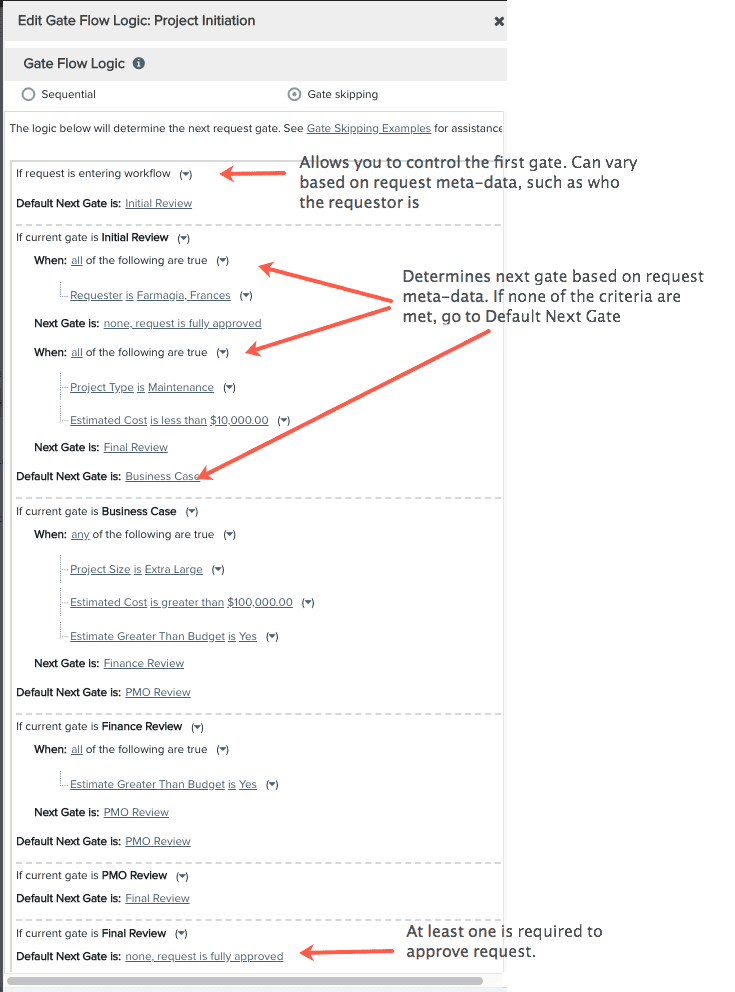
| If request is entering work flow | Not exactly a filter element as you only have one of these statements at the beginning of the gate flow logic. Specifies the first gate the request will land at. For example, if the requester is a member of the PMO, send the request to the Business Case gate, skipping all other gates; otherwise, send the request to the Initial Review gate. |
| When |
Specifies request metadata that determines what gate is the next gate. For example, imagine a request has a user-defined Cost field. The value of the Cost field is request metadata that can be used to qualify where the gate should go next: if the Cost > $150,000 then go to the Finance Approval gate, otherwise go to the Final Approval gate. It might be useful to think of each "when" block as an if-then-else statement. When A is true then next Gate is 1, else next gate is 2. A "when" block can contain multiple criteria. Use "all" if all statements must evaluate to true; use "any" if any one statement is required to evaluate to true. When using multiple "when" blocks, note that order matters. For example, if there is a criterion that you always want evaluated, regardless of the outcome of any other "when" block, then put the when block that contains that criterion first. Otherwise, if a different "when" block evaluates to true first, that "required" criterion will never be evaluated. |
| Default Next Gate | List of gates configured for the category that come after the current gate, as well as the option "none, request fully approved" (see below). Use it to specify the next gate the request will move to if none of the gate skipping criteria are met. The initial value of Default Next Gate will reflect the sequential gate order. |
|
Next Gate
|
List of gates configured for the category that come after the current gate, as well as the option "none, request fully approved" (see below). Use it to specify the next gate the request will move to if the gate skipping criteria are met. |
| none, request is fully approved |
This is an option in the Next Gate drop list. When you select this value for Next Gate, the request is moved out of the gate flow (no Current Gate value), the request becomes fully approved, and the request's gate status is set to Approved. Make sure that there is at least one "none, request is fully approved" next gate for each flow. For example, if you have gates 1-6, depending on your gate flow criteria a request might be fully approved after gate 3, while other requests may not be fully approved until they have traversed all six gates. If you omit this value entirely, requests will never be approved. |
How to Skip Gates
This section assumes you have already created the gates.
- Navigate to Admin/Setup/All Entities/Requests/Categories and select the category for the request gates you are configuring.
The list of gates in the Gates panel reflect the sequential order, as shown in the screenshot below:
- Double-check the gate order is the way you want it.
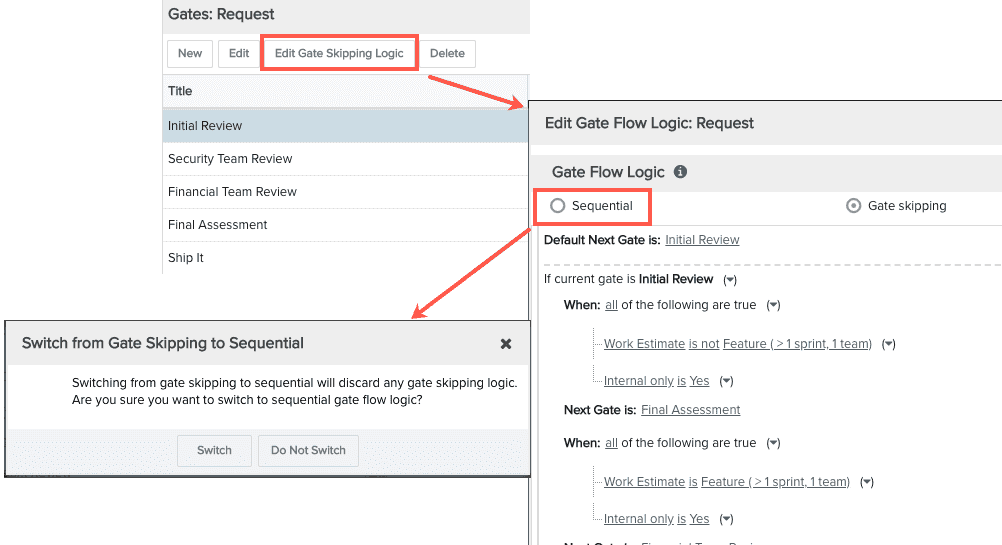
- Click the Edit Sequential Gate Logic button (if you have already switched to Gate Skipping, the button will say Edit Gate Skipping Logic). This brings you into the Edit Gate Flow Logic modal.
- To configure gate skipping logic, click the "Gate skipping" radio button. You can also decide to use sequential gates - use them as-is, or re-order them by using the Move Up/Move Down buttons.
Assuming you picked "Gate skipping", the Edit Gate Flow Logic modal shows the same set of gates you saw when the "Sequential" radio button was active. Each gate has a drop list that contains all the gates to come called "Default Next Gate is". Initially, the default next gates align with the sequential gate order - it is just making explicit the fact that the current flow follows the same order you see on the screen - no skipping has been configured yet. Each gate also has a control that allows you to add gate skipping criteria. The screenshot below illustrates these features:
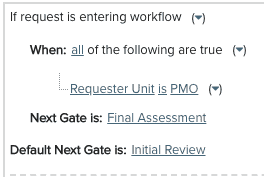
Now you can start adding skipping logic. First decide where the request will enter the flow. By default it goes to the first gate in the sequence (in our example above, the request enters the workflow at Initial Review). However you can add gate skipping logic to direct the request to any existing gate.
- Add logic that directs the request to the Final Assessment gate if the requester is from the PMO unit. Otherwise, the request will enter the workflow at Initial Review. Note that you are not required to add logic - the request would simply have entered the workflow at Initial Review.
You basically repeat this process for each gate - either let the request flow directly to the default gate, or add one or more criteria set to any gate that can be a decision point.
Let's add some logic to the Initial Review gate:
- At the Initial Review gate, add another next gate criteria set that uses the values of fields on the request called "Internal" and "Work Estimate". If internal is selected, and the work estimate is Feature sized, then the request skips to the Finance Team Review gate. If the request is not internal (meaning it is external), then the request flows next to the Security Team Review gate.
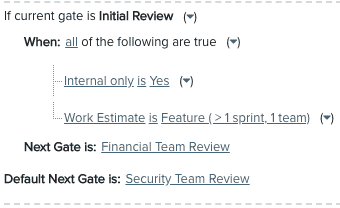
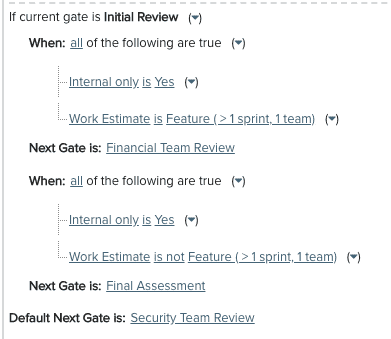
- You can add multiple sets of criteria to a gate. For example, if a request is Internal and the Work Estimate is feature sized, then you can skip the Security Review and go directly to Financial Team Review. Or, if the request is Internal but the Work Estimate is not feature sized, skip directly to Final Assessment. Basically, anything Internal skips the Security Team Review gate (note that is is the Default Next Gate - meaning if no criteria resolve to true, go to Security gate), but the Work Estimate determines whether or not a request lands at the Financial Team Review gate.
Lather, rinse, and repeat for additional gates. See Gate Skipping Examples for more variations on a theme.
Switching From Gate Skipping to Sequential Flow
If you need to switch back to sequential gate flow - for example, you need to reorder the gates, or you simply realize you don't need gate skipping - do the following:
- On Admin/Setup/All Entities/Requests/Categories, select the category whose gate flow you want to edit and in the Gates panel click the Edit Gate Skipping Logic button.
- (Optional) We recommend taking a screenshot of your gate skipping flow before you revert back to sequential, just in case you want to re-implement it.
- Click the Sequential radio button.
- Confirm your intent to discard gate skipping logic by clicking Switch, or change your mind and click Do Not Switch.
- Once you switch, use the Move Up/Move Down buttons to reorder the gates.
Deleting Gates included in Gate Skipping
- If any request category has one or more requests In Progress or On Hold, then you cannot delete any of that category's gates.
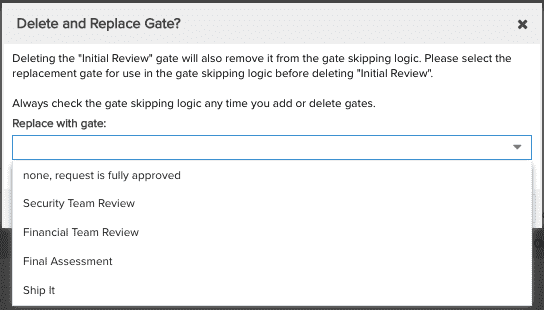
- If there are no requests In Progress or On Hold for a category, then any gate in that category can be deleted. If you delete a gate that is part of gate skipping logic, you will be prompted to select a replacement gate. Note that you should always check your gate skipping criteria after you delete/replace a gate as it will likely need some tweaking.
To delete a gate:
- Go to Admin/Setup/All Entities/Request/Categories and select the category for the gate(s) in question.
- Select the gate and click the Delete button or right-click and choose Delete from the context menu.
- Select a replacement gate or "none, request is approved".
 |
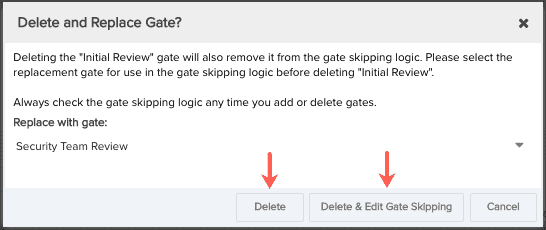 |
- Click Delete or Delete & Edit Gate Skipping, which will take you directly to the logic editor.
Adding Gates into a Gate Skipping Flow
You can add a gate at any time. Once you save a new gate you will be prompted to either place the new gate before a specific existing gate, or simply put it at the end of the flow. Regardless of where you place the gate, it will not be "connected" to the gate flow because it is new and no gate currently has it configured as the "Next Gate", and the new gate's Next Gate is set to "none, request is fully approved". It is recommended to use the Save & Edit Gate Skipping button.
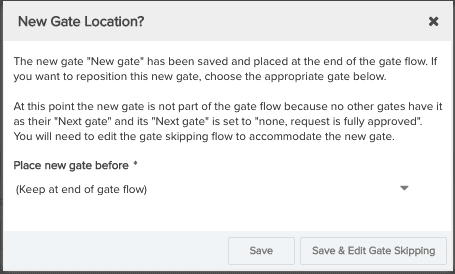
If you add a gate while a request is in flight, that request will traverse that new gate only if it is placed before a gate that the request has not yet reached (and if approval logic dictates that it reach that gate). If you place the new gate behind the request's current gate, any new request (entering the flow) will traverse the new gate, but the existing request(s) will not.
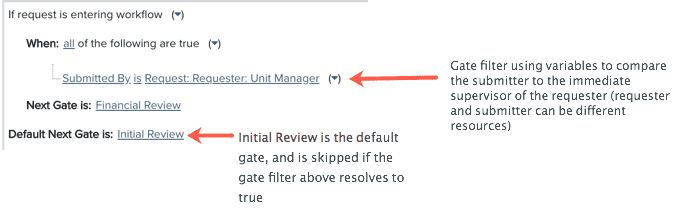
Using Variables in Gate Skipping Criteria
PPM Pro provides a set of variables for building gate skipping filters that are derived from resource attributes on the request. Variables let you build generic, dynamic statements rather than use hard-coded values.
For example, say your normal process includes an initial review by the unit manager of the requester. You can imagine a scenario where the unit manager submits the request on behalf of the requester - in this case, you want to have the request skip the Initial Review gate. You can configure this with variables, so the gate skipping is viable without using hard-coded values. The gate filter would look like the following: