
Configuring Gate Fields/Show on New
You can configure whether a field appears on the new request and its "state" - editable or read only, required or not, with a default value or not. With requests, you can additionally configure whether a field is visible/editable, required, and has a default at each gate. You can configure the fields/gates differently for each category. Using the 'Show' setting, you can specify if a field is viewable or editable to the user when creating a new request. In addition, each gate has a 'Show' setting you can use to specify if a field is viewable or editable on each gate. These restrictions can be different for each category's Details and gates. Note: when a request has a status of On Hold or Approved, only those fields configured to Show on New will be visible. Just something to keep in mind when designing your requests.
As with other entities, you can also create restrictions on request fields at the Available Fields level (apply to all categories). These restrictions limit/provide specific groups access to a field across all categories. See Creating Field Restrictions for Requests.
Note that if you have restrictions for a field at both the Available Fields and Details level, both restrictions will be evaluated, and the most restrictive setting will be enforced. For example, if an Available Field restriction gives the Admin group edit rights to field A, but a Details-level restriction limits a field to view only, then the field will be view only for all users. On the other hand, if a Details level restriction shows the field as editable, and an Available Fields restriction specifies that only members of the Admin group can edit the field, the field will be editable by the Admin group only.
Note also that if a field is configured as Required (or not required) at the Available Fields level, this serves as a template for when the field is first placed on a Details panel for a category. After you place the field on Details, any change you make back at the Available Fields level (such as making a required field NOT required), will NOT be reflected by the field on Details. If you remove the field from Detail and place it back again, the current Available Fields properties will apply.
You configure the gates on the Admin/Setup/All Entities/Requests/Details, as shown in the screenshot below. In the right-most pane, you'll see either two or three tabs: Variable Properties, Mappings, Other. You will see Mappings only if 1) the request category has at least one associated entity, and 2) there are fields in the associated entity that are of the same type as the selected field. Each tabbed section is described below.
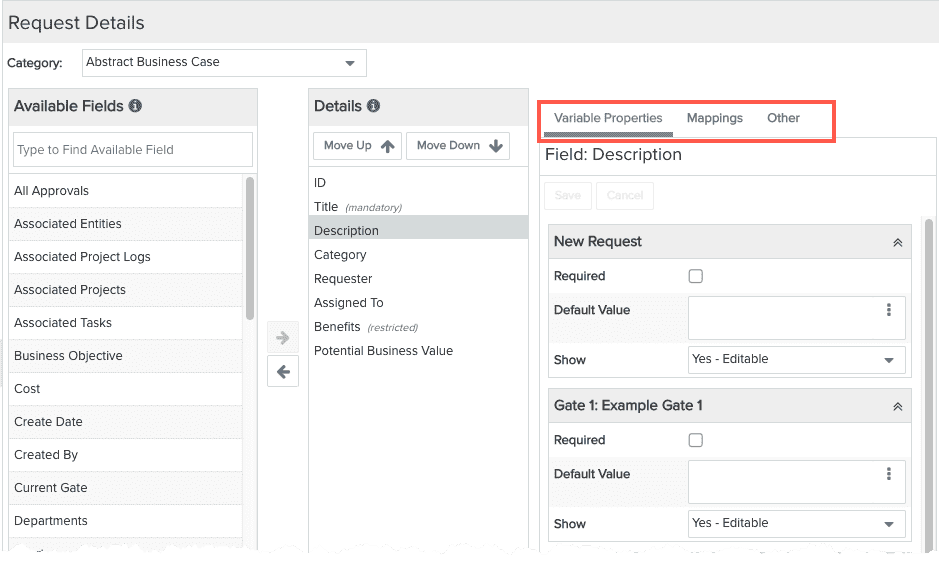
Variable Properties
Variable Properties is where you configure, per category, how a field is used on new requests and the request's gates (the "variable" part is the category). You select the category by choosing it from the Category droplist at the top-left of the request Details page.
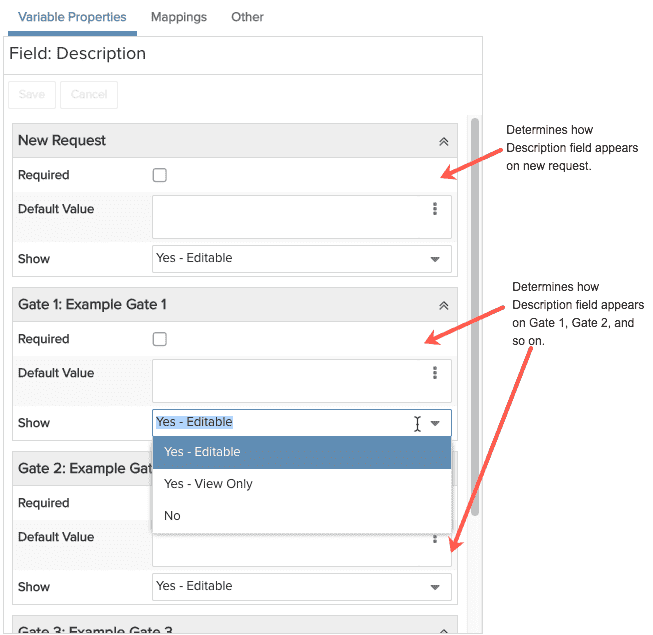
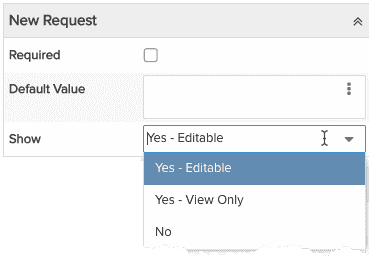
- There will always be one New Request section, which is where you configure whether the selected field should appear to the end user when they create the request, and if so, should it be editable or read only, required, or have a default.
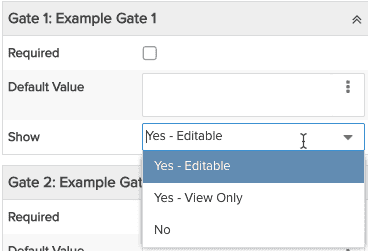
- You will see one or more gate sections - the number depends on how many gates you created - titled with a with the prefix "Gate <#>:" and the name you entered. This is where you configure whether the selected field should appear to the end user at that gate, and, if so, should it be editable or read only, required, or have a default.
- Note that the default value is only the initial value if none is provided. If you provide a default at one gate, it will carry forward to future gates. If a user were to remove a value at one gate and there was a default set at the next gate, then the default be applied. But any time a field has a value (whether the original default or some other a user changed to), defaults going forward do not apply. Note: the Requester field is a special field that behaves a little differently with regard to default values: the Requester field always populates with the request creator. Whether the Request is shown on Details or not, it will default in to the creator of the request, even if a default is specified.
Note: If you want a Group Header to appear only on specific gates, configure all the fields beneath the header, and the header will follow. For example, if you have a group header called Budget, and a field under it called Cost, configure Cost to be hidden for a gate and the header Budget will be hidden as well.
Mappings
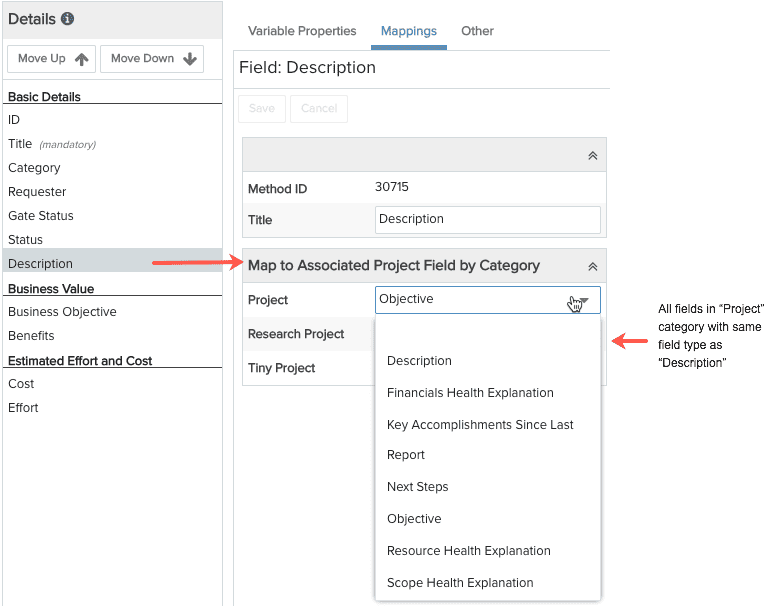
Mappings is where you set up relationships between gate fields and fields on the associated entity. For example, you might want to map the request Description field to the Objective field on projects using the "Project" category. The requirement is that the fields on both ends of the mapping must be of the exact same type. You can map the request field to any category configured for the associated entity - in the screenshot above, there are three project categories: Project, Research Project, and Tiny Project. There will be a section on the Mappings tab for each associated entity; the screenshot above illustrates a request that is associated with the project entity. If the category included task associations, then you would see another section labeled "Map to Associated Task Field by Category". You can associate requests with projects, tasks, and issues - remember that your request category must be configured to support the association types if you wish to have them in your requests (and likewise, each associated entity category should be configured to support request associations). Finally, the target field Show on New = Yes for new project creation, and editable when updating mappings).
Other
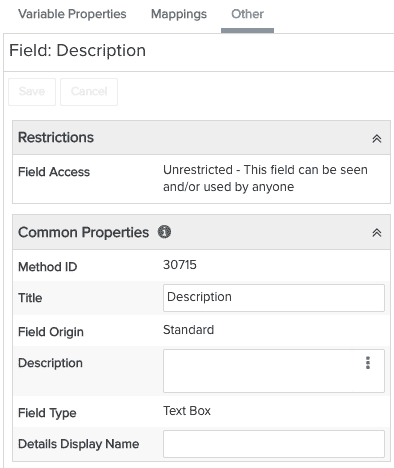
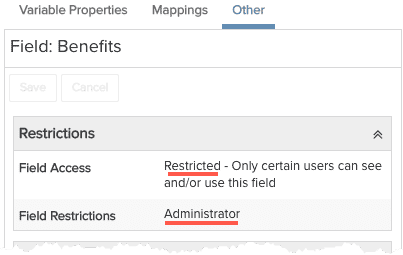
The Other tab displays elements that are common to the field across categories. You can add/edit the field description or modify the field title (both changes applied across categories), or use the "Details Display Name" field display name. The read-only Restrictions section displays restrictions placed on the selected field, if any, that were created at the Available Fields level (you'll see the name of the restricted group, but will have to click over the the Available Fields page to get more information).
 |
 |
Configure the Fields
- Create at least one gate, as described above.
- Navigate to the Details page for the request and select a field.
- Click the Variable Properties tab if it is not already selected.
- In the New Request section, indicate if the field should be required "on new" and if it has a default value.
- Configure how you want to the field to 'show on new'.
- For Gate 1, indicate if the field should be required for the gate and if it has a default value.
- Configure how you want the field to appear at that gate.
- Repeat for each gate.
- Click Save.
- (Optional) Click the Mappings tab if you want the user to be able to copy data from the request to associated entities. Only valid field options will be presented in the droplist. The request field and the field on the associated entity must be same field type.
- Click Save if you made any changes.
- (Optional) Click the Other tab view information about the field that is common across categories, such as the title and the field type. Any changes you make to fields on this tab are in effect for all categories.
- Click Save if you made any changes.