
Setting Up Data Streams, Calculation Details for Financial Metrics
Note: Users with Organization > Finances > Financial Summary Components > Edit permission can navigate to and edit the Organization/Financial Summary Components/General tab. This topic covers:
- how to set up the choosing default data streams for all financial summaries
- how to calculate EAC and ETC and set up NPV calculation parameters
See the Fields tab to Create Fields for the Financial Summary (Beta).
Overview
The financial summary structure displays financial information about a project. A data stream is a conduit of monetary values that feeds the fields on the financial summary structure. Each stream is derived from a different pool of financial data: Budget, Forecast, and Actuals. When you create fields for summary structures you will configure the relationship between the fields and the relevant data stream(s). See Creating Fields for the Financial Summary (Beta).
Data streams are selected at the Organization level so they are consistently available to all project financial summaries. You can choose to include one, two, or all three data streams. Any included data stream can be excluded at the individual project summary level; any data stream that is excluded here (at the Organization level) cannot be included at any project summary level.
Renaming Streams/Financial Entities
Note that the display name of each stream corresponds to the pool of financial data that is its source. You can change the Display Name of a data stream, and the new value will update all the instances that reference the same source across PPM Pro - labels, financial entries, calculations, and so on. For example, if you change the "Forecast" display name to "Planned", the financial Entries section will now display a "New Planned" button, instead of "New Forecast". You can play around with the labels, and can always change them back. If you don't see a change you expected after you save, try doing a browser refresh.
Choosing Default Data Streams for Summaries
The General tab is home to the available data streams that you can use in your organization's financial summary structures. While you can have multiple structures that can vary by project category, the data streams you select here can apply to all structures.
Which streams to include depends on the type of data you want to make available to your project managers and others responsible for and reviewing the financial health of your organization's projects. If you don't want to include budget information in any summary, then don't allow the Budget stream. If you want to include budget information on some summaries but not others, then include it and users can simply select to hide budget on individual project summaries as needed.
Check the Allow checkbox for any data stream you want made available for display in the Summary structure.
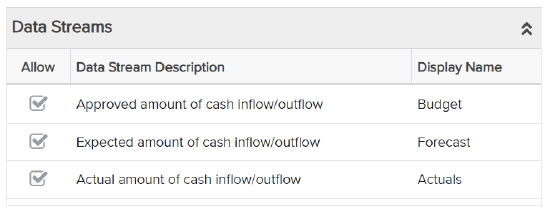
Once you allow the stream, it will be shown by default on your Summary structure - as mentioned above, you always have the option of hiding it whenever it suits your needs (can be toggled on/off). You can also select which streams are visible on a project-by-project basis by showing or hiding the streams in the Financial Summary settings for each project. See Working with the Financial Summary (Beta) for more details.
Calculation Details
You configure financial metric calculation details under the Organization/Financial Summary Components/General tab. What you select here are the defaults for new financial summaries and are automatically applied to any financial summary you create. You can override the defaults directly on any financial summary in the Calculations tab in the summary's Configure Settings dialog (Actions > Configure Settings). There you will be able to adjust the ETC and EAC calculations, and the NPV parameters. Any subsequent changes to the Organization-level settings will not impact existing financial summaries.
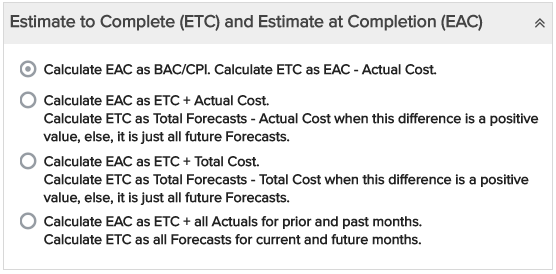
Setting Up Estimate at Complete (EAC), Estimate to Completion (ETC) Calculations
The screenshot below shows the section on Organization/Financials/General tab (or the Calculations tab in the project's Actions > Configure Settings dialog) where you configure how you want EAC and ETC to be calculated. PPM Pro offers some flexibility in how these automatic metrics are calculated.
- Select the top (1st) radio button if you want to use the standard PMI metric that is based on budget
- Select the middle (2nd) radio button if you want to use actual cost
- Select the bottom (3rd) radio button if you do have values recorded in the future and want them considered as a result of total forecast - actual cost
- Select the fourth (4th) radio button if you have values recorded in the future and want them all considered as forecasts
Choosing Net Present Value (NPV) Calculation Parameters
The screenshot below shows the section on Organization/Financials/General tab (or the Calculations tab in the project's Actions > Configure Settings dialog) where you configure the parameters around NPV.
- Cash flow start date - required
- Calculate for N months/years/quarters - required
- Discount rate - optional

Projects can have up to three separate NPV fields. NPV field titles can be configured in the Admin tab.
NOTE
Cash flow is never prorated based on the Cash flow start date. The calculation always considers the entire month, quarter, or year that the start date falls into. For example, if you specify a Cash flow start date of May 2, 2022, and Calculate for:
- 12 Months - the calculation will include May 2022 through April 2023, the initial investment period is May 2022
- 3 Quarters - the calculation will include Q2 (the quarter May 2022 falls into) starting with April 2022 through Q4 ending with December 2022, the initial investment period is Q2
- 4 Years - the calculation will include 2022 (the year May 2022 falls into) starting with January 2022 through December 2025, the initial investment period is 2022
What Next?
You can select data streams and other settings on the Generate tab and create summary structure fields in any order. If you haven't already, head over to the Fields tab to create your structure fields.