
Designing Details - Forecast and Actuals
Note: This topic applies to both the Admin/Setup/All Entities/Financial Entries/Forecast Details and Admin/Setup/All Entities/Financial Entries/Actuals Details pages. These pages/instructions are almost identical for forecasts and actuals, except there are a couple of fields that are available to forecasts or actuals, but not both.
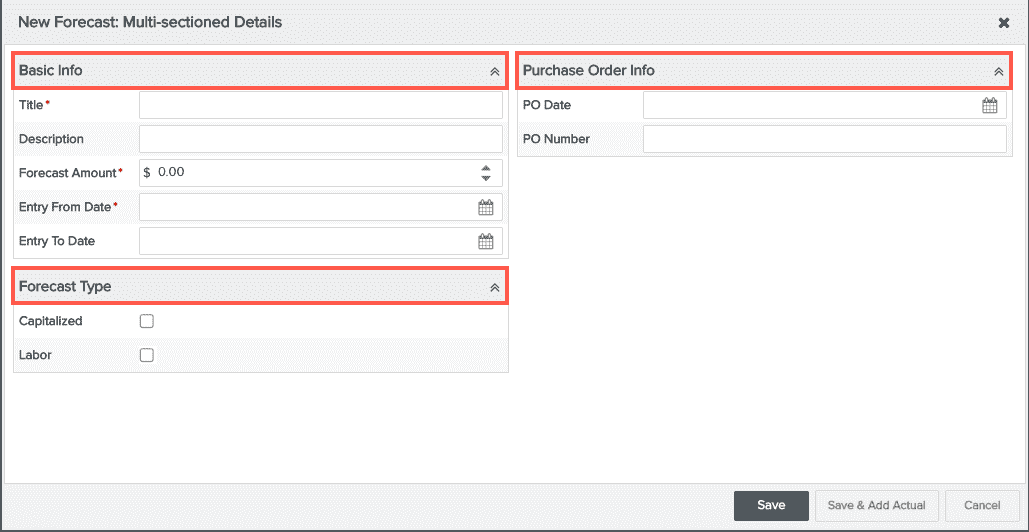
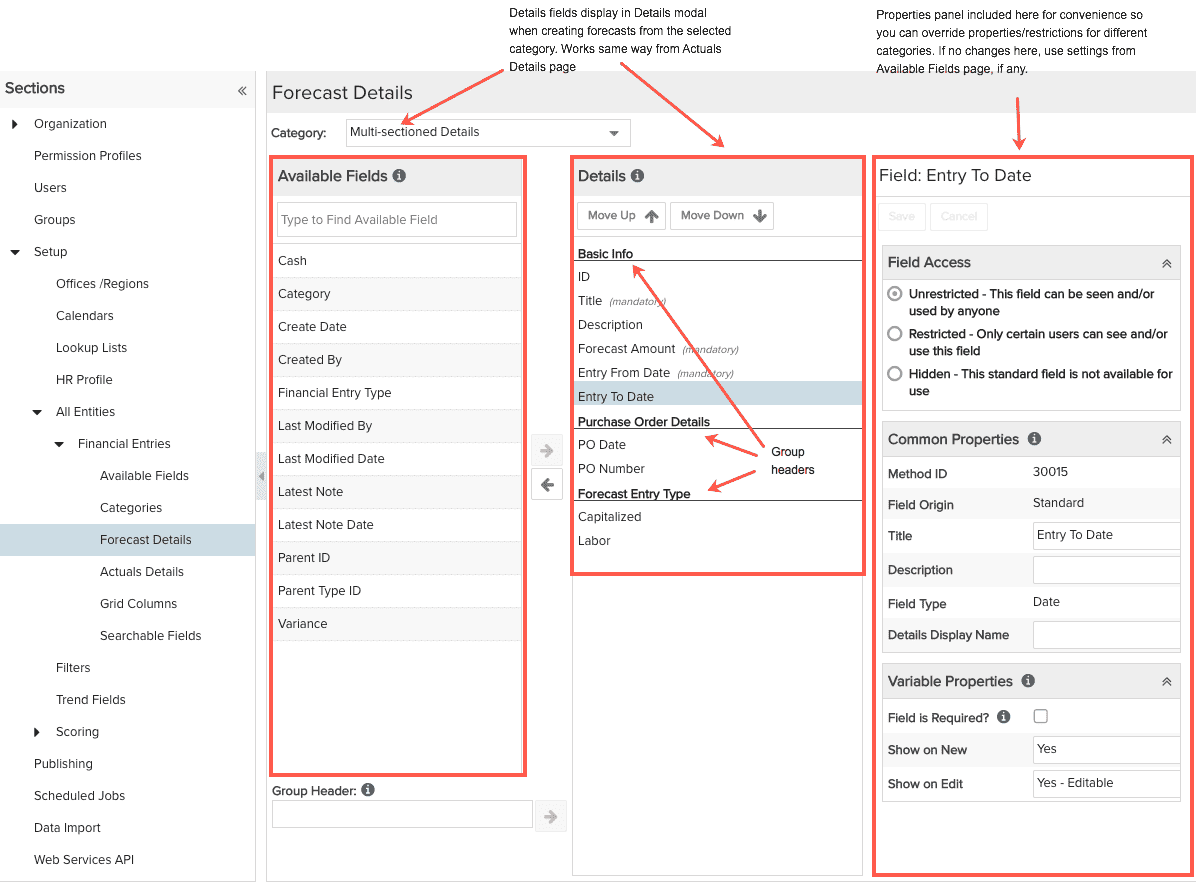
The Admin/Setup/All Entities/Financial Entries/Forecast Details and .../Actuals Details pages are where you determine the fields and layout of the Details modals that appear when you create/edit forecasts or actuals. You can create groups of fields, and add, remove, and rearrange fields in those groups. Each field has properties that you can configure, such as whether a field is required, or is visible or editable when you create a forecast or actual. Below is a screenshot of a Details modal for a forecast entry that includes three group headers (Basic Info, Purchase Order Info, Forecast Type) and their fields:
You choose the fields to display in the Details modal from the Available Fields panel. This list excludes any fields that were hidden on the Admin/Setup/All Entities/Financial Entries/Available Fields page.
When you build out your Details modals, you associate them with a category. This allows you to provide different combinations of Details fields for different categories. You pick the category you want to associate with the Details screen by choosing it from the Category droplist near the top of the screen. Note that if you have configured only one category, the droplist will be disabled. If you have multiple categories, select a category and then lay out the Details fields. You will configure a pair of Forecast and Actuals Details modals for each category.
Any restrictions you configured on the Available Fields page will apply to those fields on the Details page. You can override the restrictions or change them per category on the Details pages (Forecast and Actuals).
Understanding Details Layout
The layout for the Details modal is formed by the Group Headers and Fields you specify here on the Forecast Details and Actuals Details pages. As mentioned earlier, typically the Details modal will be different for each category (different fields included, different field groupings, for example).
If an end user customizes a Details modal, let's say by dragging/dropping a section to a different position, the changes will also be reflected in the Details modals of other forecasts with the same category.
Default Details Fields
The following fields will appear on any category's Details panel - you can customize as desired.
|
Default Forecast Detail Fields |
Default Actuals Detail Fields |
|---|---|
| ID | ID |
| Title (mandatory) | Title (mandatory) |
| Description | Description |
| Forecast Amount (mandatory) | Actuals Amount (mandatory) |
| From Date (mandatory) | From Date (mandatory) |
| To Date | To Date |
Placing Fields on the Details Panel
You can drag and drop fields from the Available Fields panel to the Details panel, or you can select a field in the Available Field panels and click the right arrow.
Note: The Capitalized and Labor standard fields can be added to forecast details only (see complete list of standard fields). The actuals will inherit their values from the associated forecast. If neither of these fields are used, the inflow/outflow are considered non-capitalized and non-labor.
Creating Group Headers
It's common to group like fields together on the Details panel. You can create headers for field groupings by entering the header text in the Group Header field and then clicking the right arrow.

Adjusting Field Order
You can move fields up/down by dragging and dropping, or selecting the field and clicking  .
.
Removing Fields
To remove a field from the Details, select the field and drag it back to the Available Fields panel, or click the left arrow.
Updating Fields
The PPM Pro administrator can update the fields at any time (even after deployment) by adding, removing, or reordering the fields on the Details panel. If your Innotas Administrator removes a field, the field will be removed from all users' Details panels. If the administrator adds a field, the field will appear for all users.
What's Next?
If you've got your categories and Details taken care of, it's time to configure the grid columns for your Financial Entries grid. See Laying Out the Grid Columns for Financial Entries.