
Resource Info
The resource's immediate supervisor and members of the Resource standard group can edit most information on this page. Members of the Admin standard group can edit user information.
The Resource Info screen contains details about the resource. To reach this screen, either click the photo/name in the resource menu at the top of the screen, or click the Resources navigation icon and double-click on the resource record in the All Resources list.
About Resources and Users
Resources can be created with or without associated users, however, only resources with an associated an active user are allowed to log time. When scheduling resources to tasks, it is important to note this difference because you will not capture actuals in PPM Pro for resources that do not have an associated user. If you plan to track Cost to Complete or Cost at Complete in your project financials, you should set the Internal Rate to 0 for any resources that do not have an associated user so that any estimated hours and/or HTC values do not get reflected in your project costs. See Finances Overview.
About Resource Info
From the Resource Info page you can perform several tasks (all initiated from the Menu), as described below:
|
Resource menu options |
Description |
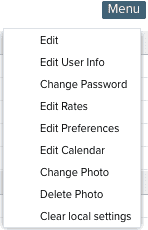 |
Edit - Edit basic resource information; see Resource Info field descriptions |
|
Edit User Info - Configure user settings, such as user type, timesheet activation date, whether the user is active/inactive, and more. This information is viewable by users, but only configurable by Admin users. See Creating Users. |
|
|
Edit Rates - The contents of the Edit Rates modal is variable and depends on what features your organization has enabled, and what permissions the current user has. You can access all content if:
The content varies depending on whether you use some or all of the features, or are member of a subset or all of the groups mentioned above.
For more information, see Updating the Rate for an Existing Resource. |
|
|
Edit Preferences - Individual users can set their own localization preferences for date and time fields, whether to display navigation icon labels, and UI skins. See Setting User Preferences. |
|
|
Change Password - Change your PPM Pro password. Only Admin users can change others' passwords. See Changing your password. |
|
|
Edit Calendar - Every resource in an organization uses a calendar to define working days and hours, as well as track events such as vacation, sick days, and personal days. See About Resource calendars. |
|
|
Change Photo - Allows you to upload a new photo. See How to Display a Resource Photo. |
|
|
Delete Photo - Deletes your resource photo. |
|
|
Clear local settings - Clears display preferences for the current user such as column order and sizing, sort order, and customized filters. Reverts to default settings. Note that this affects cosmetic settings only, and will not impact data. Clear local settings does not clear user-specific things such as locale preferences (timezone, country), bookmarks and recent items. |
Resource Info field descriptions
|
Resource Fields |
Description |
|---|---|
|
Resource Information |
|
|
ID |
Generated by PPM Pro |
|
Name: Last, First |
Resource Last Name, First Name |
|
Title |
The title or job position of the resource |
|
Division (formerly Business Unit) |
The Division under which the resource falls |
|
Type |
The kind of Resource. The resource types are defined by your system administrator. |
|
Unit |
The unit to which the resource belongs. Users with administrative privileges can reference Admin/Organization/Hierarchy. |
|
Unit Manager |
The resource who is the manager of the unit to which the resources belongs. See Adding Resources to Units for more information. |
|
Immediate Supervisor |
The supervisor of the resource. All direct reports will be available in the supervisor's Home/Resources. Supervisor can edit resource record, except for rate information (must be member of Resource group). |
|
Timesheet Approver |
Approves timesheets for the resource. If your organization is using 2-step approval (includes project manager), the Timesheet Approver gives final approval after all project entries have been approved by project owners/managers. Must be active user. |
|
Expense Approver |
Approves Expenses for the resource after they have been approved by all project owners. Must be active user. |
|
Primary Organization Role |
The Role that the resource normally performs on projects. Roles are configured in Admin/Organization/Roles. |
|
Effective Base Calendar |
The Organization calendar in effect for the resource. The calendar can be overridden at the project level. |
|
Can Edit Calendar |
This field allows the resource to edit the resource calendar, for example, to add a vacation. Can be set by the Immediate Supervisor. |
|
Capacity Multiplier |
Can be set by Resource standard group members only. Adjusts a resource's capacity. PPM Pro determines capacity from the resource calendar, and then multiplies it by the value in the Capacity Multiplier field. If you want a single resource to represent a team of 10 people (as far as capacity), you use 10 in the capacity multiplier. If you want to reduce capacity by 20% to account for administrative time, use .8 in the capacity multiplier. If you want a resource to have no capacity, use zero (0). You might also use zero if a person is in the system so they can approve requests, but they are never available to be scheduled to work. You don't want to inflate the capacity of that person's role or show this person as available when searching for a resource. |
|
Capacity Start Date (Hire Date) |
The date the Resource was hired and can have capacity. |
|
Termination Date |
The date the Resource ended employment with the organization. Starting on the termination date, the resource will not be able to log time and will have a capacity of zero (0). |
|
Last Modified Date |
The date of the most recent change to any editable field on the Basic Info screen. |
|
Address |
|
|
Office Information |
Select an office from the Office droplist. Any address and phone information associated with the office will be displayed when you select the office. You cannot enter this information separately. Contact your PPM Pro administrator if you need more information associated with an office. |
|
Daytime Contact Information |
|
|
Phone (work) |
Resource work phone number. |
|
Phone (mobile) |
Resource mobile phone number. |
|
|
Resource email address. |
| Disable Alerts |
Allows administrators to temporarily disable users' email and alerts. Enabling this feature will disable all email and alerts to a particular resource - Home/Alerts, timesheets, and so on - but not places where you type an actual email address like in the published dashboard notifications. The email field remains populated so you can disable the feature later and the email and alerts will become active again. Default = No (alerts are active) |
|
Alternate Resource |
Who to contact in case the Resource is unavailable. |
|
Alternate Timesheet Approver |
Certain resources in an organization have the responsibility to give final timesheet approval to a pool of resources. How many resources the final approver is responsible for is organization-dependent. To see the pool of resources the timesheet approver is responsible for, scroll down the approver's resource record to the section called "Timesheet Approver for the following Resources". That section contains the list of resources for whom the final approver approves timesheets. If you are a final timesheet approver and know that you will be unavailable to give final timesheet approval to the pool of resources assigned to you (because you are going on vacation, for example), you can specify an alternate resource to give final timesheet approval in your place. To set this up, navigate to your resource record (click your name in the top-right corner of your screen). Once on the Resource Info page, choose Menu > Edit and locate the Alternate Timesheet Approver field. Enter the name of the resource who will give final timesheet approval in your absence. Note that the alternate can approve your resources' timesheets, but no further delegation is supported. In WS API, the value is converted to Resource Name Last, First. |
|
Rates |
|
|
This rate is visible only to members of the Resource group. The internal rate determines how much a resource costs your company on an hourly basis. The value you see is derived from either an internal rate table, or a custom rate. |
|
|
Billable Rate |
Optional feature, contact your account manager for more information. The amount of revenue you estimate a resource generates for your company on an hourly basis. To edit the Billable rate for a single resource in the Edit Rates dialog, you must be a member of the Resource and Billable Rates groups. Note: If you bulk edit resource records from the All Resources page, you do not need to be in the Billable Rates group (but still need to be in the Resource group). This rate is visible only to members of the Resource an team. |
|
Normalize Cost |
Optional feature, enable/disable in Timesheet Settings by user in Admin group. Rate set by member of Resource group. Enable to allow companies to accurately calculate costs for hourly and salaried employees. Calculations are based on an hourly rate; however, salaried resources are paid a fixed amount per pay period, regardless of the hours worked. Normalizing costs ensures the hourly rate will be prorated up or down based on the number of hours the resource worked, keeping the cost of the resource the same. See Normalizing Costs for more information. |
|
Timesheet Period Cost |
Part of Normalize Cost feature, described above. The fixed pay period amount, used to normalize costs. For weekly timesheet cost, you would take annual salary divided by 52 to get this value. For bi-monthly timesheets, divide the annual salary by 24 and use that number. See Normalizing Costs for more information. |
|
Max Hours per Week |
This field is visible only if your organization uses weekly timesheets, has enabled the Limit Hours Logged per Week setting, and the current user is an Org team member, resource team member, or resource's immediate supervisor. The number of hours a user can log to a timesheet is limited to this value. A value of zero means no limit to hours. |
| Limit timesheet hours to working hours |
This field is visible only if your organization uses weekly timesheets, has enabled the Allow maximum hours logged per week to be limited setting, and the current user is an Org team member, resource team member, or resource's immediate supervisor. Limits the number of hours a user can enter daily to a timesheet to the working hours of the resource calendar (ignoring events).
|
|
User Information - these fields can be found under Menu > Edit User Info (must have Admin privileges) |
|
|
Active? |
Set to Yes if the user is active. Set to No to deactivate the user, but leave the user's record in the system. |
|
Admin? |
Enable to put the user in the Admin standard group, giving access to the Admin tab. |
|
Create Requests? |
Enable to give the user the ability to create requests. This only applies to Legacy requests; new Requests are controlled via permission profiles. |
|
User Type |
Choose the type of user to create:
See User Types/Permissions for more information. |
|
Timesheet Activation Date |
The date from which time sheets can be generated. Users must have an active timesheet to be able to log time against a task. Upon activation, four weeks of timesheets are created and are accessible from the user's Home/Timesheets tab. If your organization does not require PPM Pro timesheets, then we recommend that you do not set a Timesheet Activate Date. Otherwise, unnecessary timesheets will be generated. |