
Publishing Dashboards
This video demonstrates how to publish a dashboard. Duration: 7 min.
Overview
Once you get your dashboard looking the way you want it to, you can publish it, which means making the dashboard available by way of a URL. Note that a dashboard cannot be deleted while it is published.
You can do the following with published dashboards:
-
create a publishing schedule - updates and republishes the dashboard automatically on a specified schedule. You can additionally configure email alerts to notify one or more users when updates occur.
-
require an access code or an PPM Pro login for viewing
-
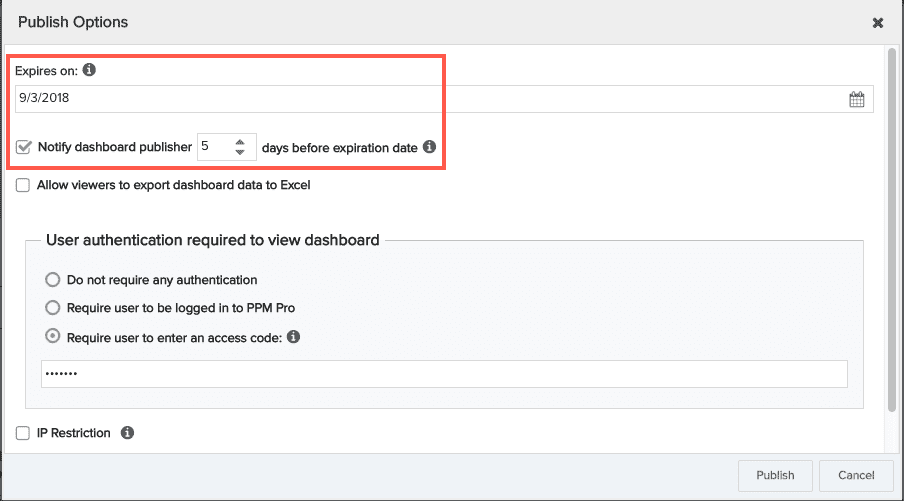
set expiration date for URL - often used in conjunction with an access code so that you are periodically reminded to reset the access code. By default, the URL will expire in 30 days.
Who Can Publish?
- To publish dashboards you must be a full user, a member of the Publishing standard group, AND have global Create Dashboards permission via a permissions profile. Best practice: the owner of the dashboard should publish the dashboard. Because the dashboard owner is not notified when another user publishes a dashboard, this might result in multiple versions of the same dashboard being published.
- To unpublish dashboards from the Admin/Publishing page, you must be a full or team user with administrative permissions. Note that these administrators cannot see/edit publish options, but can unpublish only.
- To unpublish the dashboard from the Dashboard list you must be the user who published the dashboard.
- To delete published dashboards you must be the owner or a user with administrative privileges. An informational message will explain that the system will first unpublish the dashboard and then delete it.
- To view schedules for all dashboards in your organization at Admin/Scheduled Jobs, must be user with administrative privileges. This page displays a list of all dashboards with a publishing schedule, showing the title, the last run date, the next run date, the expiration date, and who scheduled the dashboard.
To place a user on the Publishing standard group
- Navigate to Admin > Groups.
- Select the Publishing group and click Add and select the appropriate user(s).
- Save.
Dashboards and Indexing
Planview does not submit customer dashboards for search engine indexing and does not put the dashboard link on any public web pages. If the published dashboard does not require a password, it is technically possible for a search engine to index it. However, it is not likely that a search engine will locate the page unless the dashboard URL has been placed on some other public web page that is being indexed. As an extra precaution, you can require authentication to view the dashboard (see Publishing dashboards for more information about setting up authentication).
Managing All Published Dashboards
PPM Pro administrators and members of the Publishing standard group can view a list of all published dashboards under Admin/Publishing. Any dashboard can be unpublished from this screen. In addition, those users can also publish and unpublish dashboards from the Dashboards List screen.
You can add or change the access code, require a login to authenticate, or reset an expiration date by clicking the Published icon for the dashboard in the Dashboard List page and modifying the settings in Publish Options dialog.
Things to Know about Published Dashboards
- Dashboards must be run before they can be published.
- Any drilldowns on reports that are included in published dashboards will be visible to all users, and active for users who are logged in. If not logged in, the user will be prompted to do so upon clicking a drilldown link. (Note: drilldown links available only to full, team, and support users.)
- The URL for the published dashboard remains the same - you do not have to redistribute the URL after each update.
- You must set an expiration date to one year or less from the current date.
- Dashboards can only be scheduled to run outside of normal business hours (5pm - 7:30am in the current user's timezone).
- A dashboard might not run at the exact time specified. The specified time defines the earliest start time. Dashboards are queued, and those configured to run around that time will get picked up, depending number of jobs ahead in the queue. A dashboard will never be run before the specified time.
- If you configure an Access code, it can be any combination of up to 20 characters
- Use the Copy URL button or right-click menu option to copy the published dashboard URL without opening the dashboard.
How to Publish a Dashboard
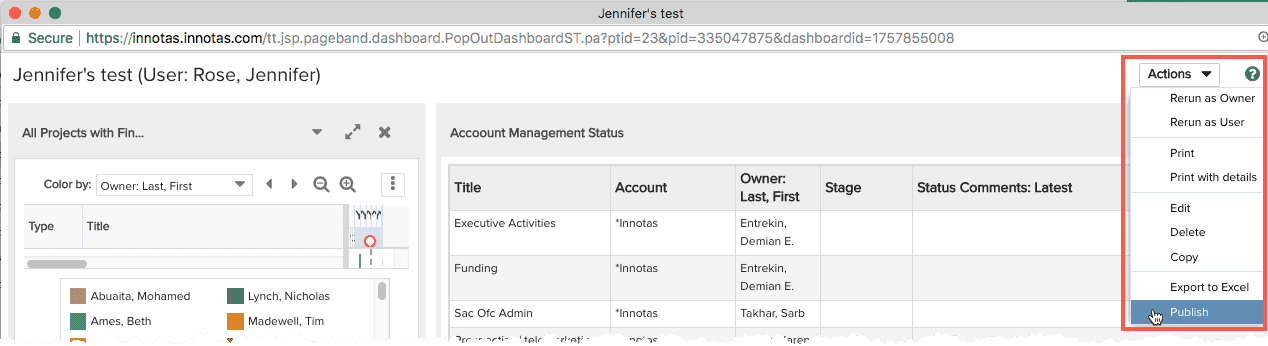
Full users who are members of the Publishing standard group and who have global Create Dashboards permission can invoke the Publish Options modal (or the Update Options for Published Dashboards) to configure and manage published dashboards. Note that you must first run the dashboard and then select Actions > Publish from the dashboard viewer, as shown below:
To publish a dashboard
View the dashboard you want to publish by selecting it in the Dashboard List and clicking Actions > View.
- In the Dashboard viewer, choose Actions > Publish, as shown below.
- (Optional) Configure authentication - the default is "Do not require any authentication" as shown below:
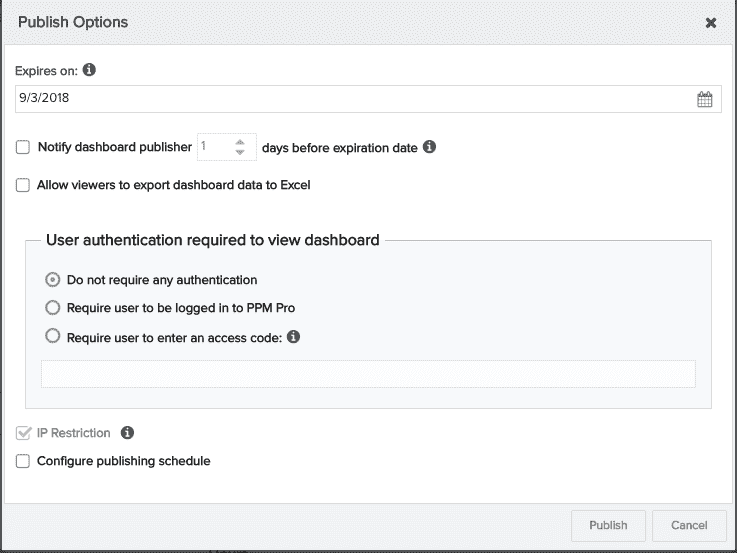
- (Optional) Set URL expiration date and notify publisher by enabled check box and entering the number of days head of expiration date to send alert.
- (Optional) Allow users to export dashboard data to Excel by enabling check box.
- To provide dashboard security, you can
- Require users to be logged into PPM Pro to view the dashboard - simply select that radio button
- Require users to specify an access code to view the dashboard.
- Configure IP restrictions.
See Configure Authentication for Published Dashboards.
- Set the date you want the URL to expire in the Expires on field. The date must be within one year of the current date.
- (Optional) Configure the system to notify the dashboard publisher prior to the expiration date.
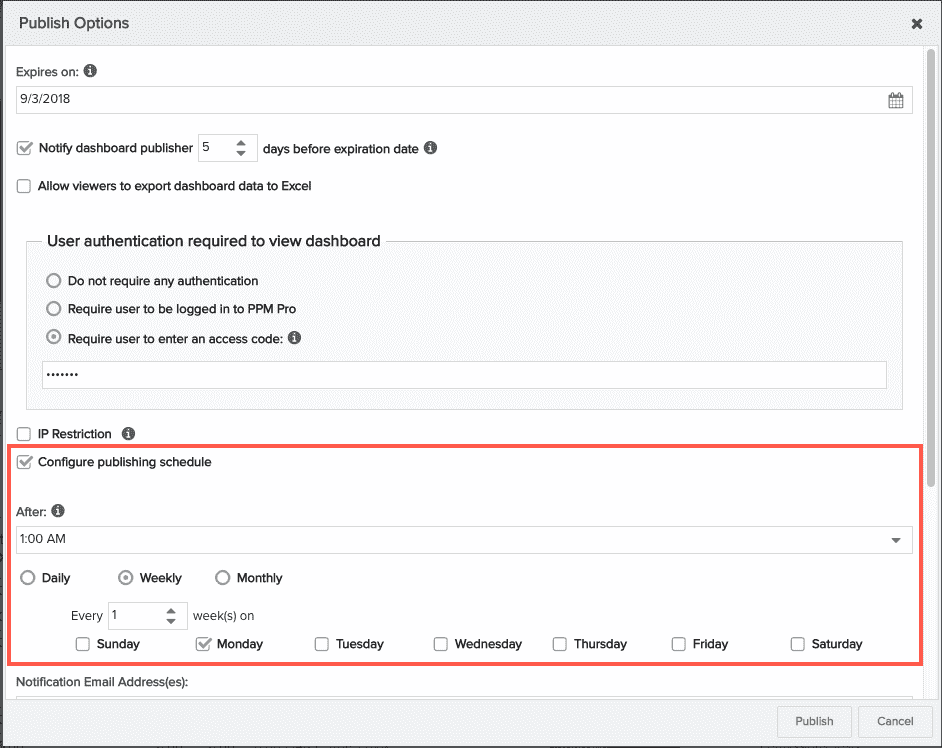
- (Optional) Configure the dashboard to republish on a regular schedule enabling the Configure publishing schedule check box and setting a schedule for repeated publishing (see above).
- (Optional) Enter custom alert text in the Email Subject and Email Message fields.
- Click Save.
To unpublish a dashboard
Note: Can be done only by user who published the dashboard. Admins can unpublish from Admin/Publishing.
- Navigate to the Dashboard List page.
- Select the dashboard you wish to unpublish and choose Actions > Unpublish.
- Click OK to dismiss the confirmation dialog.
Note: Users with administrative privileges can view a list of all published dashboards under Admin/Publishing. Any dashboard can be unpublished from that screen.
Exporting Published Dashboard Data to Excel
You can allow dashboard viewers to download data to Excel by enabling the checkbox next to Allow viewers to export dashboard data to Excel. This gives users access to the data without having to be logged into PPM Pro.

Configuring Published Dashboard Authentication
By default, no authentication is required to view a published dashboard - users can just click the URL. Note that if no authentication is required, this applies to the published dashboard itself, and not to drilldowns - users must be logged in to view drilldowns.
You can require authentication two ways:
a) Require users to be logged into PPM Pro to view the dashboard
b) Require users to specify an access code to view the dashboard. The access code can be any combination of up to 20 characters. You can reset the access code whenever you want.
Each of these options is configured by selecting the appropriate radio button. If you choose to require an access code, enter the code in the field that becomes editable after you select the access code option:
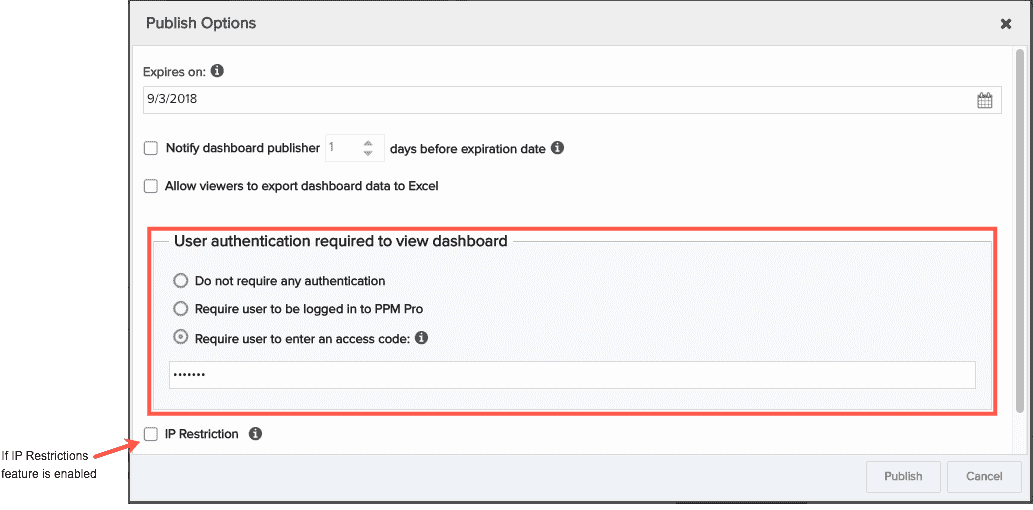
Configuring IP Restrictions
You can additionally require the user to log in from an IP address that falls within a range specified by your PPM Pro administrator. Note that your organization must be using the IP Address feature (enter a support case at customercare@planview.com if you are interested in enabling this feature). See IP Restrictions.
Setting URL Expiration Date and Notifying Publisher
You must set an expiration date for the dashboard URL that is no more than one year out from today's date. In addition, you can configure PPM Pro to send a notification in advance of the URL expiration date by checking the setting Notify dashboard publisher N days before expiration date. When this setting is checked, a notification email will be sent to the dashboard owner at the specified number of days prior to the dashboard expiring. You can update the expiration date at any time.
The email message body will be:
The dashboard <Dashboard Title> will expire in <n> days
Click the link to view publish details: <link>
Setting a Dashboard Publishing Schedule
You can optionally set up a publishing schedule along with optional alerts.
You can configure a publishing schedule for any dashboard. The schedule determines how often to rerun and republish the dashboard automatically, helping dashboard owners streamline their end of day, week, or month reporting. Remember that dashboards are a snapshot of data in time. If a dashboard is set to be published weekly, say, on Sunday at 7am, the data you're looking at on the following Wednesday was last updated then. To see current data, rerun the selected dashboard (provided you're a user with visibility rights to the dashboard).
Click the checkbox next to Configure publishing schedule (see screenshot below). Use the scheduling settings that appear to configure the publishing schedule.
Dashboard Publication Alerts
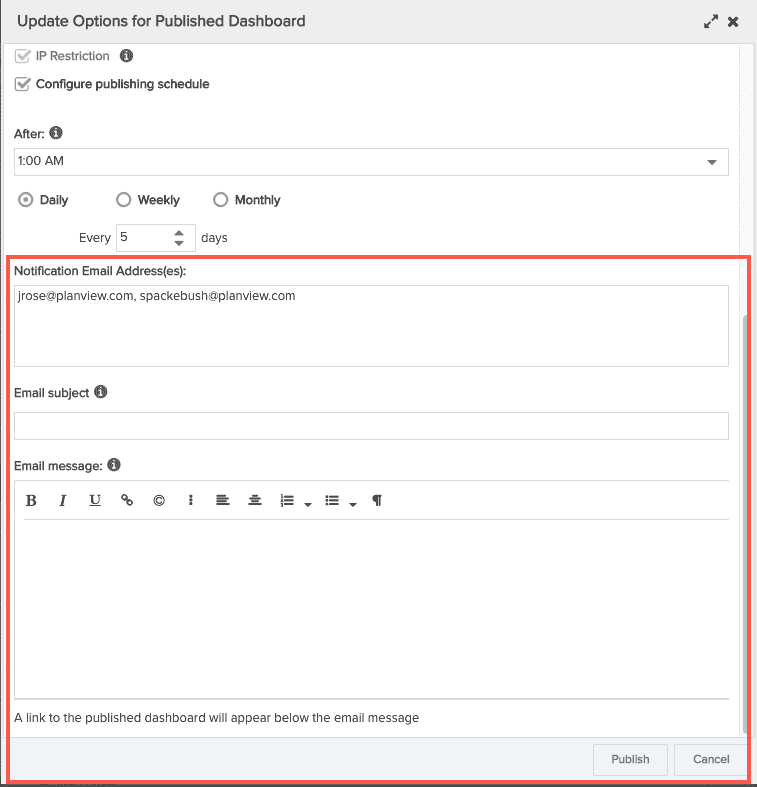
After you configure the publishing schedule, you can notify individual users each time the dashboard is re-published by entering their email addresses in the Notification Email Address(es) section; you can use a distribution list to notify a larger number of users, provided the list is configured for use outside of your company domain. Separate email addresses with comma(,) or semi-colon(;). List of email addresses cannot exceed 500 characters. Message maximum is 4000 characters. Create a custom subject/message using the Email Subject and Email Message fields, respectively; a link to the published dashboard will be included below the message. The message fields are disabled until at least one email address is entered.
The recipient(s) will receive an email notification each time the dashboard is automatically republished (alerts are not sent if the dashboard is manually republished). The sender should always be alerts@ppmpro.com. You can put this sender or the ppmpro.com domain on your allowlist.
Resetting the access code or expiration date
Note: Can be done only by the user who published the dashboard.
- Navigate to the Dashboard List page.
- Select the dashboard you wish to modify and click the Published
 icon .
 - In the Publish Options dialog that appears, enter a new access code and/or expiration date.
- Click Save.