
Ad-Hoc Filters
Ad-hoc filtering - available from entity list pages such as Task, Project, Resources, Portfolios, Reports, Dashboards, and Issues - allows you to quickly and easily configure filters for refining search results for the local page. These filters are called "ad-hoc" because you build them on-the-fly by combining saved filters, fields, and free-form text. As a convenience, you can save an ad-hoc filter if you think you will want to use it repeatedly.
Note: When setting up entities (such as tasks, projects, requests), remember that when you filter on free-form text, the system will only look at the fields you configured on the entity's Searchable Fields page in SSA. For more information see Configure Searchable Fields.
For more information see:
Anatomy of an Ad-hoc Filter
The ad-hoc filter facility appears in the title bar of the entity list view:

When the filter field is empty, as shown above, the implicit filter is Show All <items>, which in this example is Projects. According to the project count in the screenshot above, 129 projects are displayed on the Projects list.
You can build out filters by combining filter components, as described below.
Filter Components
You can build filters out the following elements:
 |
Note that ad-hoc filter menu contains a link to the Manage Filters interface, where you create and manage traditional filters. |

Filter Menu
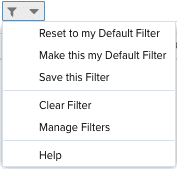
The Reset Filter combo-button to the right of the filter field contains a set of items for manipulating filters. Clicking the button invokes the first menu item - Reset to my Default Filter - and is provided as the default action as a convenience.
|
Ad-hoc Filter Menu |
Menu Item |
Description |
|---|---|---|
|
|
Reset Filter button |
Resets the filter contents to the default filter. If you have not specified a default filter, contents reset to My <items> (for example, My Resources). |
|
Reset Filter to my Default Filter |
You can explicitly choose this item or simply click the Reset Filter button to reset the filter definition to the default filter. Out of the box, My <items> is the default filter (for example, My Issues). It will remain the default filter until you explicitly set a new default using Make this my Default Filter. |
|
|
Make this my Default Filter |
Makes the current filter the default filter. |
|
|
Save this Filter |
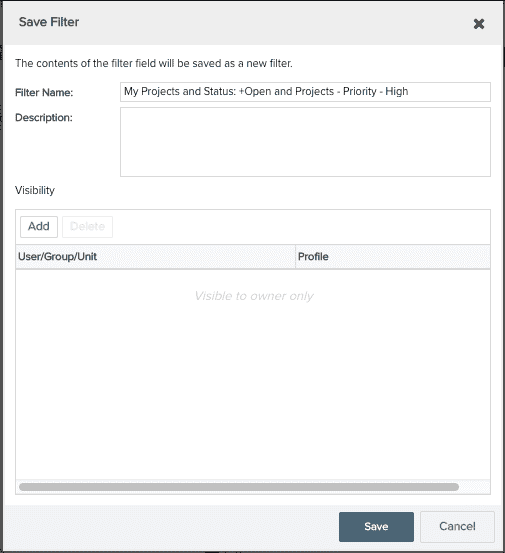
Saves the current elements into a filter. The Save Filter dialog allows you to name the filter, set the visibility, and add a description. |
|
|
Clear Filter |
Removes the entire filter field contents (selected filters and text entries). You can manually clear the filter by closing all the "pills" and deleting text. |
|
|
Manage filters |
Invokes the filter interface for creating/deleting and managing filters. |
Building Filters
To refine the search criteria, you can choose elements from Recent Saved Filters and Filterable Fields, and can optionally enter free-form text. You can string together several filters. As you add each component, the results list refreshes to match the current criteria. Note that if you delete all elements, the implicit search will not be performed until you escape out of the filter.
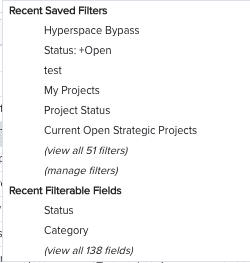
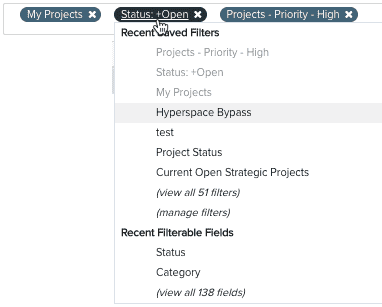
Recent saved filters and filterable fields are presented in "pills" (or sometimes called "capsules"), as shown below.

Free form text is not in a pill unless it matches a filter or filter field and you then select it from the menu.
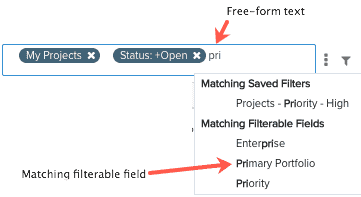
After you select the matching element, it appears in a pill, and the filter automatically presents the list of relevant comparison operators and values, as appropriate.
Setting a default filter for the entity
If there is a filter that you plan to use frequently, you can set it as the default filter for that entity by selecting Make this my Default Filter from the menu. Then you can quickly return to this filter by clicking the Reset Filter combo-button.
Using Date Tokens
Innotas supplies an extensive set of date tokens to use in conjunction with date fields:
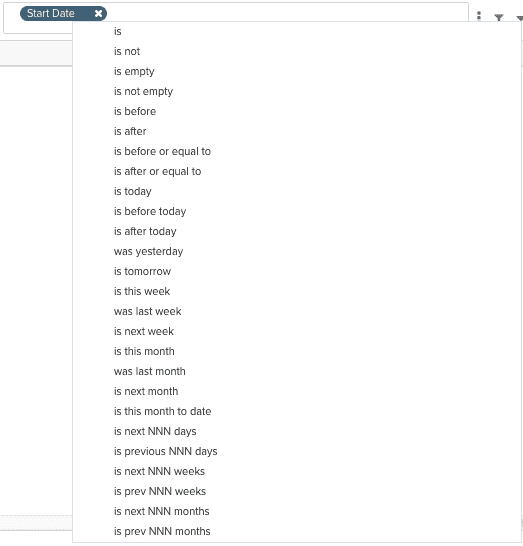
Note that Innotas considers a week to be Mon-Sun (regardless of your timesheet period), and year is Jan-Dec (regardless of your fiscal year setting) . So, for example, "this week" always starts on a Monday.
Saving Filters
You can save any ad-hoc filter by selecting Save this Filter. This brings up the Save Filter dialog, where you can name the filter and add a description. This filter will be available anywhere you access saved filters. Note that if you save a filter that uses another filter as a component, any changes made to the sub-filter will not affect the filter that contains it.
By default the filter is visible to the owner. You can share the filter with others or everyone at the point, or you can share with others later.
Deleting Filter Elements
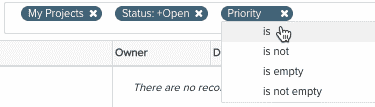
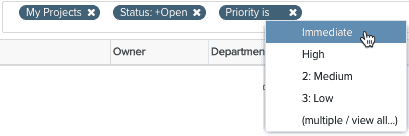
You can delete filter elements individually by clicking the Close icon on the pills or by backspacing over them, or delete the entire ad-hoc filter by choosing Clear Filter from the menu. You can also replace a pill by clicking on it and choosing a new component from the droplist, as shown below. To delete a saved filter you, click the (manage filters) link, locate the filter and click the Delete action.
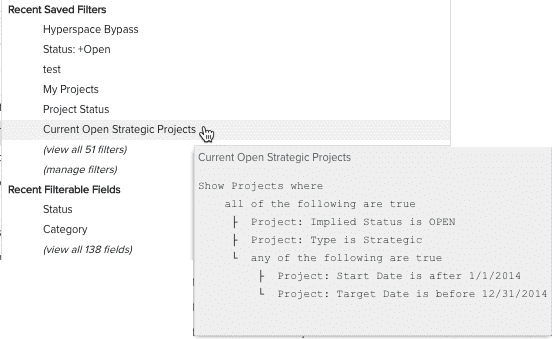
Viewing the Filter Definition
For all custom filters, you can hover your cursor over the "pill" to view the actual definition. For example, imagine you build a filter that uses the following elements:

You can save the filter and then view its definition:
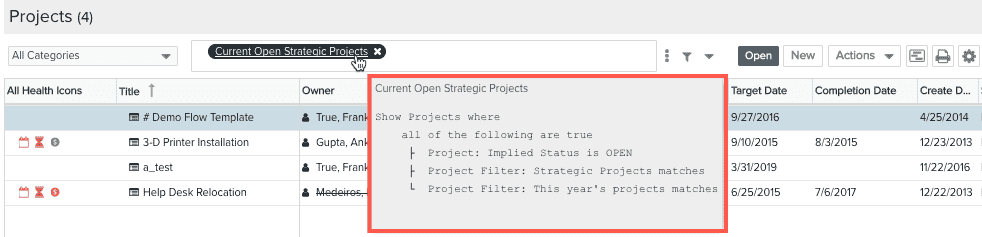
Note that you can view the definition of the individual elements as well (in the first screenshot), as long as they are custom.