Working with Tasks (Create, Edit...)
This topic describes how to perform common task functions in the Task view. Note that to use the features of this view you must be on the project team with the Project > Edit > Tasks permission. To delete tasks, you must have Project > Delete > Tasks permissions.
See the following topics for more information about managing tasks:
Copying Tasks within/between Projects
Creating Material Expense Estimates
Adding threaded notes to a task
Attaching documents and URL links to tasks
Associating tasks with issues or other tasks
Keyboard Shortcuts
The Scheduling view has a robust set of keyboard and toolbar shortcuts. Click here for the complete list, which you can print as a quick reference.
Creating Tasks
Users with Project > Edit Tasks permission can create tasks. If the project Tasks section is not available, contact your PPM Pro administrator and ask for permission to edit tasks. Many of the actions described below can be performed on a single task or a group of tasks - you can use the spreadsheet-style editor to create multiple tasks at once (referred to as "bulk new").
For best results, we recommend limiting the number of tasks per project to 1000.
Note: Task Owners can edit task Details, add attachments, notes, and adjust dates. However, only users with edit Project permission can make edits that change the structure of the project (Delete Task, Copy Task, Indent/Outdent Task).
Schedule From Date
When you create a new task, the task Start Date will be set to the project’s Schedule From Date. If your plans change and you want to start the project on a different date, simply change the project’s Schedule From Date, or from the Tasks lists choose Actions > Schedule From... and select a new date. Note that only automatically scheduled tasks and tasks without constraints are shifted. Manually scheduled tasks and tasks with constraints must be adjusted by hand.
Task Sequencing
As you create, delete, move, schedule, indent, and outdent tasks, PPM Pro automatically sets the Task # field sequentially to give you a column for sorting based on how you built the hierarchy. The Outline number is also automatically updated to show both the sequence and the location in the hierarchy.
Both fields are available in task-related filters and report sources.
Creating a single task
- Navigate to MyProject/Tasks and choose New.
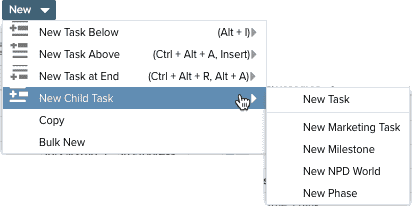
- Pick the desired location for the task. If your organization has set up multiple task types (or categories), you will see them in a sub-menu, as shown in the screenshot below. In this example, there are four task types: New Marketing Tasks, New Milestone, New NPD World, New Phase.
Note: The default task category is configured by your administrator and will be the first category in the New Task menu. Note that there is a project setting called Default Task Category that can override the value set by your administrator.
- Fill in all applicable fields in the task Details panel (make sure you are displaying the Details view).
- The default task Start Date is set to the project’s Schedule From Date and the task Target Date will be set based on the default task Duration of one day and a Constraint Type of As Soon As Possible.
- Budget Revenue is used to designate the Fixed Bid (FB) or Not to Exceed (NTE) amount for those tasks that use FB or NTE billing type
- Click Save when you are done. See Filtering Tasks for information about the ad-hoc filter and how it works with new/edited tasks.
Creating Multiple Tasks
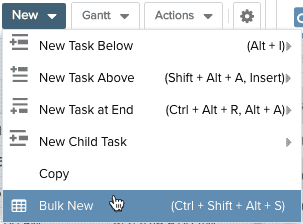
You can create batches of tasks using the spreadsheet style editor. Navigate to MyProject/Tasks and either open the editor from Actions > Spreadsheet Edit, or New > Bulk New.
The spreadsheet-style editor opens. See Using the Spreadsheet-Style Editor.
Editing one Task at a Time
- Navigate to MyProject/Tasks.
- Select a task from the list and choose the Details tab and edit there, or double-click on the task record and edit fields inline.
- Click Save.
Editing Multiple Tasks
- Navigate to MyProject/Tasks.
- Select a tasks from the list and choose the Actions > Bulk Edit. See Bulk Editing.
- Click Save.
Deleting Tasks
Note the following:
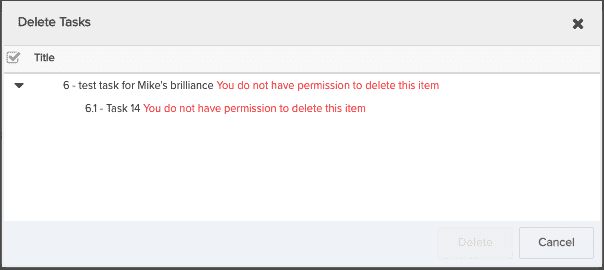
- You need the appropriate permission to delete tasks (Project > Delete > Tasks).
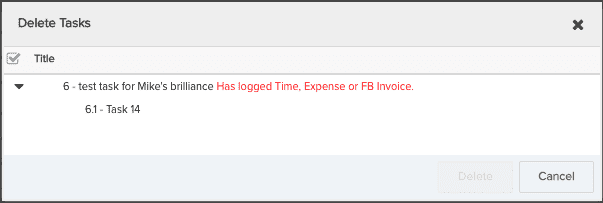
- Tasks with timesheet actuals or expenses recorded against them cannot be deleted.
- Tasks with schedules can be deleted (schedule deleted as well).
- Navigate to MyProject/Tasks.
- Select the task to delete and choose Actions > Delete.
- Click Delete. If the Delete button is not active, then you do not have permission to delete the selected task(s), or actuals/expenses, fixed bid invoices have been recorded against the task.