
Create a Community
Overview
Creating a community space inside of Planview IdeaPlace is easy with the Community Creation Wizard, which unifies the process into a single page, instead of a multi-step process. This mirrors the experience of challenge creation.
NOTE
You need Super Administrator access to be able to create a community.
How it Works
The Community Wizard includes the following options:
- URL creator* - Matches the new URL structure (below).
|
URL/Address Type |
Original URL |
New URL |
|
IdeaPlace Instance |
customer.spigit.com |
|
|
Community |
customer.spigit.com/community |
|
|
Challenge |
customer.spigit.com/challenge |
- Make Child of - Offers a way to structure the community hierarchy within your instance.
- Inherit Theme - Copies down the visual theme (branding) from a preexisting template.
- Inherit Site Configuration - Copies down ALL configurations from a preexisting template.
- Community Access - Standard access options.
- Community Title* - Title that displays in the Manage Sites section and the browser tab.
- Community Tags - An option to tag the community for types that appear in the Community Attributes section.
(Fields with an asterisk * in the title are required fields.)
How to Create a Community
1. On the Administration page click General Settings > Create Community.
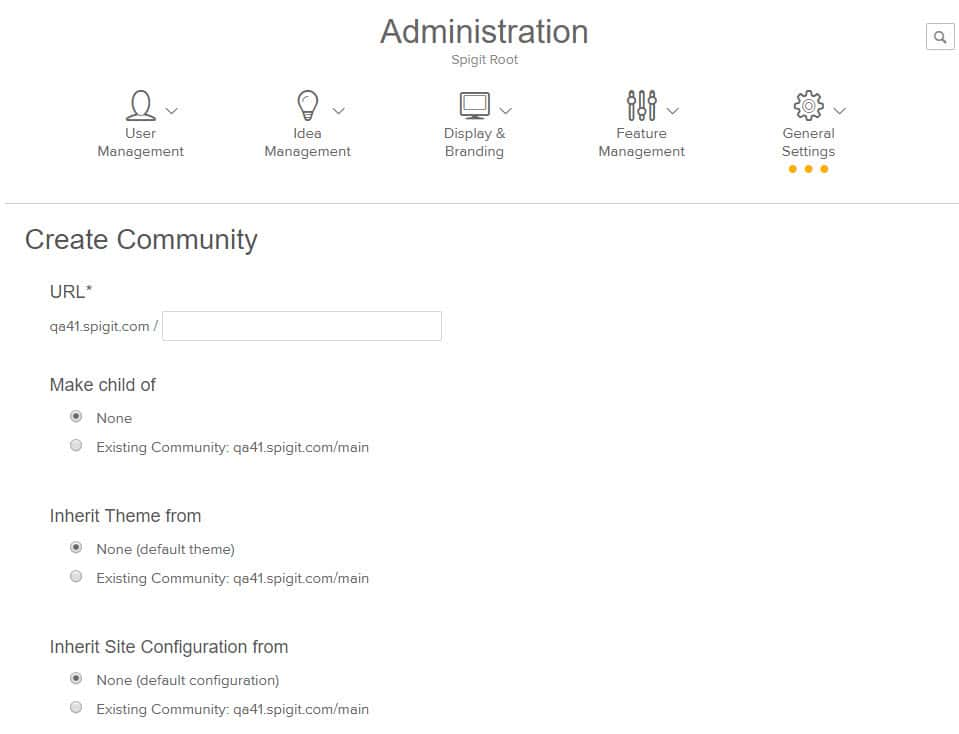
2. Select the configurations you would like for your community.
3. Click the Create Community button. You will be taken to the Activity Stream of the newly created community.
Below, the community settings are described:
|
Element |
Definition |
Option |
|---|---|---|
|
Restore Configurations |
Restore site's previously saved configurations.
WARNING Careful thought should be given to using this utility, as it will restore the parent community as well as all sub-communities!
(Under Administration > General Settings) |
 |
|
Make child of |
Select a parent community for which this community will be a child. If you don't make a selection, the new community will be a child of the community you are in. (Under Administration > General Settings > Create Community) |
 |
|
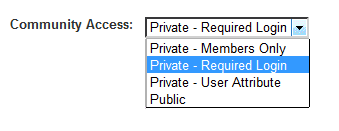
Community Access
|
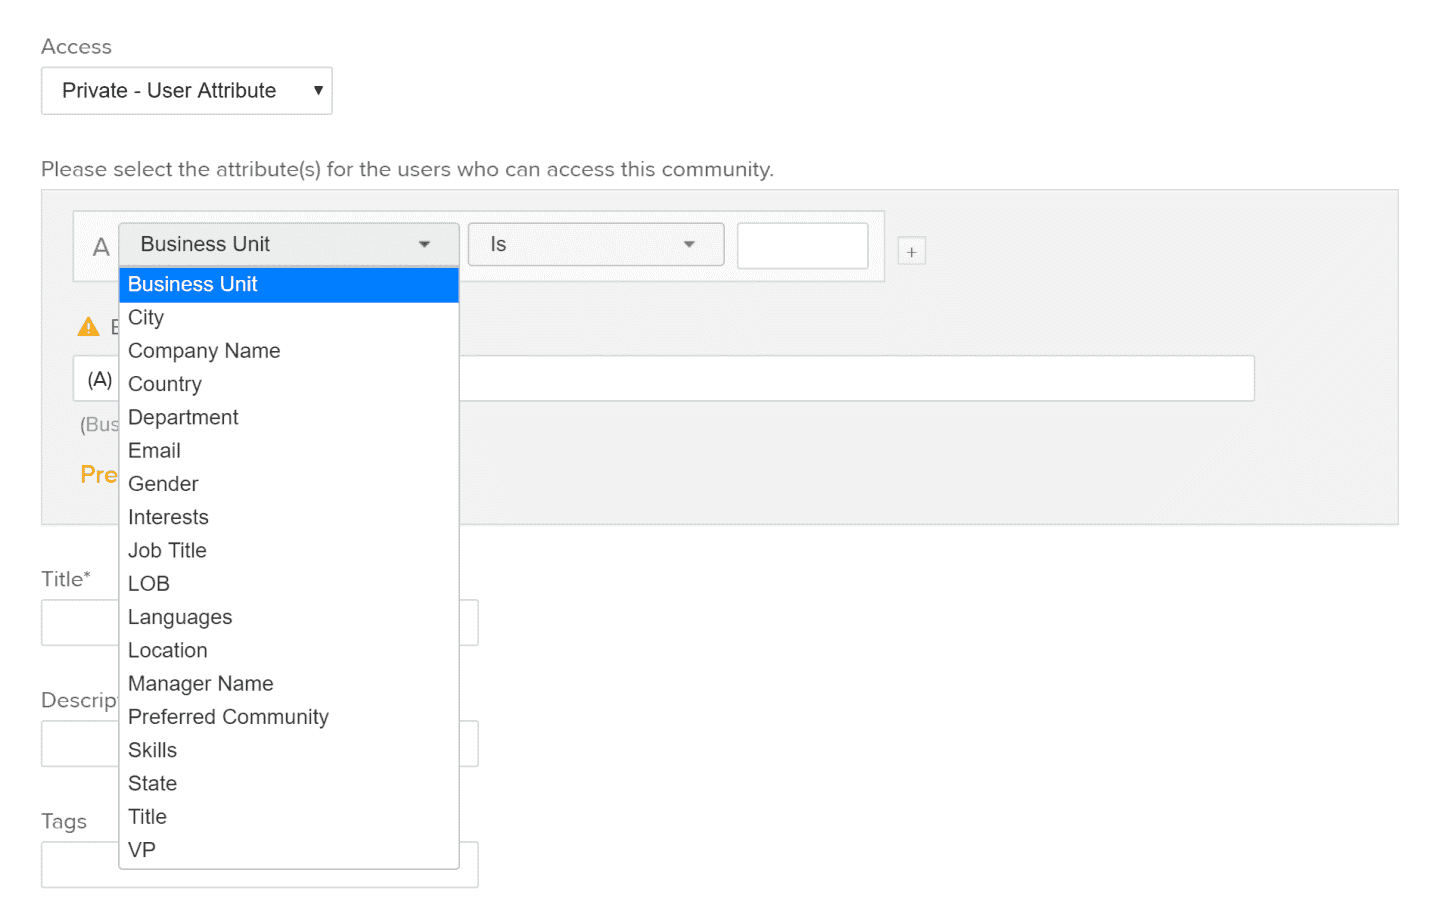
Public: When a site is set to public, the user profiles will not be accessible until a user has signed into the site. An individual must register to post content. Registration can be restricted to a specific email domain, such as @spigit.com. This option appears only in non-SSO instances. Private-require login: Community is private and users must log in before viewing content. This setting is best if you have many communities and want all users to have access to all communities. Private-members only: The community is private and users must log in before viewing community content. Community access must be specifically granted to users. This setting is best if you have multiple communities, and you would like to restrict community access to certain users. Private – User Attribute: The community is private and users are restricted by an attribute in their profile that is also stored in the database. (Under Administrationn > General Settings > Create Community, and after community creation, under Administration > General Settings > Setup Settings. See second screen shot to right for the dropdown of attributes to select from.)
NOTE The number of allowed user attributes used to control access to the site (i.e., email, password, title, department) is limited to 78.
|
|
|
Community Title
|
The community name that will appear on the Sites widget and on the Communities page. Also the default title for the page that appears in the browser title bar, although this can be overridden on a per page basis in the Site Editor. If empty, default community title is used. (Under Administration > General Settings > Create Community) |
|
|
Community Description |
Specify community description. If not specified, the default community description is used. (Under Administration > General Settings > Create Community) |
|
|
Community Tags |
Specify community tags. If not specified, the default community tags are used. (Under Administration > General Settings > Create Community) |
 |


- The following article will give you a comparison between challenges and communities: Challenge versus Community
- Click here for IdeaPlace System Architecture considerations.
- Last, the attached Copy from Community spreadsheet will provide some supporting documentation.
NOTE
When trying to change the parent community of a challenge, a community may appear hidden when it is not hidden. This may happen because access to the community is restricted using the user attribute setting and your account (even Planview IdeaPlace Administrators) may not have the required attributes to access the site. Access to the community can be changed and the parent of the challenge changed and then access set back to the original, or your account can be given the user attribute value necessary for access.