
Languages
Introduction
Language settings enable Administrators to quickly change the application language of their challenge. There are two types of content in each challenge: application labels and strings, and user-generated content such as ideas and comments. IdeaPlace language settings will only apply to application labels and strings (widget titles and button names). Any user-generated content will not be impacted. Out of the box, IdeaPlace supports: English (United States), French (France), Spanish (Latin America), Spanish (Spain), Japanese (Japan), Portuguese (Brazil), Chinese (China), German (Germany), Polish (Poland), and English (United Kingdom). If one of these languages is not what you need, you can import any custom language you desire. In addition, you can modify existing language files. We will show you how.
How it works
A language file can be manually edited to create a new language file for a IdeaPlace-supported language or to update an existing language for either a Standard or a customized standard language. This is done with IdeaPlace's Language Development Kit (LDK).
For example, Client A may want to run a challenge in the Czech Republic. The Czech language file can be created and added to any challenge.
OR
Client B may want to change a few terms throughout the challenge or instance in an existing article such as: changing the term "idea" to "project".
Once a new language has been edited or added to a challenge, the administrator can choose the challenge default and also decide whether users can select a new language.
NOTE
This will only change application labels and strings.
Administrators can make language changes through the Administration interface or the inline editor option. (See below for details.)
How to Select the new Languages
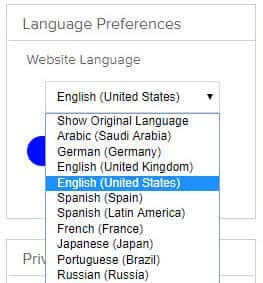
Once an administrator has uploaded or edited a custom language, they will need to set it as the default in the new challenge by navigating to the challenge and selecting it from the languages configuration page. Users will then have the option of selecting the language from their My Profile page in the languages widget.
Language Editor and Variable Updates
Application labels in your IdeaPlace site consist of strings that contain Names that function as application variables, and string text. Names represent special words that are used in multiple places throughout the site and are treated as variables so multiple occurrences can be updated through a single change. For example, “idea” is a special Name that is commonly changed to ''solution" throughout the site.
When using the Language Editor, Names appear in brackets to indicate the variable syntax, for example [idea].
Administrators and SuperAdministrators can customize language translations by entering Edit mode and clicking a string. Strings are highlighted in a green square. Only one Super Administrator can perform edits at any given time. Multiple simultaneous users of the Language Editor on a site is not supported.
The string text and Names are updated through the edit options. Although both string text and Names are displayed together, they are updated independently of each other. String text changes are applied to all occurrences of the string in the current community or all communities. Names are updated for only the current occurrence, all occurrences in the current community, or all occurrences in all communities.
NOTE
When making Name updates, confirm the correct setting before applying the change. Also, each Name must be updated separately from the text and from other Names.
Because string text and Name changes are updated independently, it is recommended to make Name changes first and then apply the string text changes. Be sure to check the current page and other pages to ensure the proper updates have been made.
How to use the Language Editor
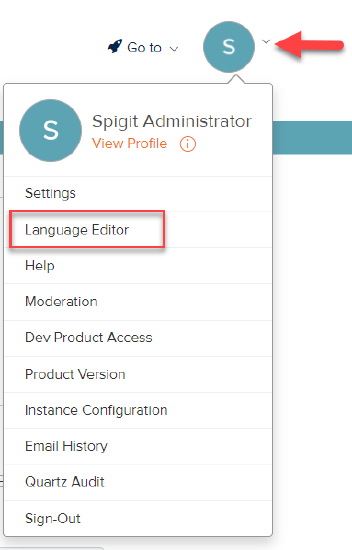
1. On the Administrator Profile dropdown menu, select Language Editor.
2. Editable text appears highlighted. Application variables appear in brackets, for example [idea].
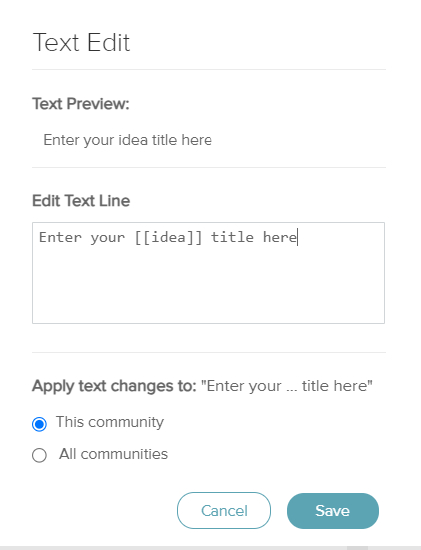
3. Click the highlighted text to open the Text Edit dialog for that string. For Names, click the Name or variable in the brackets [ ] to display the update options. Names can also be moved by dragging and dropping the Name to the desired location in the string.
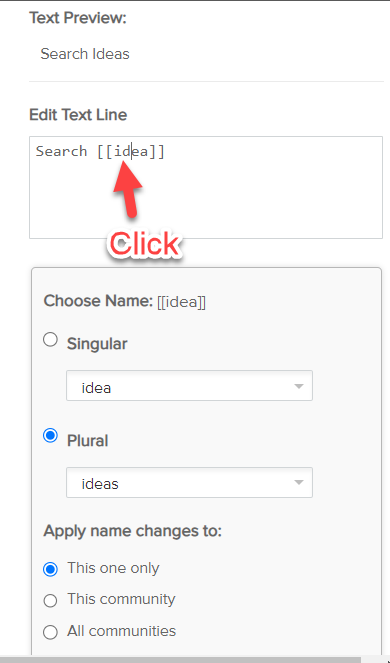
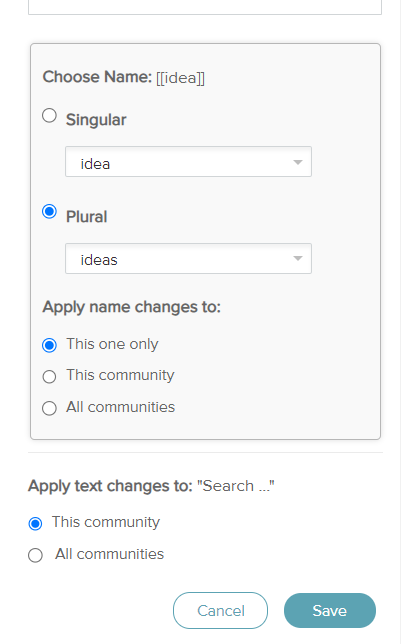
4. Click on the text in the brackets to show the Singular/Plural drop-downs. Use the Singular and Plural drop-downs to select an existing variable value. To add a new value, click Add New in either the Singular or Plural drop-down. If you add a new singular name, you must add the equivalent plural name (and vice versa) so that the correct singular and plural versions of the word are applied to difference contexts throughout the site.
Use the radio buttons next to the words “Singular” and “Plural” to confirm which name should be used in the context you are editing.
Be careful not to remove or delete the brackets surrounding the variable. Removing one or more brackets will convert that variable to text. On rare occasions, variables can be replaced with text if that level of customization is required.
Any required variable punctuation, such as apostrophes should go outside the brackets, for example [user]’s.
NOTE
Adding quotes in an entry is not recommended. It will cause the field labels to display on the page. If you do add them, you can fix the issue by using the xliff file to remove the quotes and re-upload the file.
5. Specify where the changes are to be applied.
WARNING
Applying Name changes to All Communities may create inconsistencies in other strings that use the same Name, in a different context, or with a different modifier or article.
| Variable Changes | |
|---|---|
| Only This Use of This Name |
Applies the changes to this Name to only this occurrence of the Name or variable. |
| This Community |
Applies the changes to this Name to all occurrences of this Name or variable in the current community.
NOTE Custom versions of the variable may also need to be updated as separate variables.
|
| All Communities |
Applies the changes to this Name to all occurrences of this Name or variable in the current community and all other communities.
NOTE Custom versions of the variable may also need to be updated as separate variables.
|
Changes are stored in the custom language file for the language you are editing. The custom language file may be saved to back up your changes.
6. Update the string text as desired and apply the changes.

| Text Changes | Description |
|---|---|
| This Community | Applies text changes to every occurrence of this string in the current community. |
| All Communities | Applies text changes to every occurrence of this string in the current community and all other communities. |
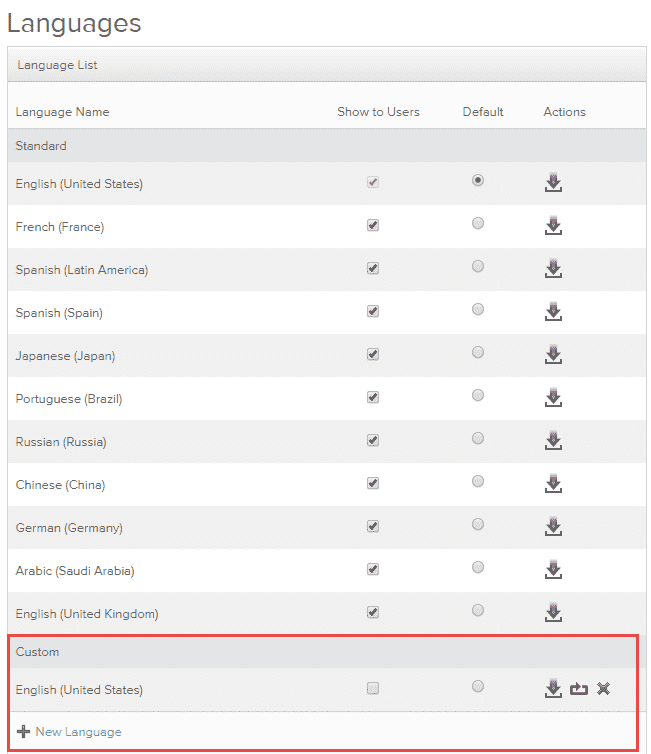
If you are modifying a specific language (i.e., English) for the first time using the Language Editor, the edited language will be displayed in the Languages Setting panel as a new custom language. (See bottom of Languages page below.) You can navigate to this page via Administration > General Settings > Languages.
How to Create and Update Language Files
Customized translations can be done by saving a language file, manually updating the language file content, or deleting the current custom version of the language file and then importing the file as a new custom language file.
Custom language files can be uploaded to the root community and propagated to the other communities. Super Administrator privilege is required.
While Super Administrator access is required to perform language edits and create new custom languages, Administrators can set the default language that is available to members in the communities for which they have access.
The following video will show you just how easy it is to create your own custom language file.
Below is a video for creating a custom language file:
After you customize a language file, you can make the new, custom language the default, as was shown in the previous video or offer users the ability to choose which language they want. Users choose among available languages on their Profile page in the Language Preferences widget.
How to update a language file
-
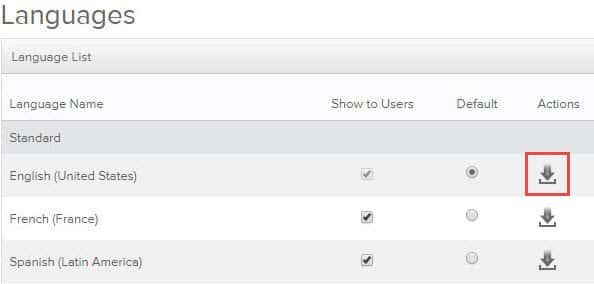
On the Administration page, click General Settings > Languages.
-
To export a base language file, select the icon under Actions for a language file, and save the file to the desired location.
NOTE
In order to do this, you need to be in your parent community, i.e., main.internal.spigit.com or www.internal.spigit.com
If creating a new custom language, save the file with a filename that contains the language code or abbreviation for the new language. The new language must be one of the supported languages. Check with your Community Manager for more information about additional language support.
Available Languages
The following language locales are available in the Languages Page. * indicates a Standard language (Tier 1). Standard languages are supported for string appearance and readability. Non-Standard languages (Tier 2) are available, but not supported, as string appearance and readability may vary. Use of non-standard languages is independent of IdeaPlace feature support. Tier 2 is essentially a language created and supported by the customer. IdeaPlace only provides the vehicle to load them. The client is responsible for maintenance and troubleshooting of Tier 2 files. IdeaPlace support will assist where possible, but translation services that are managed and provided on the client side remain the client's responsibility for the integrity of the file.
|
* Standard Languages (Tier 1) |
Non-Standard Languages (Tier 2) |
| Chinese (China) zh_CN | Arabic (Saudi Arabia) ar_SA |
| English United States en_US | Belarusian be_BY |
|
English United Kingdom en_GB |
Chinese Simplified (Singapore) zh_SG |
|
French Continental fr_FR |
Dutch (Netherlands) nl_NL |
|
German de_DE |
Hebrew iw_IL |
|
Japanese ja_JP |
Italian it_IT |
|
Polish pl_PL |
Korean ko_KR |
|
Portuguese Brazilian pt_BR |
Malay ms_MY |
|
Spanish Continental es_ES |
Portuguese (Portugal) pt_PT |
|
Spanish Latin American es_LA |
Romanian ro_RO |
|
|
Russian ru_RU |
|
|
Taiwanese zh_TW |
|
|
Thai (Thai digits) th_TH_TH |
|
Thai (western digits) th_TH |
|
|
Turkish tr_TR |
|
|
Ukrainian uk_UA |
|
|
Vietnamese vi_VN |
The language file is a standard XML Localization Interchange File Format (XLIFF) file. Many translation companies support this format. IdeaPlace offers a recommended translation vendor for custom language translation. Using the recommended vendor is likely to speed up the translation as the vendor is already accustomed to IdeaPlace language terms and settings.
-
Update the language file.
-
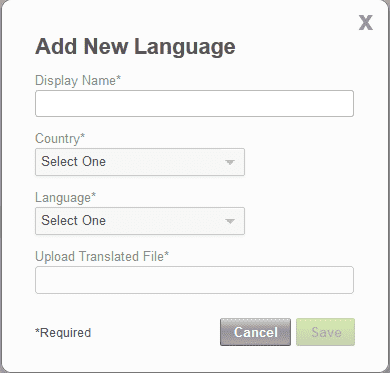
When the changes are complete, click the New Language link at the bottom of the Language Settings page and browse to the updated language file.

-
Specify the Language Locale and browse to select the desired translated file. The updated file must use the XLIFF file type.
-
Click Save to import the file. Imported language files appear in the Custom language list. Only one custom language file is allowed for each supported locale.
How to Edit a Language File
A language file can be manually edited to create a new language file for a IdeaPlace-supported language or to update an existing language for either a Standard or a customized standard language.
WARNING
Adding a new non-supported language is possible, however the language results are not supported. While non-Standard languages are possible, they are not supported by IdeaPlace as string appearance and readability may vary. Use of non-standard languages is independent of IdeaPlace feature support.
The language file is a standard XML Localization Interchange File Format (XLIFF) file that can be downloaded from the Languages page. XLIFF files can be downloaded for both Standard languages or custom languages.
Download an XLIFF File
To download an XLIFF file, on the Languages page click the Download icon next to the desired language. If an existing language file is available for the language you wish to customize, download that file. Otherwise, download the language that will be easiest to work with.
The Download dialog appears with options to open or save the file. It is recommended to open the file in an editor, such as Notepad++, or an XML-based editor.

XLIFF File Contents
The Spgit XLIFF language file contains several main sections or XML groups, Header information, Glossary and Property.
- Header Information
Ensure the heading information is set to UTF-8 and the language code is set to the required code, for example for United States English, the lanaguage code (xml:lang="en_US") is o "en_US".
See the list of supported languages and language codes to ensure the proper language code is used. The language code also appears as part of each <target> statement.

- Glossary
This section contains the keywords that appear as 'Names' or variables throughout the application. An ID number is assigned to each term to uniquely identify the term and whether it is a singular or plural form. These Glossary terms appear in variable syntax throughout the language strings in the Property section. The element <group restype="Glossary"> is used for this section.

- Property
This section contains the properties or language strings used throughout the application. The ID number assigned to the Glossary terms appears in the variable syntax whenever a Glossary term is used throughout the language strings to indicate which variable Name to display.
- Variable Names
The language strings contain text and Names that function as application variables. Names represent special words that are used in multiple places throughout the site and are treated as variables so multiple occurrences can be updated through a single change. For example, “idea” is a special Name that is commonly changed throughout the site. The Glossary items function as the default Name or variable values. Each instance of a Name is assigned a unique index number that appears as the Glossary ID and variable syntax identifier.
For example, the variable Name for 'idea' is specified as 'idea' on the line:
</trans-unit>
<trans-unit exstyle="singular" resname="idea" restype="singular" id="129">
<source xml:lang="en_US">idea</source>
<target />
A singular and plural version of each variable Name is available. Update the variable Names in the Glossary section to reflect the most common expected usage of each term.
Variable Names appear in the Property section language strings as words and an index number surrounded by brackets []. In this example, both 'idea' and 'job' are variable names.
<trans-unit resname="job.label.deleteJob" id="230">
<source xml:lang="en_US">Remove [[Idea],129] [[Job],73]</source>
<target />
</trans-unit>
If a different word for a variable Name is required, the variable Name inside the bracket can be changed to the desired word or words. Any required punctuation such as apostrophes should go outside the brackets, for example [[user],123]’s. Variables Names can be moved to a different location within the string by moving the entire bracket contents to the new location.
NOTE
Be careful to maintain the variable Name syntax such as [[term, ],number]. Any extra spaces or omissions in the syntax will cause variable display errors.
- System Variables
The hash symbol (#) indicates a system variable, for example #{@node.permalink}.System variables may also use
 syntax. Do not make any changes to system variables.
 - Email Template Variables
The dollar symbol ($) indicates an email template variable, for example ${inviter}. Do not make any changes to email template variables.
XLIFF File Updates
WARNING
Experience and basic understanding for XML syntax and editing are required to complete updates to an XLIFF language file. Invalid and incomplete syntax will cause XML validation errors and could prevent the customized XLIFF language file from being imported.
Updates should be done using an XML based editor such as NotePad++. After updating the file, the file must be saved as an XLIFF file type.
Glossary Section
The first step in adding a new language or updating an existing language is to modify the variable Names in the <target> </target> elements in the Glossary section of the XLIFF file. If the XLIFF file is based on the standard English file, the target tags will be blank and will need syntax added along with the translated term and language code. Otherwise, only the existing text inside the <target> </target> elements and language code (lang=) needs to be modified. The language code must match one of the codes for a supported IdeaPlace language to ensure proper encoding and language display.
For example, the highlighted lines have been added to defined these Glossary terms for 'contributor' and 'task' in the Polish language.
<group restype="GLOSSARY">
group rename="AllCommunities">
<trans-unit exstyle="plural" resname="contributor" restype="plural" id="89">
<source xml:lang="en_US">contributors</source>
<target xml:lang="pl_PL">uczestnicy</target>
</trans-unit>
<trans-unit exstyle="singular" resname="task" restype="singular" id="16">
<source xml:lang="en_US">task</source>
<target xml:lang="pl_PL">zadanie</target>
</trans-unit>
Property Section
After completing the updates to the variable Names in the Glossary section, modify the language strings in the Property section. These language strings consist of text and variables. If the XLIFF file is based on the standard English file, the target tags will be blank and will need syntax added along with the translated string and language code. Otherwise, only the existing text inside the <target> </target> elements and language code (lang=) need to be modified. The language code must match one of the codes for a supported language to ensure proper encoding and language display.
NOTE
Any system variables (#) and email template variables ($) should not be modified.
For example, the highlighted lines have been added to define these language strings in the Polish language.
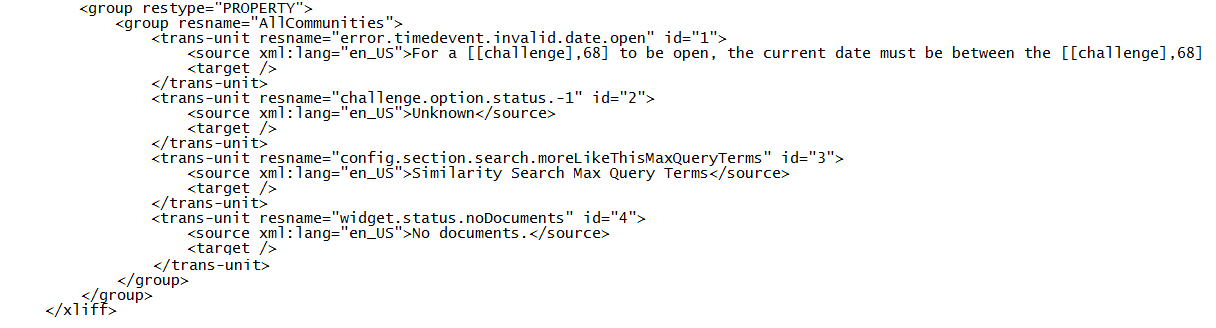
<group restype="PROPERTY">
<group rename="AllCommunities">
<trans-unit resname="admin.info.separateEmailAddresses" id="2">
<source xml:lang="en_US">Email addresses can be separated by a comma (,), a colon (:), a semi-colon (;), a space, one per line, within greater-than less-than symbols (&lt;&gt;), within brackets ([]) or within quotes (&quot;).</source>
<target xml:lang="pl_PL">Adresy e-mail można rozdzielać przecinkami (,), dwukropkami (:), średnikami (;), spacjami, można umieszczać je po jednym w wierszu, między symbolami większości i mniejszości (&lt;&gt;), w nawiasach kwadratowych ([]) lub w cudzysłowach (&quot;).</target>
</trans-unit>
<trans-unit resname="admin.info.siteCreated" id="3">
<source xml:lang="en_US">The site has been created. </source>
<target xml:lang="pl_PL">Witryna została utworzona. </target>
</trans-unit>
<trans-unit resname="prediction.nav.chooseWinner" id="4">
<source xml:lang="en_US">Choose a winner. </source>
<target xml:lang="pl_PL">Wybierz zwycięzcę. </target>
</trans-unit>
If customizations were made using the Language Editor, additional sections for those customizations will appear in the XLIFF file for each community in which the customizations were made.
Customizations for a challenge will look like this:
<group resname="test.spigit.com/main">
<trans-unit id="7284" resname="sitechallenge.label.newidea">
<source xml:lang="en_US">NEW IDEA</source>
<target xml:lang="en_US">NEW IDEA</target>
</trans-unit>
</group>
To add customized text for individual challenges add an entry at the end of the file in the format below, incrementing the trans-unit id counter by one.
<group resname="test.spigit.com/ceochallenge">
<trans-unit id="7285" resname="sitechallenge.label.newidea">
<source xml:lang="en_US">NEW OPPORTUNITY</source>
<target xml:lang="en_US">NEW OPPORTUNITY</target>
</trans-unit>
</group>
NOTES
Both Administrators and Super Administratorss:
- can still choose which language they want to set as default
- have access to the Achievements and Endorsements configurations
Language files do not support carriage returns or new line feeds. Please use a slash to separate sentences when needed.