Planview Customer Success Center

Creating an Idea Template

Idea Templates: Duration 4 min.

Introduction

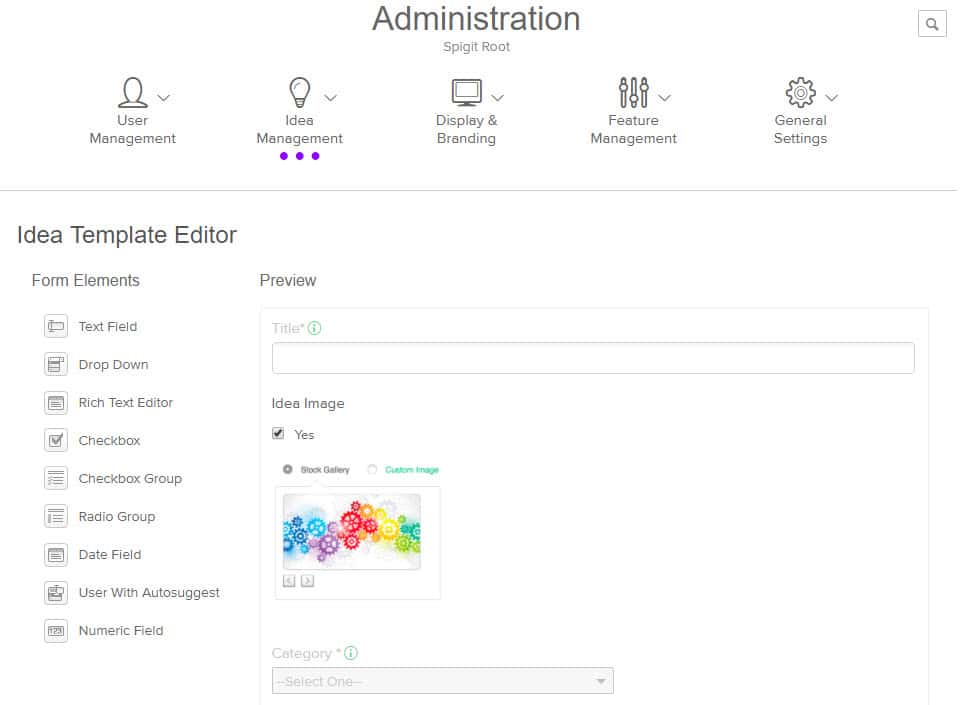
You can create, edit, and access the idea template by navigating to Administration > Idea Management > Idea Template Editor.  

How it Works

Navigate to Administration > Idea Settings > Shown Idea Template to modify the fields that are shown when an idea is viewed.

  1. Go to Administration > Idea Settings > Idea Template Editor and click View XML at the very bottom.
  2. Copy the Label field from the section(s) that should be included in the idea.
  3. In the Shown Idea Template field type $__ labelname__ (two underscores each time) for each field you would like included when an idea is viewed.

On the Preview pane, the default template will include these required elements:

  • Title field
  • Category dropdown
  • Description field

Optional fields include:

  • Idea Image checkbox (you can turn the idea image off or on here). The supported format is .jpg (.gif is not supported). For optimal display of idea images, we recommend using rectangular images with a landscape orientation (wider rather than taller), and a minimum pixel size of 310 pixels wide by 165 pixels high.
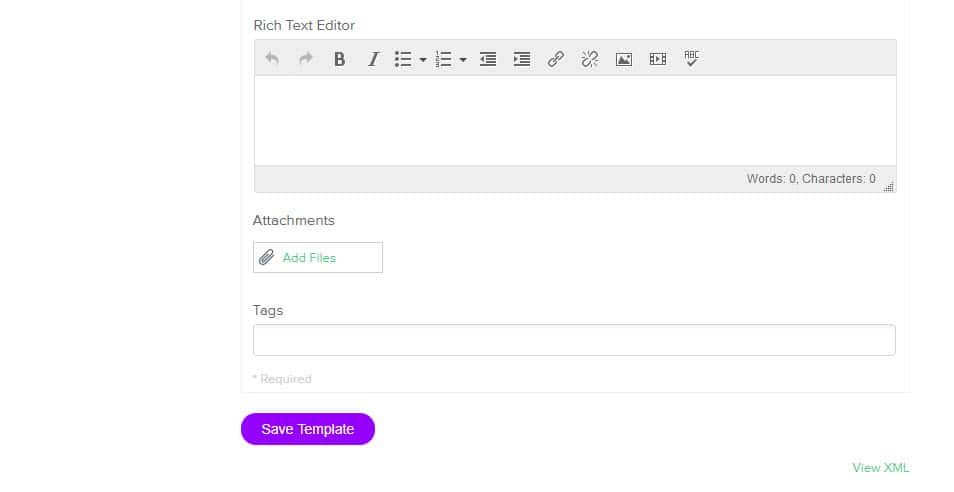
  • Attachments button
  • Tags field


NOTE

If you are creating a template for a challenge, the Description field is required.


IdeaTemplateEditor1.jpg

   IdeaTemplateEditor2.jpg

Use an editable widget on the side of the Post Idea page to add idea posting tips.


NOTE

As you customize the Idea Template, consider the potential amount of information submitted by users. For the Text Field and Rich Text Editor elements, you may set a maximum character limit. For large amounts of content, you may suggest the use of links to document repositories. Reminding users to link to details is a more sustainable approach than copying and pasting large documents. This might prevent latency issues during high volumes of participation.


How to Add Elements

You can drag and drop the following elements from the Form Elements list on the left side of the window into the template. Drag the new element into the space below the Category element and above the Tags element:

 Element  Description
 Text Field

 Use this if you want to limit the text someone enters to a single line.

 For example, "Provide one sentence on how your idea will create value."

 Drop Down

 Use this if you want to provide a curated list of items to choose from.   

 For example, "Choose the product line this idea applies to."

 Rich Text Editor

 Use this if you want to provide the idea owner with image, video, and text formatting   options.

 For example, "Provide details on your idea."

 Checkbox

 Use this if you want to provide a list of curated options, where only one can be   selected.

 For example, "Choose the department this impacts most."

 Checkbox Group

 Use this if you want to provide a multi-select option.

 For example, "Choose all departments this idea will impact."

 Radio Group

 Use this if you want to provide a list of curated options, where only one can be   selected.

 For example, "Choose the department this impacts most."

 Data Field

 Use this if you want the idea owner to choose a date from a calendar.

 For example, "When can this idea be implemented by?"

 User with   Autosuggest

 Use this if you want the idea owner to choose a name from an existing   member.

 For example, "Who created this idea with you?"

 Numeric

 Use this if you want the entry to be stored as a number.

 For example, "What is the potential value of this idea?"


NOTE

The Numeric Field field will expose all content into Insights and allow Administrators to harness the metric builder to construct dashboards that contain calculations of the combined data. Examples might be Estimated ROI or Estimated Cost Savings.This field will not accept negative numbers and is limited to sixteen characters.


Additional Element - Anonymous Posting

One additional element can be included in the template, but must be turned on via other Administration pages: Anonymous posting. This template element may be turned on/off from the Administration > Anonymous > Allow anonymous posting and Anonymous Posting Default checkboxes.

When turned on, this element will display in the default template. If you hover over the element, IdeaPlace displays a link to the Administration page where you can manage the element. See the Anonymous article for additional information.


How to Move Elements

You can reorder the elements in the template by dragging and dropping them.  The following elements cannot be moved:

  • Title field
  • Image button
  • Category drop down
  • Attachments button
  • Tags field
  • Anonymous posting (if turned on)


How to Delete Elements

Delete any added element by  clicking the "X" in the upper right corner of the element.

To save the completed template, click Save Template.


NOTE

Once a custom element (added by an Administrator) is deleted or the label changed, all Insights reports may stop updating and the following steps need to be performed:

  • Navigate to the Insights Management Console and login with your account.
  • Delete the attribute from the report, make a copy of the report and then delete the original report.


WARNING

If you try to edit or remove an element after ideas have been submitted, IdeaPlace will warn that:

"If you remove this field you will no longer be able to use it for idea submission. The data will still be available for reporting. Are you sure you want to proceed?"

You can click Yes to continue or No to cancel.


How to Customize Template Fields

Once you add elements, you can customize them. Click the edit icon in the element.

For all elements:

  • Create a label for the element (required).
  • Click the Required box to make this element required in the template (optional).
  • Add Help text, to guide the person submitting the idea (optional).
  • Limit who can access the template (optional).


    NOTE

    If you limit access, only the roles you specify will be able to see the fields on the Post Idea page, and the information entered in those fields on the View Idea page.


For the Text Field and Rich Text Editor elements:

  • Set a maximum character limit for the content (optional).

For the Drop Down, Checkbox, and Checkbox Group elements:

  • Add and specify list items (optional). Note: you can change the order of the list items by dragging and dropping them.

When you are done editing, click the edit icon   again to close the edit options.

To save the completed template, click Save Template.


NOTES

If adding additional fields after ideas have been entered into the challenge, add the new fields to the bottom of the form. If you need to add a field to the top of the form, please contact support for assistance to resolve any data-integrity issues.

Once a custom element (added by an administrator) is deleted or the label changed, all Insights reports may stop updating and the following steps need to be performed: Navigate to the Insights Management Console and login with your account. Delete the attribute from the report, make a copy of the report and then delete the original report.

You can see the template's XML by clicking View XML at the bottom right corner on the Idea Template window. The XML information is needed for other Administrative settings, such as Shown idea template on the Administration > Idea Management page.

The user_field(s) from the Idea Template are not available in the Advanced Search on the View Ideas page.