
Creating a Challenge using the Challenge Wizard
Ready to create your challenge? Watch this short video to get started! The step-by-step is also listed below.
Creating a Challenge: Duration 2.5 min.
Overview
Challenges are created from the Challenge home page and inherit the settings from the originating community.
How it Works
You must be logged in as an Administrator to create a new challenge.
How to Create a Challenge
-
From the Challenge home page (http://yourinstance.spigit.com/Page/SiteChallenges), click the New Challenge link.
The Challenge form appears.
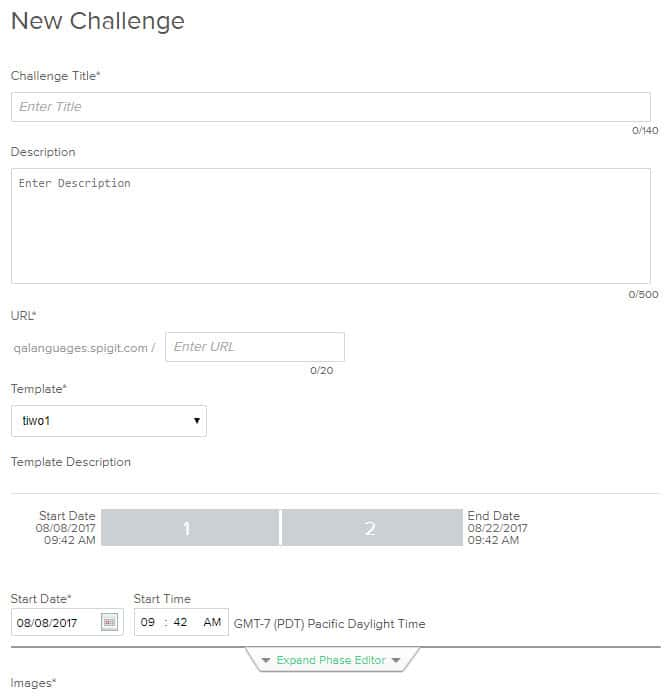
- Specify the challenge settings, such as title, description, start and end dates, and status.
- Start Time: You can start a challenge every 15 minutes and create Phases of the challenge to start every five minutes. This allows Administrators of the software to use Planview IdeaPlace in a much more agile manner; allowing Rapid IdeaPlace methodologies (conference room IdeaPlace). The timer will only permit challenges to be started with a minimum window of 15 minutes from the point of challenge submission.
- If desired, challenges can be created with the same name. The system will provide a unique internal challenge ID for challenge processing.
- The title will be used in the challenge URL. For example, if the challenge title is "How to improve our product," the challenge URL will be www.howtoimproveourproduct.company.spigit.com.
- Start and end dates are based on the Administrator's browser's time zone setting. Time Zone is not selectable by the Administrator. All Time Zones will revert to the Time Zone of the Administrative user at the point of challenge creation. When a Time Zone shifts between Standard and Daylight Saving's Time, the challenge configuration will adapt and update in line with the new start/end time.
- After the initial challenge creation, changes to the community title and description, and changes to the challenge title and question are exclusive and do not impact each other.
-
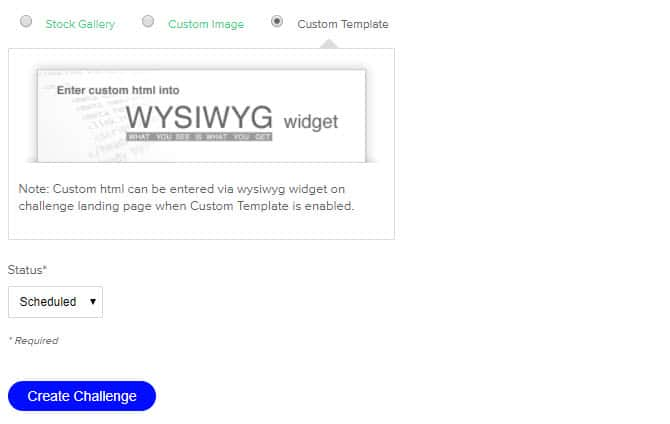
Click Upload to upload an image. This image appears on the Challenge Home page as a visual representation of the challenge. Supported formats are .jpg or .png For optimal display of challenge images, we recommend using rectangular images with a landscape orientation (wider rather than taller), and a minimum pixel size of 450 pixels wide by 250 pixels high.
-
Click the Use Challenge Template check box to apply the specified challenge template to the new challenge.
-
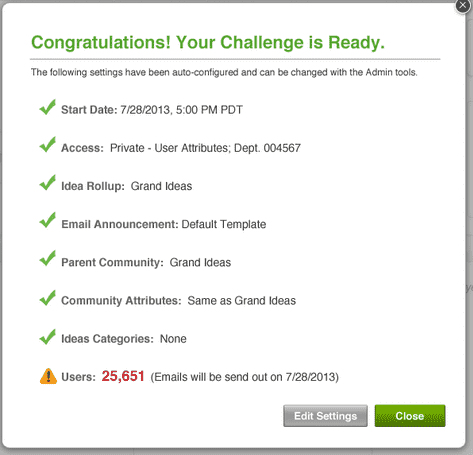
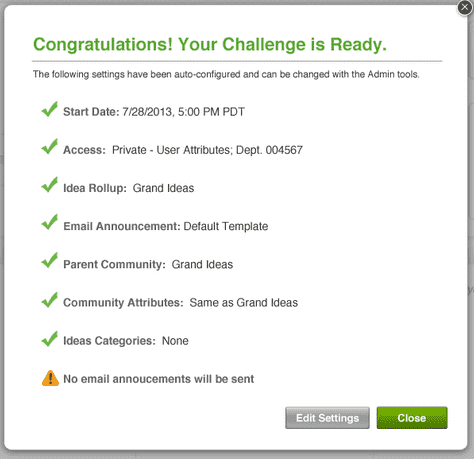
Click the Automatically Send Email Announcement check box to generate a new challenge notification to challenge members. If enabled, a verification notice with the number of email announcements will be displayed in the challenge confirmation page to confirm that email notifications will be sent.
-
Click Create Challenge to launch the new challenge.
A screen appears with options to edit the challenge settings or create the challenge based on the current default settings.
To edit the settings, click Edit Settings. The Challenge Setting screen appears.
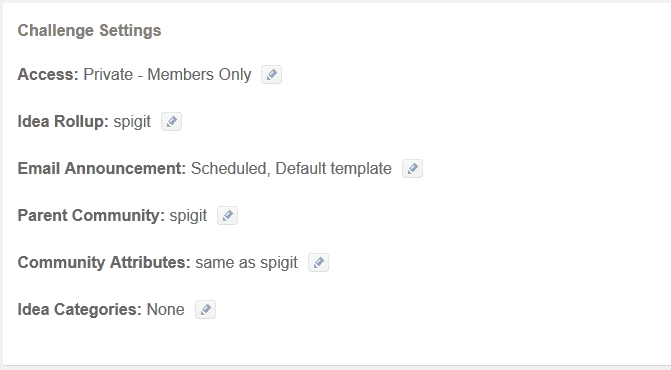
Click the icon next to each setting to edit the setting.
To create the challenge using the current settings, click Create Challenge.
A confirmation page appears with a list of the enabled options and email notification impact.

The Challenge home pages appears.
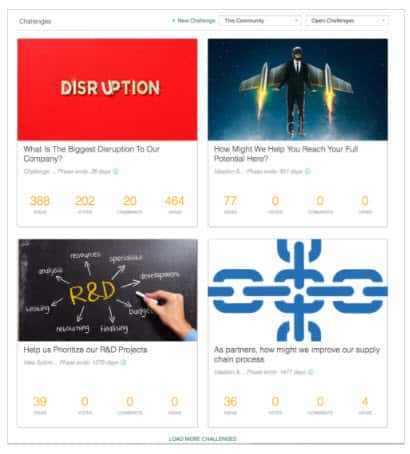
Challenge users can post ideas, view ideas and monitor idea, innovator, and activity status.
By default, the challenge is created with the Scheduled status. The Open status is configured with an Open phase that allows users to post ideas and comment on ideas. Email notifications may be sent to challenge members based on the specified email notification setting.
How to Configure/Add Phases for Open Challenges
By default, the Open status is configured for the Open phase; allowing users to post ideas, vote, and comment. Once a phase becomes Active, you cannot change it. (The following steps are an abbreviated version of this process. For more detail, see How to Add a New Phase in the Middle of an Active Challenge.)
To change the phases for challenges in the Open status:
- Add a phase at the end of the challenge.
- Copy and paste the information from what is now the next to last phase, into this new, last phase.
- Do #2 again for each of the other inactive phases, until you reach the space you need for a new phase.
- Save your changes.
Community Access
A community can establish user access based on specific User Attributes, such as gender, location, or department. So, if the community determines that the users must be “female” or located in “Cincinnati,” then only users that meet one of the specified criteria/attributes will have access to the community. The User Attributes for each user are defined/created under the User Profile Page and then matched against the configured community attributes.
How to Set Up Community Access
Go to Administration > General Settings > Set up Settings.
-
Under Access, select the Private-User Attribute from the dropdown box.
-
Under User Attribute, select the attribute(s) to be associated to the community. These attribute(s) are then matched to the attributes in the User Profile. When a user matches any of the User Attributes, they will be granted access to the community.
NOTE
Draft Challenges and Archived Challenges only appear in the dropdown when a user is an Administrator in the community. These challenges will not appear in the Go To menu either even if the user has the Administrator role in the draft challenge.
FAQs
How do I update the challenge thumbnail?
When you want to update the challenge thumbnail for the SiteChallenge page, if you were initially using the WYSIWYG widget, you have to revert back to “custom image” in the challenge settings, then upload, then revert the challenge layout options back to “Challenge WYSIWYG”.