
October 2020 Release Notes
NOTE
New Bug Fixes and Minor Enhancements are at the bottom of this page. An Update to the OData Connector section is indicated in italics below. New PBIX Changes are also being introduced in this release
Embed Reports Option
Following the roll out of Power BI Embedded, we are now delivering an option to embed specific reports (and their tabs and filters) into any page within IdeaPlace.
This new capability is designed to allow access to a specified report without the requirement for the user to hold the Report Analyst or Report Creator role. Instead, the report will be visible to any user with the appropriate role to view that page or widget. The new embed feature will navigate the user away from the page from which you configure the access point (the URL), which is by design, as the Power BI reports require a wider page real estate.
How to Embed a Report
- Have a custom widget placed upon the page you wish to use to display the report.
- Navigate to the Insights page.
- Select the report you wish to embed by clicking it from the report list.
- Now click the Export option on the Insights navigation ribbon, at which point the Embed ID is visible. Click it.
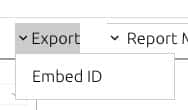
Figure 1 - Embed Report ID Option
- This will generate a report ID to your clipboard automatically.
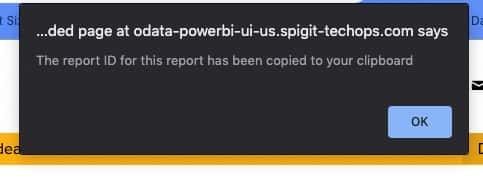
Figure 2 - Report ID Automatically Added to your Clipboard
- Now navigate to your chosen editable widget and click the Edit icon.
- Using the insert link icon, open up the hyperlink configuration option.
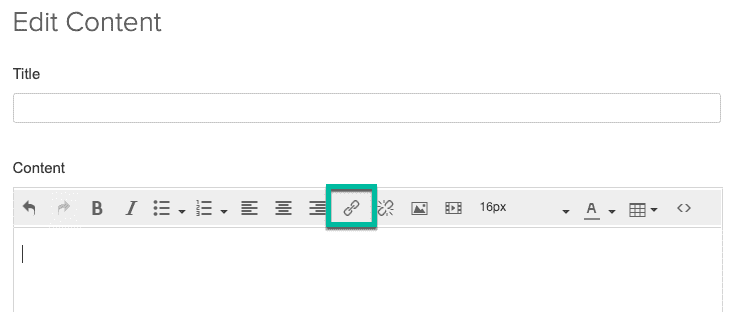
Figure 3 - Your Insert Hyperlink Option in the WYSIWYG Editor
- Type in the full URL for the site into the first URL bar. This is always in the format below:
https://<sitename>.spigit.com/<challengename>/reports/EmbeddedReportPage?report_id=
NOTE
If you are not using .spigit.com then you should insert your URL in the first section.
- Now insert your report ID from your clipboard so that the URL looks like this example:
https://<sitename>.spigit.com/<challengename>/reports/EmbeddedReportPage?report_id=d1d10c78-424c-43d3-9705-20954171c83e
- You can now alter the display text and the target (we recommend selecting New Window) for the report viewing experience.
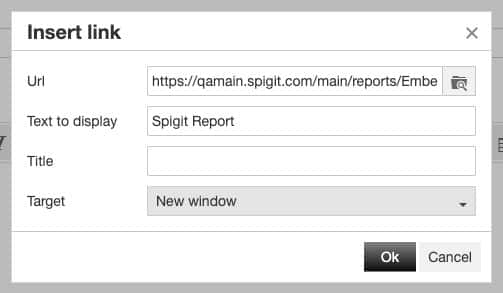
Figure 4 - Configured URL Ready to be Published
- When you are finished, click OK then Publish to save your changes.
- Your report link is now active and displaying the text that you have entered as a hyperlink.
- Clicking the link will transition the user to the report (same tab or a new tab depending upon your selection).
The report and its associated tabs are now visible and workable by the user without the access to other reports within Power BI Embedded.
Figure 5 - Embedded Report View
OData Connectors
Power BI and Tableau can connect to Planview IdeaPlace data for reporting using an OData service that is provided as part of the IdeaPlace licensing package. This exciting development brings full flexibility in model and metric-building to your data insights approach, helping you to easily demonstrate value.
To accomplish this connection, the following steps are required:
How to Grant the External Report Author Role
In order to authenticate to the Web Data Connector, each user must be assigned the External Report Author role within their IdeaPlace instance. This role is not available by default and will require a customer care ticket to be submitted in order for it to appear in your user management section.
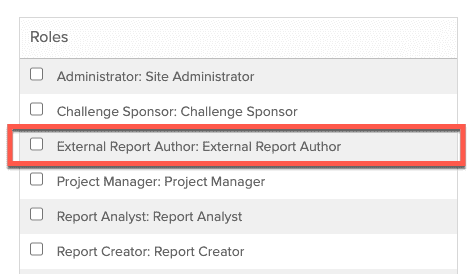
Figure 1 - External Report Author in the User Role Section
This new role, when granted, automatically registers the user for the connection and triggers an email to the nominated user detailing their temporary authentication credentials for the connector. The credentials contain a username (IdeaPlace email address) and temporary password.
These credentials should be used for the first-time login via the web connector. You will be asked to reset your password during that first login.
NOTE
There is a limit to the number of users that can be added to the external report service each day. Therefore we ask that you only add a role to the profile of a user that will actually be creating and publishing reports using our OData connector.
Bug Fixes and Minor Enhancements
Pairwise Ranking and Graduation - Following some isolated reports that ideas in Pairwise were not displaying in the final ranking nor graduating based upon the final ranking, we have investigated this matter. The fix ensures that graduation and ranking of ideas are unaffected and will now work as designed.
French Language File – We have corrected some small display issues for clients that are leveraging the standard French language file.
User Role IDs Updated – In order to deliver our new External Report Author Role, we are amending the Role ID numbers for the Report Creator and External Report Author roles. These IDs will be set to a number that will not be disrupted by amendments in the future.
If you have an idea template that uses the Report Creator role as an access permission, you will need to update this after the upgrade. To do so:
- Navigate to the Idea Template Editor.
- Locate the field.
- Re-select the Report Creator Role.
- Save.
If you have not leveraged the Report Creator role for field permissions on the idea template, then you do not need to take any action.