Work with the Roadmap
NOTE
The ability to create new Roadmap workspaces has been suspended for now; however, existing Roadmap workspaces will continue working. No further development is done to Roadmap.
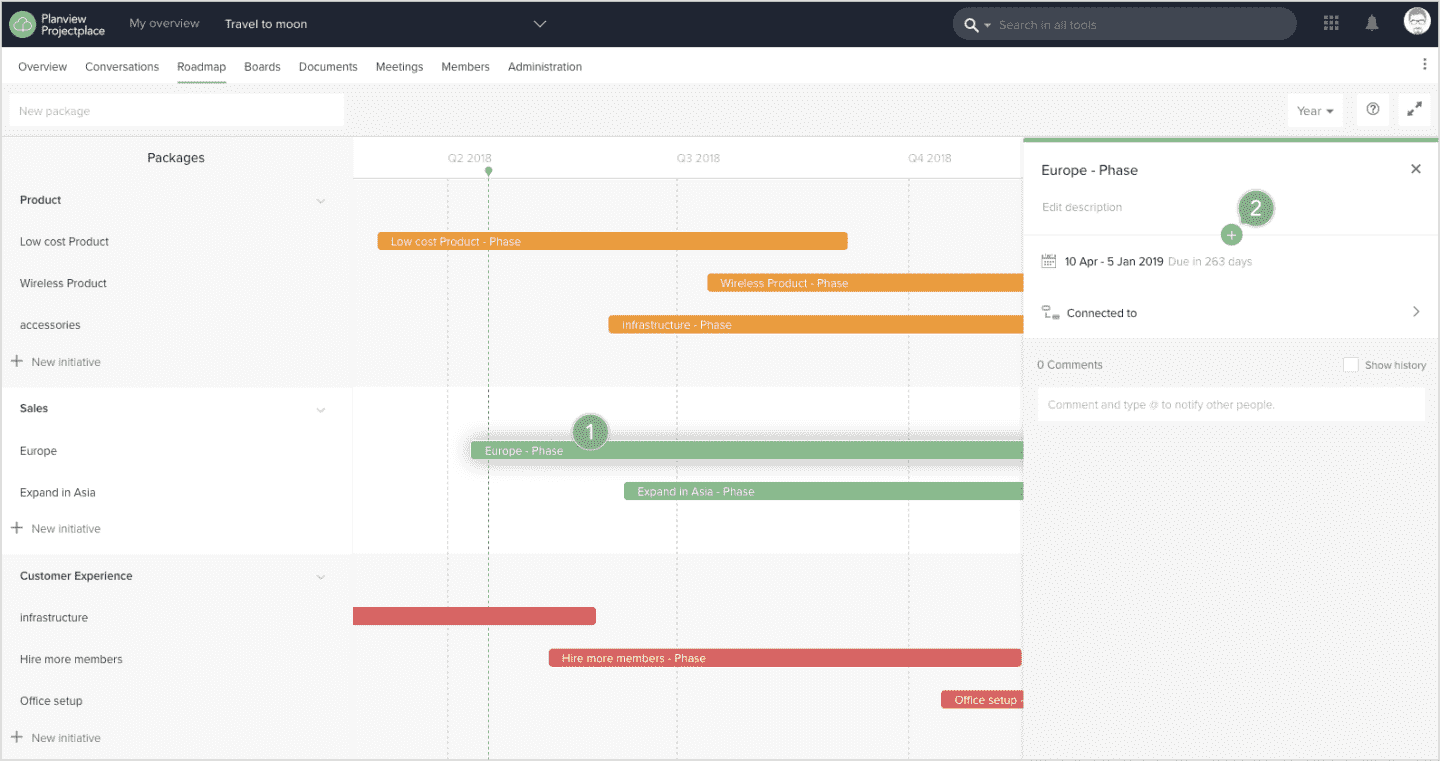
Find Your Way Around the Roadmap Tool
The Roadmap tool has two main parts; a list of work packages and initiatives on the left, and a graphical time plan showing the phases planned in time to the right. A package is a grouping of sequential initiatives you want to achieve over time. Initiatives may have one or more phases on the timeline. Tasks required to complete a phase are represented by activities. At the activity level, you can break work down into cards and connect those cards to boards.

- Add new packages. Enter a name and press Enter to add a package.
- Click New initiative to add a new initiative within that package.
- Drag and drop initiatives to rearrange them within a package.
- Click a package or initiative name to open up the detail pane.
- Hover your cursor over an initiative and click the Add Phase icon to create new phases.
- Click a phase on the timeline to open the detail pane.
- Select the zoom level by Month, Quarter, or Year to get a good view regardless of how far ahead you need to plan, and how detailed the plan is.
- Click the arrow to expand a phase and see the list of activities in it.
You can change dates and duration of activities and milestones directly in the list, or use drag and drop and resize in the time plan.
Work with a Package
Click a package name to open the detail pane.
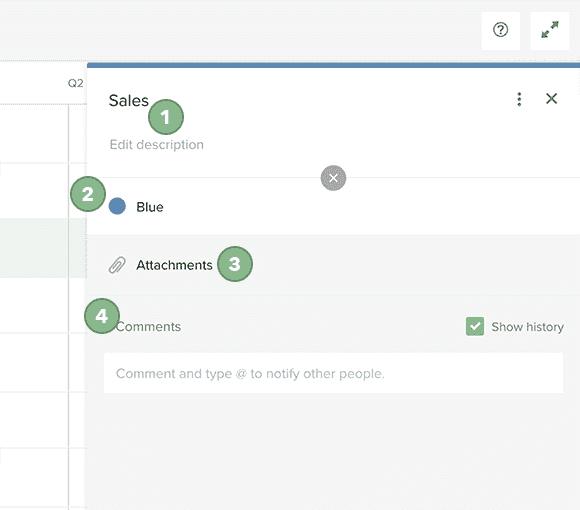
- Click the package name to change the name of the package. To add or edit the package description, click Edit description. The package description is useful, for example, to note what the product value is for the package making it easily accessible for all stakeholders who have access to the workspace.
- Change the package color or label by clicking the desired label. Organize your plan with a variety of colors and labels improving how you categorize each package allowing you to have a simple and direct overview.
- Attach important files that correspond with each package for improved access to related material. For example, attach documents related to your product strategy.
- Adding comments helps stakeholders discuss strategies and collaborate with other workspace members.
Work with initiatives
Click an initiative name to open the detail pane.
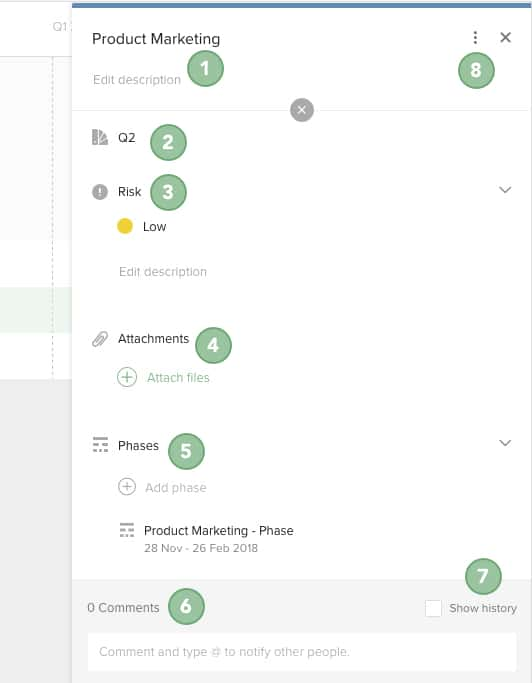
- Click the Initiative name to create or edit the name. Click Edit description to create or edit the initiative description.
- Move the activity to another package by selecting from the available packages list. Click the package name to select a different package from the drop-down list.
- Add the risk level of the activity (Low, Medium, or High). You can also describe the kind of risk involved in the risk description.
- Attach necessary files essential to the package. You can attach files from a ProjectPlace document archive, your hard drive, or from other cloud document services such as Box, Google Drive, Dropbox, and OneDrive.
- Click Phases and then Add phase to divide the work to be done into smaller independent phases within each initiative.
- Use the Comments field to discuss the initiative with workspace members.
- Click the Show history box to learn more about the initiative's history.
- Click the three dots icon to Delete the initiative.
Work with Phases
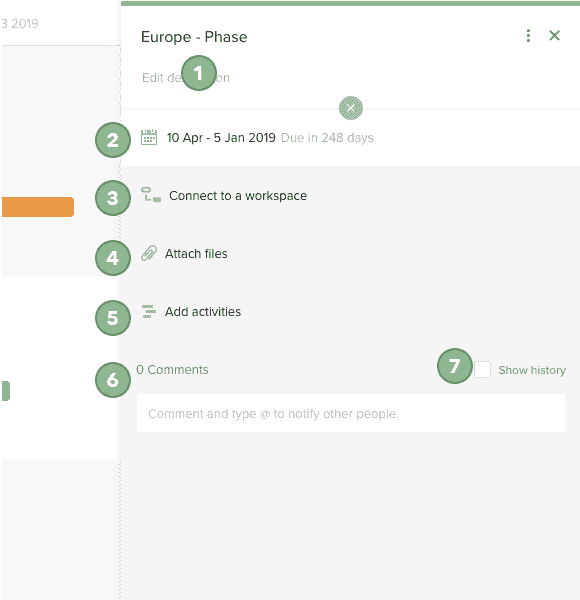
- Click the phase name to create or edit the name. Click Edit description to create or edit the phase description.
- Change the phase start and end date.
- Connect the phase in a plan workspace. Learn more
- Attach necessary files essential to the phase. You can attach files from a ProjectPlace document archive, your hard drive, or from another cloud document services such as Box, Google Drive, Dropbox, and OneDrive.
- Add activities necessary to complete the phase.
- Use the Comments field to discuss the phase with workspace members.
- Click the Show history box to learn more about the phase's history.
- Click the three dots icon to Delete the phase.
Work with activities
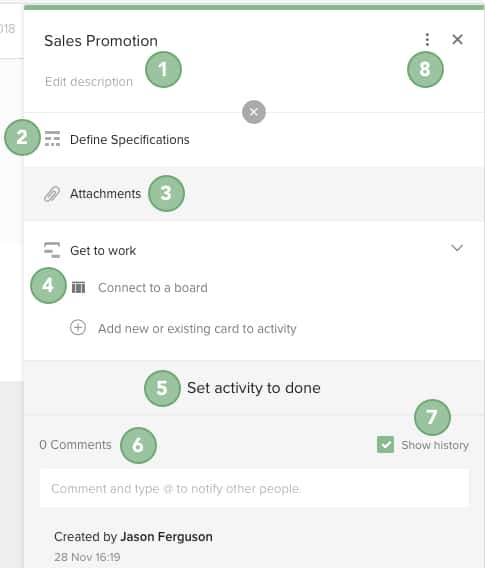
- Click the activity name to create or edit the name. Click Edit description to create or edit the activity description.
- Move the activity to another phase. Click the phase name to select a different phase from the drop-down list.
- Attach necessary files essential to the activity. You can attach files from a ProjectPlace document archive, your hard drive, or from other cloud document services such as Box, Google drive, Dropbox, and OneDrive.
- Connect the activity to a board
- Set the activity to done when all the activity work is complete. The activity status will be set to Done and all cards connected to that activity will no longer be visible on any board, only in the activity.
- Use the Comments field to discuss the activity with workspace members.
- Click the Show history box to learn more about the activity's history.
- Click the three dots icon to Delete the phase.
Get the Activity Done
Involve the team responsible to perform the work by connecting the activity to a board. Make things easier by breaking down the work into actionable cards. You can also connect existing cards (for example cards that have been created on a board) to the activity.
To connect the activity to a board:
- Go to the activity detail pane.
- In the section Get to work, click in the field Connect to a board.
- Select one of the boards in the pop-up list. To filter the list, start typing the name of the board and the available matches will appear at the top of the list.
Any cards connected to an activity will be visible on the board you select.
You can also create a board from this view. In the Connect to a board field, write the name of the new board and press Enter.
To break down an activity into cards:
- Go to the detail pane of the activity.
- In the Get this done section, click the Add new or existing card to activity field.
- Write the name of the new card and press Enter.
To connect existing cards to an activity:
- Go to the detail pane of the activity.
- In the Get this done section, click the Add new or existing card to activity field.
- Select one of the cards in the pop-up list. To filter the list, start typing the name of the card and the available matches will appear at the top of the list.
If you select a card that is visible on a board, and the activity is not connected to that board, the card will no longer be visible on the board.
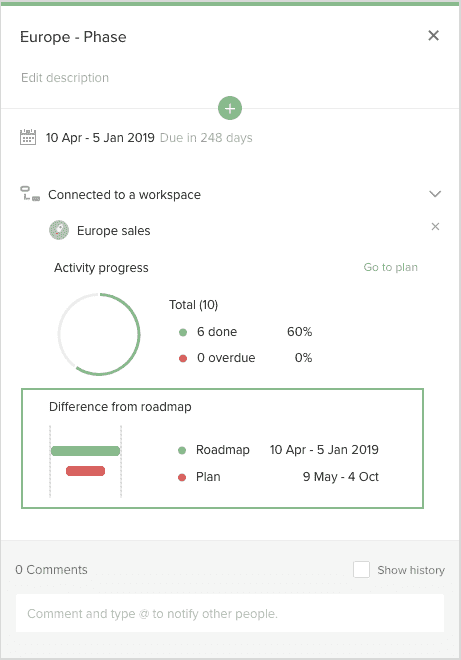
Connect a Roadmap Phase to a Workspace
A Roadmap phase can be assigned or connected to a project workspace so the appropriate team members can work on the initiatives and activities within the roadmap phase.
To connect a Roadmap phase to a Workspace:
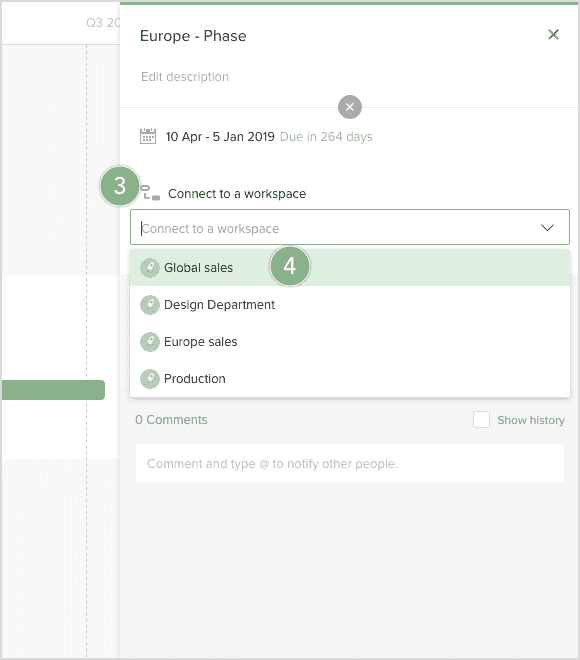
- Navigate to the desired Roadmap and click the phase to open the phase detail pane.
- From the phase detail pane, click the plus icon
 to open a list of elements you can apply to the selected phase.
 - Click the Connect to a workspace option to see a list of workspaces you are a member of.
- Select the appropriate workspace from the list by clicking the name of the workspace you want to connect the phase to.
As the assigned team works on the connected phase, you will see progress being made to the phase from the Roadmap.
Phases can either have activities or be connected to a workspace. If you cannot see the Connect to a workspace option from the list, remove the activity in the phase and try to connect the phase to a workspace again.
Roadmap phases cannot be connected to workspaces that are integrated from Planview Enterprise One - Portfolio and Resource Management or PPM Pro. Team Member Flex members will not be able to use this feature as well.
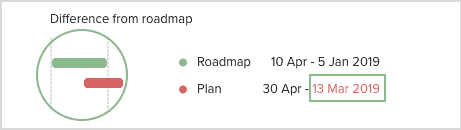
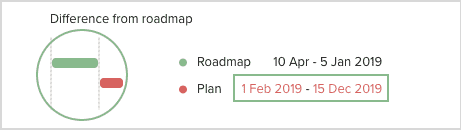
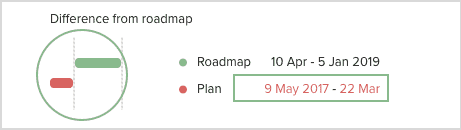
Differences in Roadmap Dates
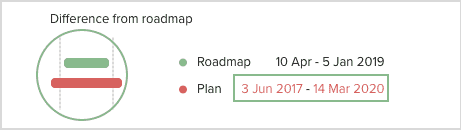
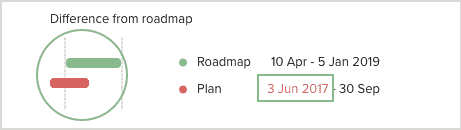
As the assigned team works on the connected phase in the workspace, it is possible some of the changes made may be different then what is included in the initial Roadmap phase. If there is a difference, for example, between the phase start and end dates in the Roadmap and the start and end dates in the connected activity in the workspace, that difference will be illustrated in the Difference from roadmap section of the workspace phase detail pane. There are a few instances when the start and end dates may be different between the roadmap and workspace. If there is a difference, the dates that differs will be indicated in red.
|
Deviations within Roadmap dates |
|
|
End date deviation |
Start and end date deviations after Roadmap end date |
|
Start and end date deviations before Roadmap start date |
Start and end date deviations before and after Roadmap dates |
|
Start date deviation before Roadmap start date |
|