



Manage teams in the account
As an account administrator, you can view, create, edit and delete teams in the account from the Teams tab in the Account administration tool. The Teams tab lists the teams and includes the team description, administrator, number of members and workspaces, and creation date.
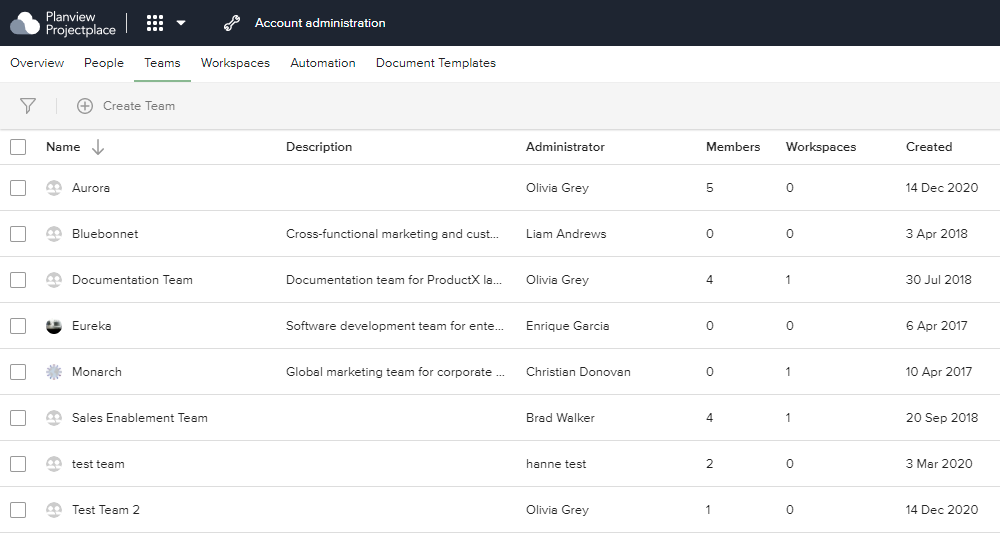
A team can include any number of account members, and a user can be added to any number of teams. A team can also include external members if you allow it.
Teams can be invited to workspaces in two ways:
- During workspace creation - the creator can pick which teams to add from the start
- After workspace creation - by inviting specific teams through the members tool in the workspace.
In both cases - all team members will be kept in sync with the workspace. Adding a team member will automatically invite that same user to all associated workspaces. Conversely, removing a team member will remove that user from all associated workspaces (unless the user is a workspace administrator, or a member of another associated team).
The easiest way to ensure that the correct teams are in the correct workspaces is to pre-define them in workspace templates.
All team members have access to the My Teams tab where each member can communicate within the team and see the work to be done by team members across associated workspaces.
Create a Team
To create a team:
- Click the tool selector
 in the top navigation bar and select Account administration.
- Click the Teams tab.
- Click the Create Team button.
- Give the team a name.
- Choose the team administrator.
- Optionally, select Allow external members to let the team include external members (Note: The administrator list shows account members only. To make an external member the team administrator, select Allow external members first.)
- Click Create Team.

Each team must have a unique team name, and at least one team administrator when the team is created. More administrators can be added to the team at any time after the team has been created.
Manage Teams
To edit a team's name, avatar, description, or team members:
- Click the team in the list to open the Team details pane. You can filter the team list based on team name, members, or administrators by clicking the filter icon
 and then entering the team name, or selecting the members or administrators.
- Click the avatar, team name, or team description to edit them.
- To add members to the team, click the Add members icon
 . Start entering names and select them when they appear. If the team allows external members, external members already in your account's workspaces are also listed. An introductory email is sent to each new member. As soon as the team member is invited, they also become a member of all associated workspaces.
- To do any of the following, click the three dots icon
 beside the team member name and then select the corresponding option:
- Assign a team member as a team administrator
- Remove a team member from being a team administrator
- Remove a team member from the team (this will also remove that member from all associated workspaces, unless the team member is a workspace administrator, or a member of another team in the workspace).
To delete a team:
Click the three dots icon beside the team name, and then select Delete.
Allow External Members in a Team
(Availabe from 23 October, 2026)
By default, a team includes only account members. If you work with contractors, partners, or vendors who are already external members in your workspaces, you can let a team include them too. They can then follow the team's work and take part in team conversations like any other team member.
The setting is off for every team until you turn it on. You can turn it on when you create a team, or later:
- Click the team in the list to open the Team details pane.
- Turn on Allow external members to be added.

Good to Know
- Only people already in your account. You can only add external members who are already members of at least one workspace in your account. A team can't be used to invite new people.
- Same access as other team members. Adding an external member to a team adds them to every workspace the team is connected to, the same as for any other team member. The team overview only shows work from those workspaces.
- Workspace settings still apply. A team that allows external members can only be invited to workspaces where Allow workspace members to invite external members is turned on. You can't turn the setting on for a team that's already connected to a workspace where it's off.
- Turning it off. You can't turn the setting off while the team has external members. Remove them from the team first.
- Team administrators. External members can be team administrators. They can't create teams.
- Easy to spot. External members are marked External in the team's member list.
- Demoted members. If you demote an account member to external member, they stay in teams that allow external members and are removed from all other teams.